How to Fix Eyelines in an AI Short Drama Dialogue Scene
A dialogue scene feels disjointed when characters look in incompatible directions, even if every individual shot looks polished. This tutorial shows how to lock screen direction, build matching reference frames, generate controlled coverage, and repair eyeline errors without remaking the entire scene.
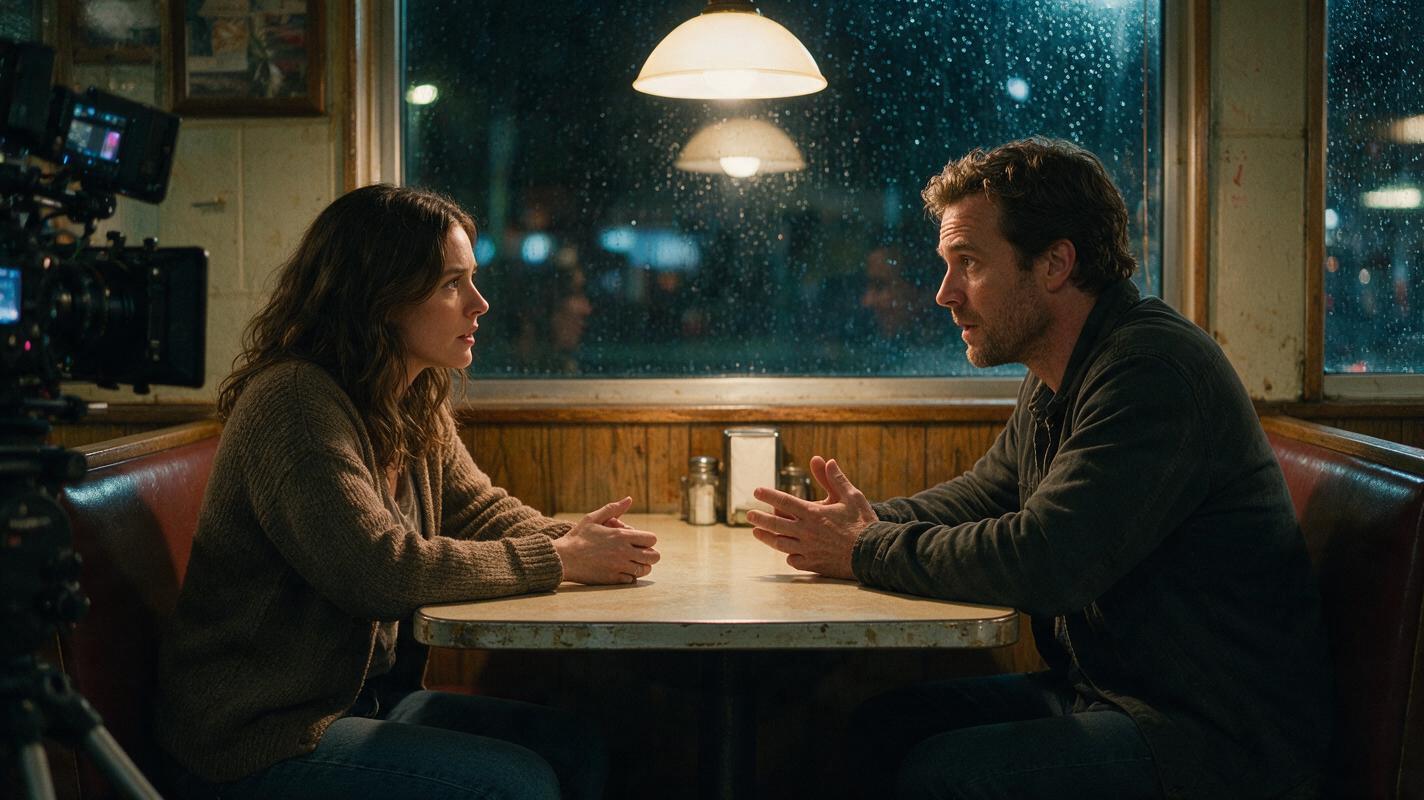
Table of contents
Build the conversation around one invisible line
In an AI short drama, dialogue continuity often fails before either character speaks. One person looks off-screen left, the other also looks left, and the edit makes them appear to be watching two different conversations.
The practical fix is to define the characters’ positions, eye targets, and screen directions before generating motion. You then create a small coverage set in which every shot preserves that geometry.
The core rule: if Character A looks screen right toward Character B, Character B should normally look screen left toward Character A. Do not change those directions unless the camera visibly crosses the axis.
This ordered workflow is designed for a two-character confrontation, but it also works for romance, interrogation, negotiation, and reaction-heavy AI microdrama scenes.
Step 1 — Lock each character before staging the dialogue
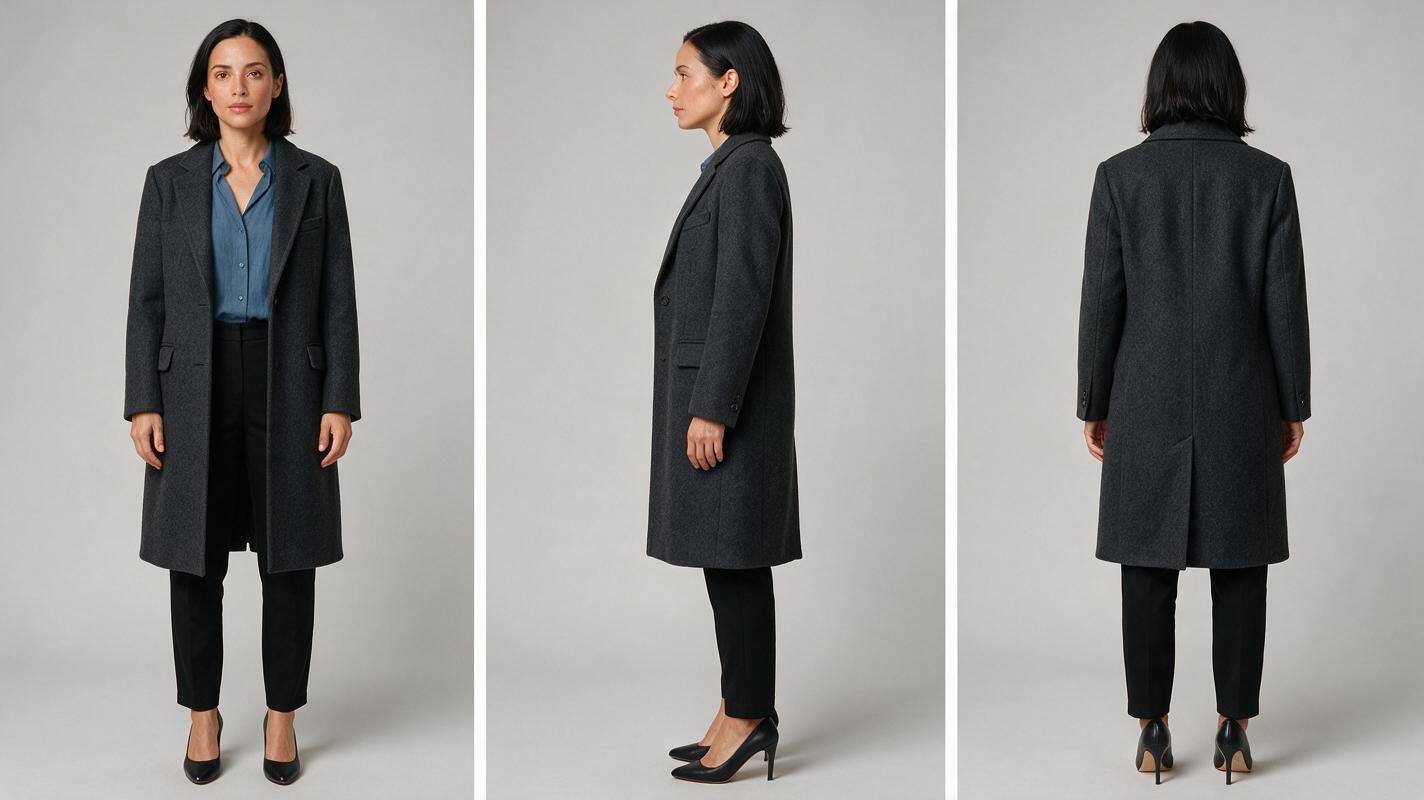
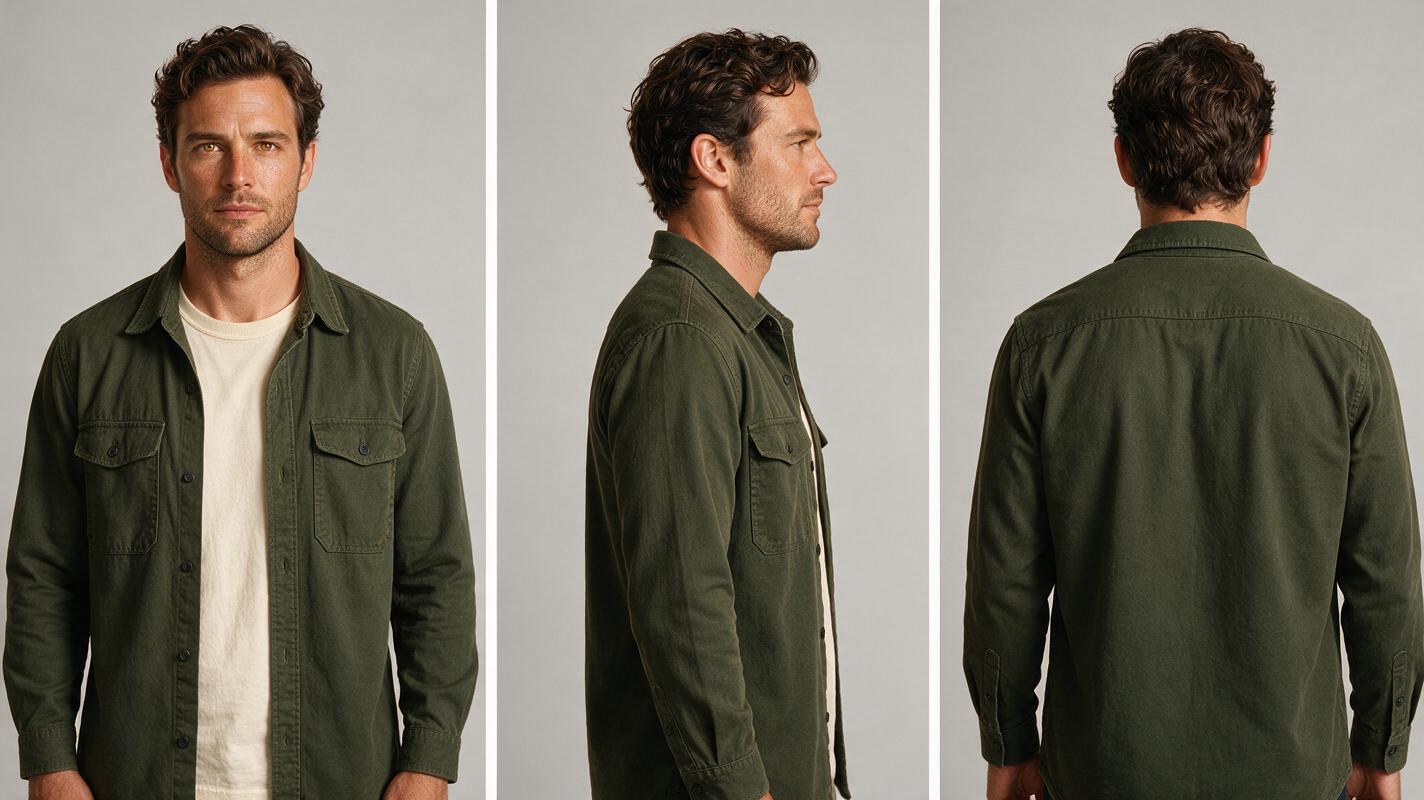
Begin with separate reference sheets for the two speaking characters. A clean three-view sheet helps you preserve facial structure, hair, wardrobe, and silhouette when the camera moves from a medium two-shot to opposing close-ups.
Create each sheet independently with an ai image generator. Do not place both characters in the same reference image: separating them reduces the risk of blended faces, exchanged clothing, or duplicated features.
Character A reference: Mara
Photorealistic three-panel character reference sheet of Mara, a woman in her early thirties with a narrow oval face, dark brown eyes, shoulder-length black hair tucked behind her right ear, charcoal wool coat over a muted blue blouse, minimal natural makeup; identical person and wardrobe in every panel; front view, exact left-side profile, exact back view; neutral expression, arms relaxed, even soft studio lighting, neutral light-gray seamless background, no props, no text, no logos; landscape 16:9. MANDATORY CAMERA: eye-level orthographic character-study framing with equal panel size and no perspective distortion.Character B reference: Elias
Photorealistic three-panel character reference sheet of Elias, a man in his late thirties with a broad angular face, hazel eyes, short wavy brown hair, light stubble, dark olive overshirt over a cream crew-neck shirt; identical person and wardrobe in every panel; front view, exact right-side profile, exact back view; neutral expression, arms relaxed, even soft studio lighting, neutral light-gray seamless background, no props, no text, no logos; landscape 16:9. MANDATORY CAMERA: eye-level orthographic character-study framing with equal panel size and no perspective distortion.Record a short identity line for each character and paste it unchanged into every relevant image prompt. Camera, expression, and action can vary; identity-defining details should not.
Step 2 — Draw the axis through the characters
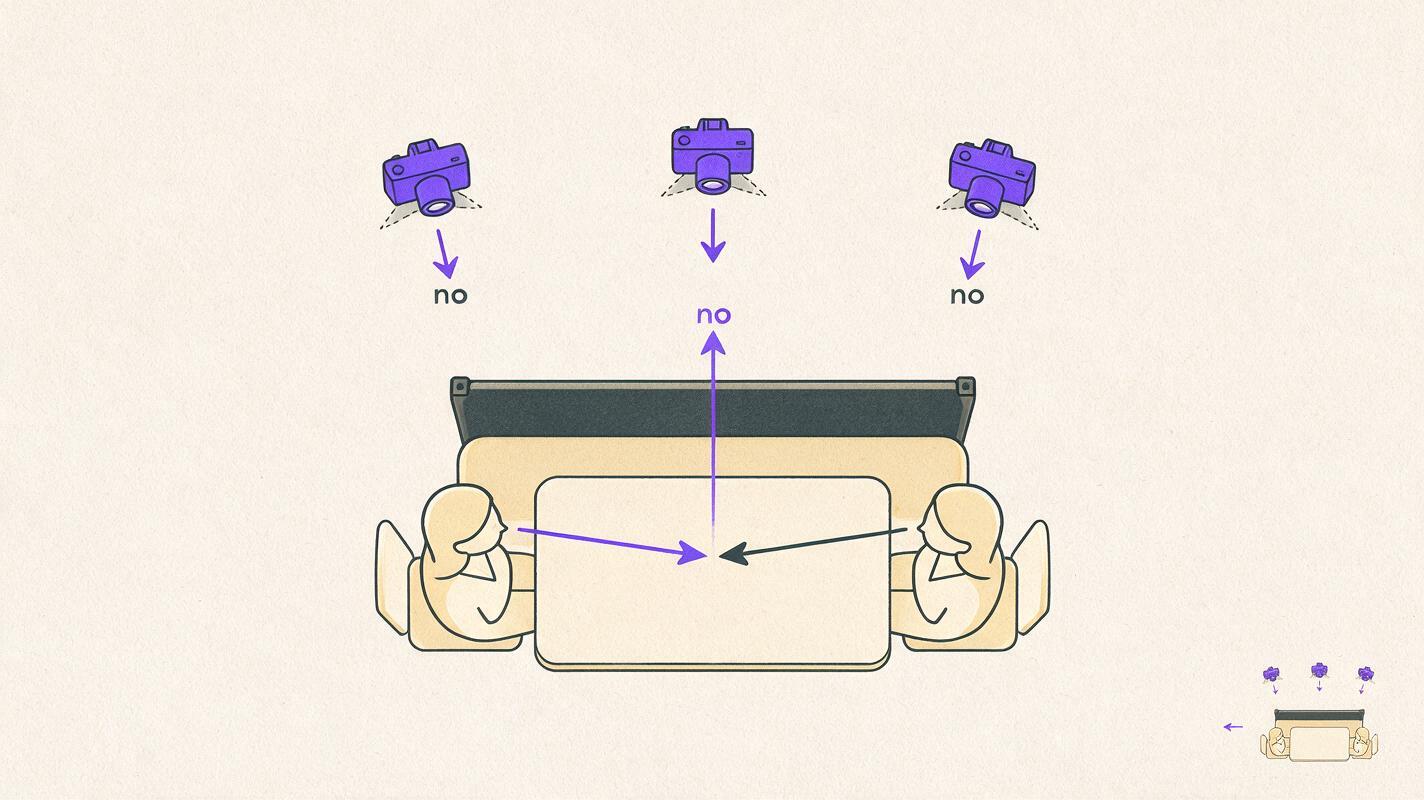
Place Mara and Elias on opposite sides of a small diner booth. The imaginary line connecting their eyes is the scene axis. Keep the principal cameras on one side of that line so their screen directions remain complementary.
For this setup:
- Mara sits frame left and looks screen right.
- Elias sits frame right and looks screen left.
- Camera A sees Mara over Elias’s shoulder.
- Camera B sees Elias over Mara’s shoulder.
- Camera C captures a neutral two-shot without reversing their positions.
Neutral overhead blocking diagram of a rectangular diner booth with two human figures seated opposite each other, one figure on the left and one on the right, a clear imaginary axis running between their faces, three camera shapes arranged along only one side of the axis, clean directional sight lines from each face to the other, muted charcoal, cream, and purple palette, no text, no letters, no numbers, no logos, no interface elements; landscape 16:9. MANDATORY CAMERA: exact top-down orthographic view with symmetrical layout and unobstructed geometry.Save this diagram beside the shot prompts. It is not an artistic reference; it is a continuity map. If a generated close-up looks wrong, compare its gaze direction with the map before changing the character prompt.
Step 3 — Generate a neutral master shot first
The master shot establishes where both characters sit, where the table edges fall, and how far apart their eyes are. It becomes the spatial reference for every close-up.
Cinematic editorial-realism film still inside a modest late-night neighborhood diner, lived-in vinyl booth, rain-speckled window, warm pendant light mixed with cool street light; Mara sits on frame left in a charcoal coat and looks screen right at Elias; Elias sits on frame right in a dark olive overshirt and looks screen left at Mara; restrained tension, both hands visible and resting separately on the table, realistic skin and fabric, no text, no logos; landscape 16:9. MANDATORY CAMERA: locked eye-level medium two-shot from one side of the dialogue axis, 50mm lens appearance, both faces in clean three-quarter view, no camera roll.Approve this frame for four things before continuing:
- The characters occupy the intended left-right positions.
- Both gazes meet at a believable point.
- The background lighting has a repeatable direction.
- Hands and table props are simple enough to remain stable.
If the master fails, revise it now. Close-ups generated from a faulty master will reproduce or amplify the spatial error.
Step 4 — Build matching close-ups from the master
Use the approved master as a scene reference, then create separate anchor frames for Mara and Elias. Preserve the location, wardrobe, lighting direction, and eye height while changing only framing and performance.
| Coverage shot | Required gaze | Story function | Common failure |
|---|---|---|---|
| Mara medium close-up | Screen right | Accusation or question | Eyes drift toward the lens |
| Elias medium close-up | Screen left | Answer or concealment | Head turns past the eye target |
| Mara reaction insert | Screen right or briefly down | Processes new information | Random gaze reversal |
| Neutral two-shot | Inward toward each other | Resets spatial geography | Characters exchange sides |
Mara close-up prompt
Use the approved diner master frame and Mara character sheet as visual references. Mara remains seated on frame left, facing three-quarters toward screen right, eyes fixed on Elias at a natural off-camera eye target, charcoal coat and muted blue blouse unchanged, controlled anger, jaw still, one restrained inhale, warm key light from upper right and cool window fill from behind; preserve diner booth materials and rainy background, no new people, no text, no logos. MANDATORY CAMERA: eye-level medium close-up from Elias's side of the table, stable 70mm portrait-lens appearance, camera remains on the established side of the dialogue axis.Elias close-up prompt
Use the approved diner master frame and Elias character sheet as visual references. Elias remains seated on frame right, facing three-quarters toward screen left, eyes fixed on Mara at a natural off-camera eye target, dark olive overshirt and cream shirt unchanged, defensive stillness followed by one small downward glance, warm key light from upper left and cool window edge light behind; preserve diner booth materials and rainy background, no new people, no text, no logos. MANDATORY CAMERA: eye-level medium close-up from Mara's side of the table, stable 70mm portrait-lens appearance, camera remains on the established side of the dialogue axis.Animate the approved anchors with an image to video workflow. Keep each performance unit narrow: one spoken phrase, one glance, or one reaction. Broad instructions such as “argue intensely” invite unnecessary head movement and gaze drift.
Step 5 — Cut on thought changes, not random motion
Eyeline continuity becomes easier when each cut is motivated by new information. Hold on the speaker long enough to establish the line, then cut to the listener when the meaning lands.
- Open on the master to establish the booth and screen direction.
- Cut to Mara looking screen right as she makes the accusation.
- Cut to Elias looking screen left before he answers.
- Stay on Elias for the denial, then cut back when Mara detects the lie.
- Return to the master only when physical geography matters again.
Avoid alternating close-ups mechanically after every sentence. Reaction shots should reveal interpretation, suspicion, or a decision—not merely prove that the second character is present.
Step 6 — Repair a reversed eyeline without rebuilding the scene
If one otherwise usable shot faces the wrong direction, first check whether a horizontal flip creates new continuity errors. Flipping can reverse hair parts, wardrobe asymmetry, signs, lighting, and props, so it is safest only when the frame contains no directional detail.
When a flip is unsafe, use one of these local repairs:
- Replace the opening frames: regenerate a correct screen-direction anchor, then continue into the usable performance.
- Insert a neutral reaction: show the listener looking down at the table before returning to the correct eye target.
- Use the master as a reset: re-establish both positions before cutting to the corrected close-up.
- Show a visible axis crossing: use a motivated camera move that travels behind one character and ends on the opposite side. Do not jump across invisibly.
A wrong eyeline is usually a geometry problem, not an identity problem. Repair the camera side and eye target before changing the character description.
Step 7 — Adapt the coverage for a vertical frame
A vertical drama video has less horizontal space for a traditional over-the-shoulder composition. Keep the foreground shoulder narrow and place the speaking character’s visible eye near the upper third of the frame.
For 9:16 delivery, test these changes:
- Move the off-screen eye target closer to the lens so the face does not become a full profile.
- Use chest-up singles rather than wide booth coverage for key lines.
- Reserve the center of the frame for the active face, not empty table space.
- Use a stacked two-shot only when both expressions need to remain readable.
- Preview captions early so they do not cover hands, props, or reaction details.
Crop the master only as a test. If both characters become cramped, generate a dedicated vertical master with the same axis rather than forcing a landscape composition into 9:16.
FAQ
Why do two correct-looking close-ups still feel disconnected?
The individual frames may use incompatible camera sides, eye heights, lighting directions, or background geometry. Compare them as a pair rather than judging each image alone.
Should a character look directly into the camera?
Usually not in conventional shot-reverse-shot coverage. Place the eye target just beside the lens. Direct lens contact has a strong subjective effect and should be an intentional story choice.
Can I cross the 180-degree line?
Yes, but show the transition. A neutral shot on the axis, a visible camera move, or a clear character movement can establish the new orientation before reverse coverage begins.
How much head movement is safe during dialogue?
Use only the movement required by the beat. Small blinks, breaths, and brief downward glances are easier to match than repeated turns or sweeping gaze changes.
What should I test before generating the complete scene?
Generate the master plus one close-up for each character. Cut those three shots with temporary dialogue. If the conversation reads silently, the geometry is strong enough to expand.
Sources
Final checklist
- Separate three-view reference sheets exist for both characters.
- The master shot fixes left-right position, eye height, and lighting direction.
- Every shot prompt states the required screen direction.
- Close-ups remain on the established side of the axis.
- Motion prompts contain one performance beat at a time.
- Reaction shots communicate a change in thought.
- Vertical versions preserve eye room and caption space.
- Failed eyelines are repaired locally before full regeneration.
Once the master and two opposing close-ups are ready, try these models for free and compare which generation path preserves the eye targets most reliably for your scene.
Keywords
ai short drama, ai microdrama, ai short film generator, ai drama generator, short drama from script, vertical drama video