How to Keep Wardrobe Consistent in an AI Short Drama
Wardrobe drift can make an otherwise coherent AI short drama feel as if every shot belongs to a different episode. This tutorial shows how to define costume states, build reference sheets, generate scene anchors, control costume changes, and review garment landmarks before editing.
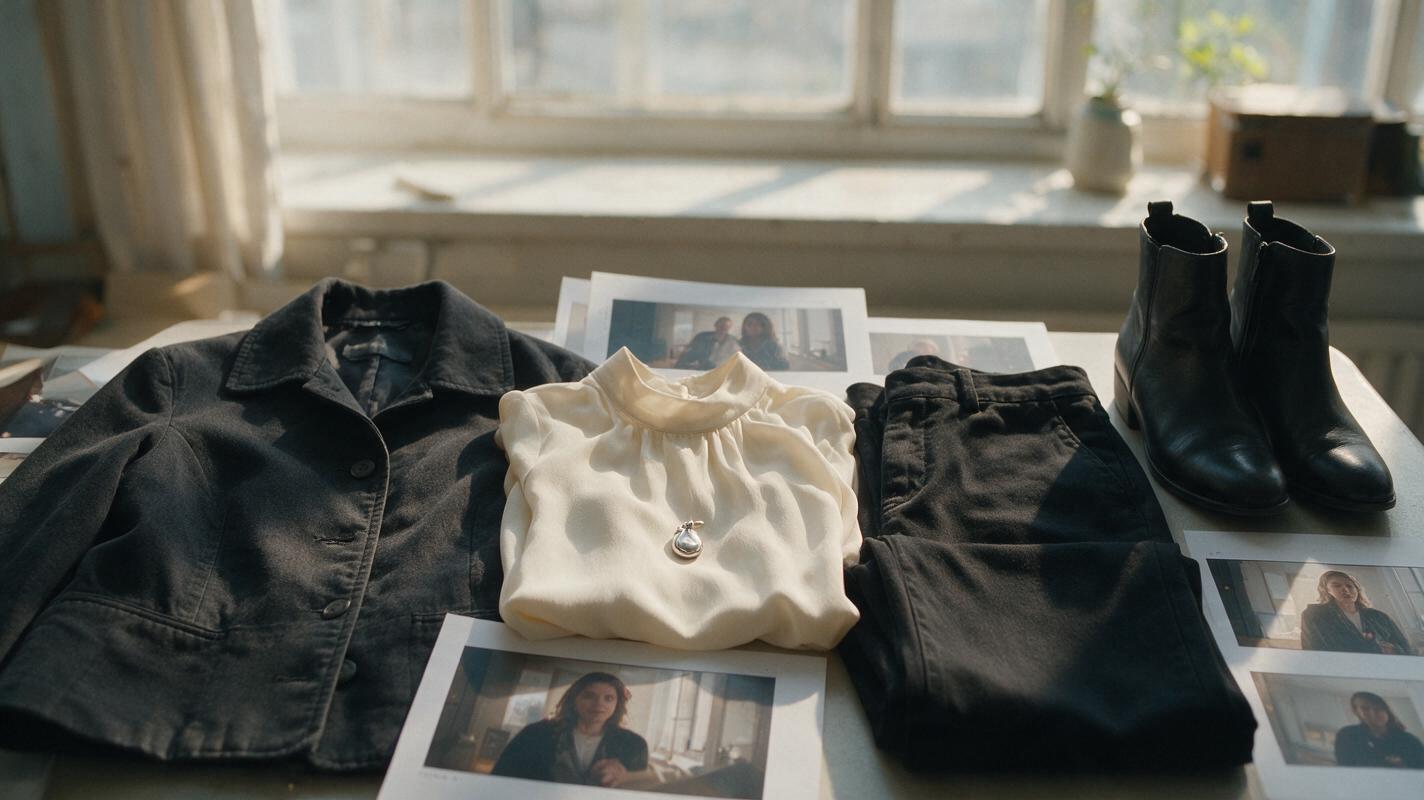
Table of contents
Wardrobe continuity starts before video generation
The reliable way to keep clothing consistent in an AI short drama is to treat each costume as a controlled story state, not as a decorative phrase repeated in every prompt. Define when the outfit changes, create a visual reference for each approved state, and generate scene anchors before adding motion.
This matters because a model can preserve a character’s face while quietly changing the jacket length, collar, buttons, jewelry, fabric, or damage between shots. Those small differences become obvious when consecutive clips are edited together.
The core rule: one story state, one approved wardrobe reference. Never ask the model to redesign clothing inside a continuity-sensitive shot.
Step 1 — Convert the script into costume states
Read the episode for events that physically alter the wardrobe: a time jump, change of location, disguise, rainstorm, fight, spilled drink, removed coat, rolled sleeve, or newly acquired object. Assign a short state code only when the visible outfit changes.
| State | Story range | Locked wardrobe | Permitted change |
|---|---|---|---|
| MAYA-A | Apartment to station | Charcoal cropped jacket, cream blouse, black trousers, silver pendant | Jacket may open |
| MAYA-B | After the rain | Same complete outfit | Wet shoulders and damp hair |
| MAYA-C | After the confrontation | Same complete outfit | Torn right cuff and missing pendant |
A state records visible facts, not prose about mood. “She looks desperate” belongs in performance direction. “The right cuff is torn” belongs in wardrobe continuity.
For an AI series video, preserve these state codes across episode scripts. This prevents a cliffhanger ending in one costume state and the next episode opening with an unexplained reset.
Step 2 — Build a wardrobe lock sheet
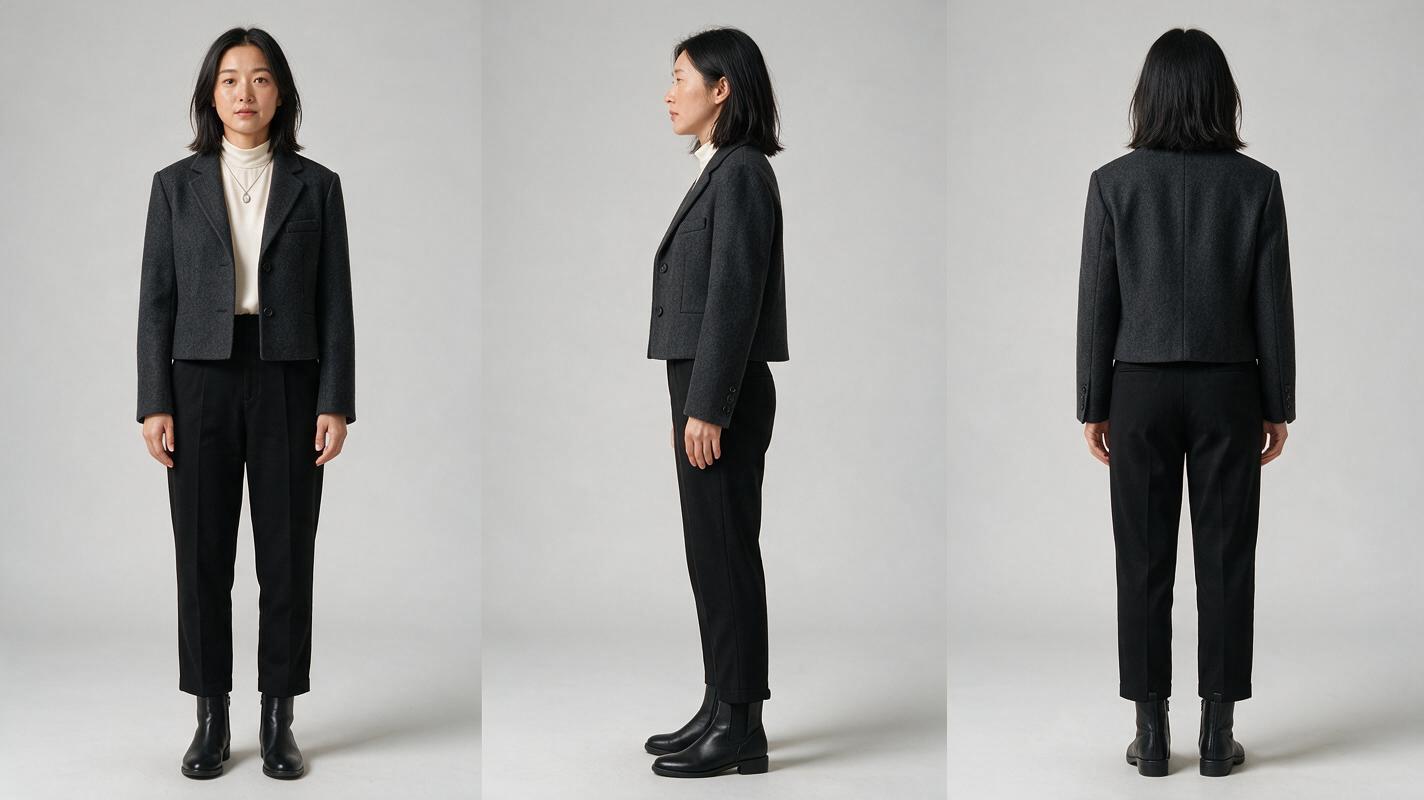
Create a neutral reference sheet before generating dramatic locations or poses. Use an ai image generator to establish the front, side, and back of the same fictional character in the approved outfit. Keep expression, lighting, and posture neutral so the clothing remains easy to inspect.
The lock sheet should make the following landmarks unmistakable:
- Collar shape and neckline
- Sleeve length and cuff construction
- Jacket hem and fastening pattern
- Fabric color, texture, and layering
- Trouser or skirt silhouette
- Shoes, jewelry, bag, and recurring props
Visual recreation prompt:
Photorealistic three-panel character reference sheet of the same fictional 32-year-old East Asian woman in every panel, oval face, shoulder-length straight black hair, wearing a charcoal cropped wool jacket with two matte black buttons, cream high-neck blouse, straight black trousers, plain black ankle boots, and one small silver oval pendant; front view, exact left side view, and exact back view; neutral posture, arms relaxed with hands visible, identical clothing construction and proportions in all panels; neutral light-gray seamless studio background, soft even reference lighting, natural skin texture, no dramatic shadows. MANDATORY CAMERA: full-body eye-level orthographic-style reference views, 70mm lens appearance. MANDATORY LAYOUT: three equal vertical panels arranged left to right within one landscape 16:9 frame. No text, labels, logos, interface elements, extra people, or duplicated limbs.Save separate sheets for MAYA-A, MAYA-B, and MAYA-C. Do not combine dry, wet, and damaged clothing into one ambiguous reference.
Step 3 — Generate an anchor frame for each scene setup
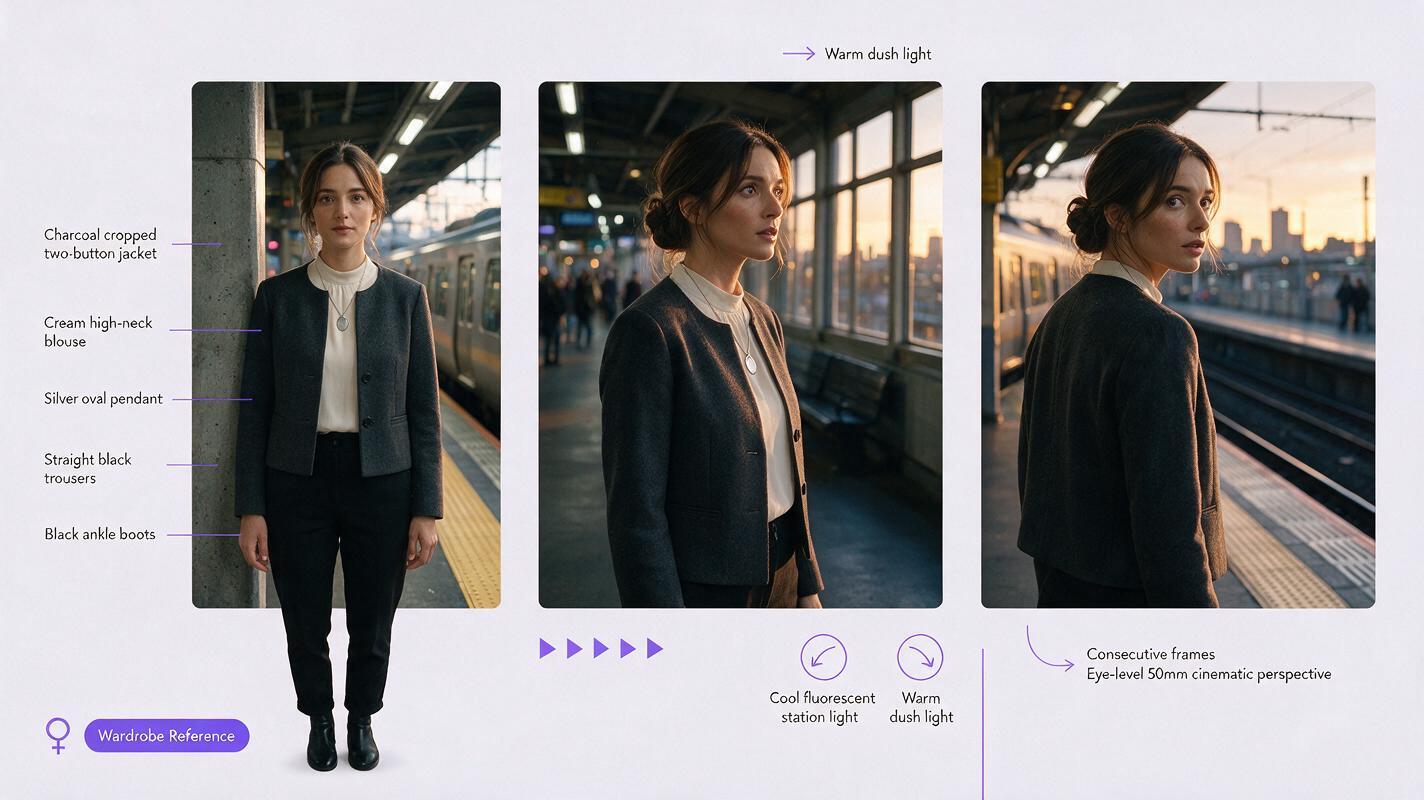
A studio sheet defines the garment, but it does not prove that the outfit will survive the location’s lighting and camera angle. Generate one approved anchor frame for every major setup: apartment interior, station platform, rainy alley, or office corridor.
Attach the correct wardrobe sheet and describe only the scene-specific variables. Keep the garment language factual and unchanged. If a model responds better to image references than long descriptions, prioritize the approved sheet over additional adjectives.
Visual recreation prompt:
Cinematic editorial-realism contact sheet showing the same fictional woman from the supplied wardrobe reference in three consecutive film frames inside a lived-in commuter train station at dusk; frame one is a medium frontal shot beside a concrete pillar, frame two is a true three-quarter profile as she notices someone across the platform, frame three is an over-the-shoulder view as she turns; preserve the charcoal cropped two-button jacket, cream high-neck blouse, straight black trousers, black ankle boots, and silver oval pendant without redesign; cool fluorescent station light mixed with warm dusk light, believable commuters softly separated in the distant background. MANDATORY CAMERA: eye-level 50mm cinematic perspective with consistent exposure and realistic depth of field. MANDATORY LAYOUT: three equal frames in one landscape 16:9 triptych. No text, logos, UI, wardrobe color changes, additional versions of the woman, or abstract effects.Approve an anchor only after checking the back view, sleeve shape, hem length, and accessories. A frontal portrait can conceal inconsistencies that appear as soon as the character turns.
Step 4 — Animate the approved frame without reopening the design
Use image to video from the approved scene anchor whenever wardrobe continuity matters more than spontaneous visual invention. Direct the movement, camera, and duration without asking for new styling.
A motion prompt should identify what changes and what must remain fixed:
The woman hears a train arrive, shifts her gaze to camera right, tightens her grip on the bag strap, and takes one cautious half-step backward. Her charcoal cropped jacket, cream high-neck blouse, black trousers, boots, and silver pendant remain exactly unchanged. Preserve face, body proportions, garment construction, button count, fabric color, sleeve length, and station lighting. Slow controlled performance, stable background geometry, no camera orbit, no costume transformation, no new accessories, no duplicate person.Generate short performance units rather than one long clip containing a walk, turn, coat removal, dialogue, and prop interaction. Every additional action gives the model another opportunity to reinterpret the garment.
For batch short drama production, group renders by wardrobe state. Finish the dry station material before switching to the wet state, then review the full group together. This makes subtle drift easier to spot than reviewing clips in script order.
Step 5 — Stage wardrobe changes across edit points
When clothing must change, make the transition editorially explicit. End the old state with evidence, cut at the physical or temporal boundary, and begin the new state with a clear confirmation shot.
- Rain change: dry jacket at the station, cut to rainfall, then show wet shoulders in the alley.
- Removed accessory: show the hand reaching toward the pendant, cut to a reaction, then reveal the empty neckline.
- Damage: establish the intact cuff before the struggle and the torn cuff immediately afterward.
- Time jump: use a location or lighting transition before introducing a completely new outfit.
Avoid generating the entire transformation continuously unless that transformation is the point of the shot. A clean cut usually communicates the event while reducing morphing, duplicated fabric, and unstable hands.
Visual recreation prompt:
Photorealistic side-by-side wardrobe-continuity failure comparison using the same fictional woman at the same commuter train platform; left panel intentionally shows continuity errors after a cut, including a longer blue-black jacket, open collar, missing pendant, and changed sleeve shape; right panel shows the corrected match with the original charcoal cropped two-button jacket, cream high-neck blouse, silver oval pendant, and identical cuff construction; same restrained expression, body position, station background, and cool dusk lighting in both panels. MANDATORY CAMERA: waist-up eye-level 65mm shot, locked camera position and matching crop. MANDATORY LAYOUT: two equal panels within one landscape 16:9 frame, incorrect result on the left and corrected result on the right. No text, labels, arrows, logos, UI elements, extra people in the foreground, or facial identity changes.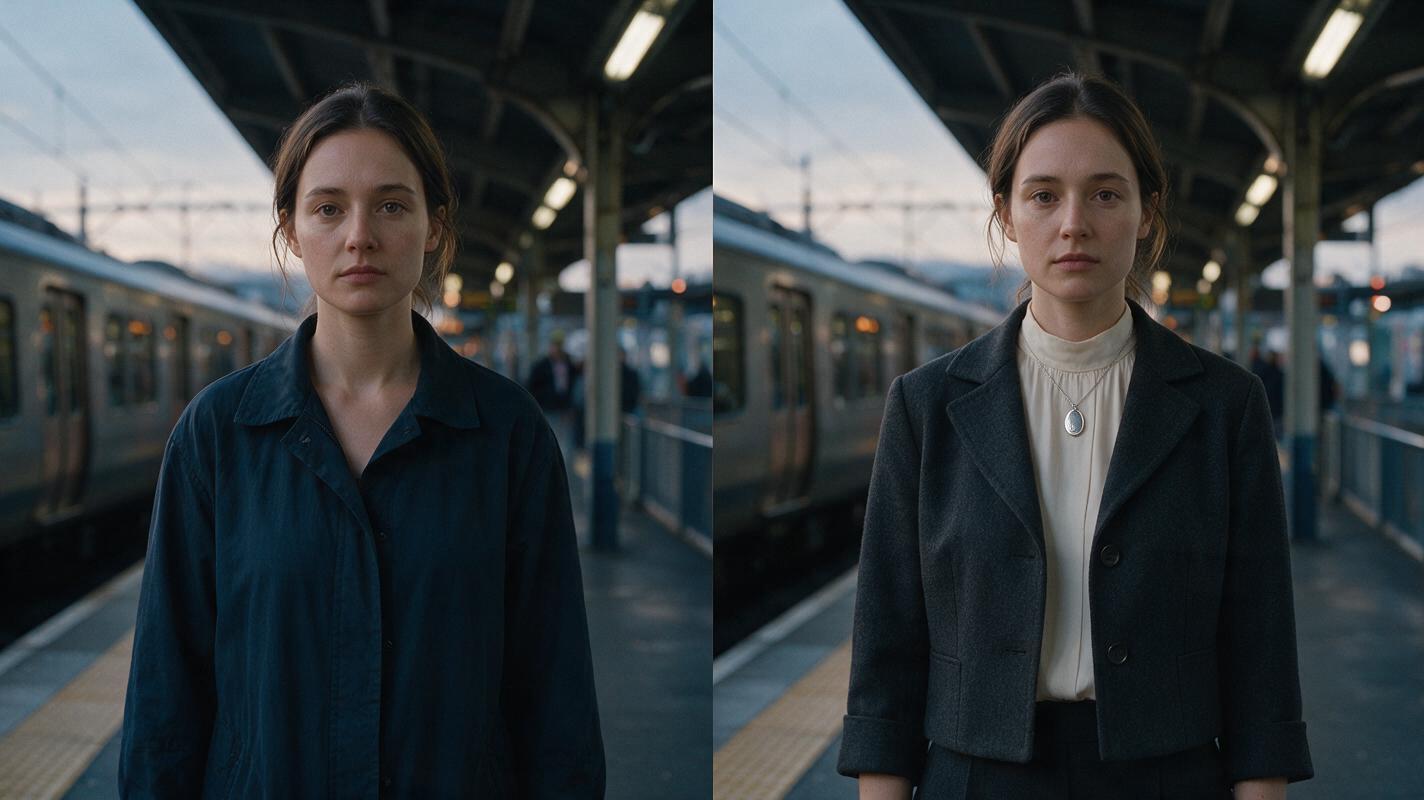
Step 6 — Review garment landmarks before editing
Do not judge continuity from thumbnails alone. Compare the last clear frame of one clip with the first clear frame of the next, then inspect a fixed set of landmarks.
- Confirm jacket and shirt colors under comparable lighting.
- Count visible buttons, fasteners, pockets, and jewelry pieces.
- Compare collar, cuff, hem, and shoulder shapes.
- Check which side carries the bag, damage, stain, or rolled sleeve.
- Verify that wetness and damage only move forward in story time.
- Watch the cut at normal speed to find distracting texture flicker.
If only one layer fails, repair that layer. A close reaction can replace a drifting wide shot; an insert can establish the missing pendant; a shorter trim can remove a changing cuff. Regenerating a successful face, location, and performance to fix one button may create more problems than it solves.
FAQ
Should the full costume description appear in every prompt?
Keep a concise locked description, but rely on the approved visual reference whenever the system supports it. Rewriting the outfit with new synonyms can invite redesign.
Can one reference sheet cover every episode?
Only if the wardrobe never changes. Create separate sheets for different outfits and for persistent story changes such as wetness, stains, missing jewelry, or torn fabric.
What is the easiest clothing to keep consistent?
Simple silhouettes, limited layering, stable colors, and clearly visible landmarks are easier to inspect. Intricate repeating patterns, transparent fabric, loose jewelry, and highly reflective materials add continuity risks.
How should wardrobe be framed in a vertical drama video?
Keep plot-critical details inside the central story column. If a missing pendant or torn cuff matters, give it a dedicated close shot rather than expecting viewers to notice it near the edge of a 9:16 frame.
When should the workflow be tested across models?
Test one anchor and one motion clip before committing an episode. When the reference packet is ready, try these models for free and compare how well each path preserves the same garment landmarks without rebuilding the production plan.
Sources
Final checklist
- Assign a code to every visible wardrobe state.
- Create front, side, and back sheets for each approved state.
- Generate and inspect a scene anchor before animation.
- Prompt for motion without reopening costume design.
- Place intentional costume changes across clear edit boundaries.
- Review collars, cuffs, hems, buttons, accessories, wetness, and damage.
- Repair the failed layer instead of regenerating the entire sequence.
Keywords
ai short drama, ai microdrama, ai series video, batch short drama production, vertical drama video, ai short film generator