How to Keep One Character Consistent Across a Multi-Shot AI Video
Create a consistent multi-shot AI video by locking the character design first, generating each scene as a controlled keyframe, and animating the shots separately. This reference-first workflow reduces face drift, wardrobe changes, duplicated features, and continuity errors when using models such as Seedance and Kling.
Table of contents
TL;DR: Build the Character Before You Build the Video
The most reliable way to keep one person recognizable across a multi-shot AI film is to create a fixed character sheet, generate a separate keyframe for every shot, and then animate those approved frames with image to video. Do not ask a video model to invent the actor, location, wardrobe, camera angle, and movement simultaneously.
This tutorial creates a three-shot microfilm about a bicycle courier arriving at a rainy train station. The same workflow works for advertisements, music videos, short dramas, and recurring social-media characters.
Why Character Consistency Breaks Across Shots
A prompt can describe a character, but it does not function like a permanent casting record. When each shot begins from text alone, the model may reinterpret broad details such as “young courier,” “red jacket,” or “short dark hair.” The resulting person can look related to the original without being the same person.
Typical continuity failures include:
- A narrow face becoming rounder between a close-up and a wide shot.
- Hair length, parting, texture, or color changing with the camera angle.
- A jacket gaining different pockets, fasteners, logos, or sleeve colors.
- A backpack switching sides or disappearing.
- Eye color and skin texture drifting in strongly lit scenes.
- The character becoming older, younger, taller, or more stylized.
Motion introduces another layer of risk. Fast turns may reveal a face the source image never defined, while a wide walking shot may simplify small wardrobe features. The solution is not an extremely long video prompt. It is a production workflow that separates identity design, scene composition, and motion.
Reusable visual prompt: continuity failure comparison
Create a practical four-frame continuity comparison diagram for a fictional female bicycle courier, landscape 16:9. LEFT PAIR labeled conceptually as inconsistent: frame one has a narrow oval face, short black bob, mustard messenger bag and matte red rain jacket; frame two visibly drifts to a rounder face, shoulder-length brown hair, black backpack and glossy crimson coat. RIGHT PAIR shows the corrected result: the same narrow oval face, short black bob tucked behind the right ear, matte red rain jacket and mustard cross-body messenger bag in both a close-up and a wide station shot. MANDATORY LAYOUT: four equally sized cinematic frames in one horizontal row, neutral charcoal separators, no software interface, no brand marks, no decorative technology graphics. MANDATORY CAMERA: first and third frames are eye-level 85mm head-and-shoulders portraits; second and fourth frames are eye-level 35mm full-body views. Photorealistic editorial film stills, realistic skin and fabric, rainy railway-platform lighting, restrained natural color.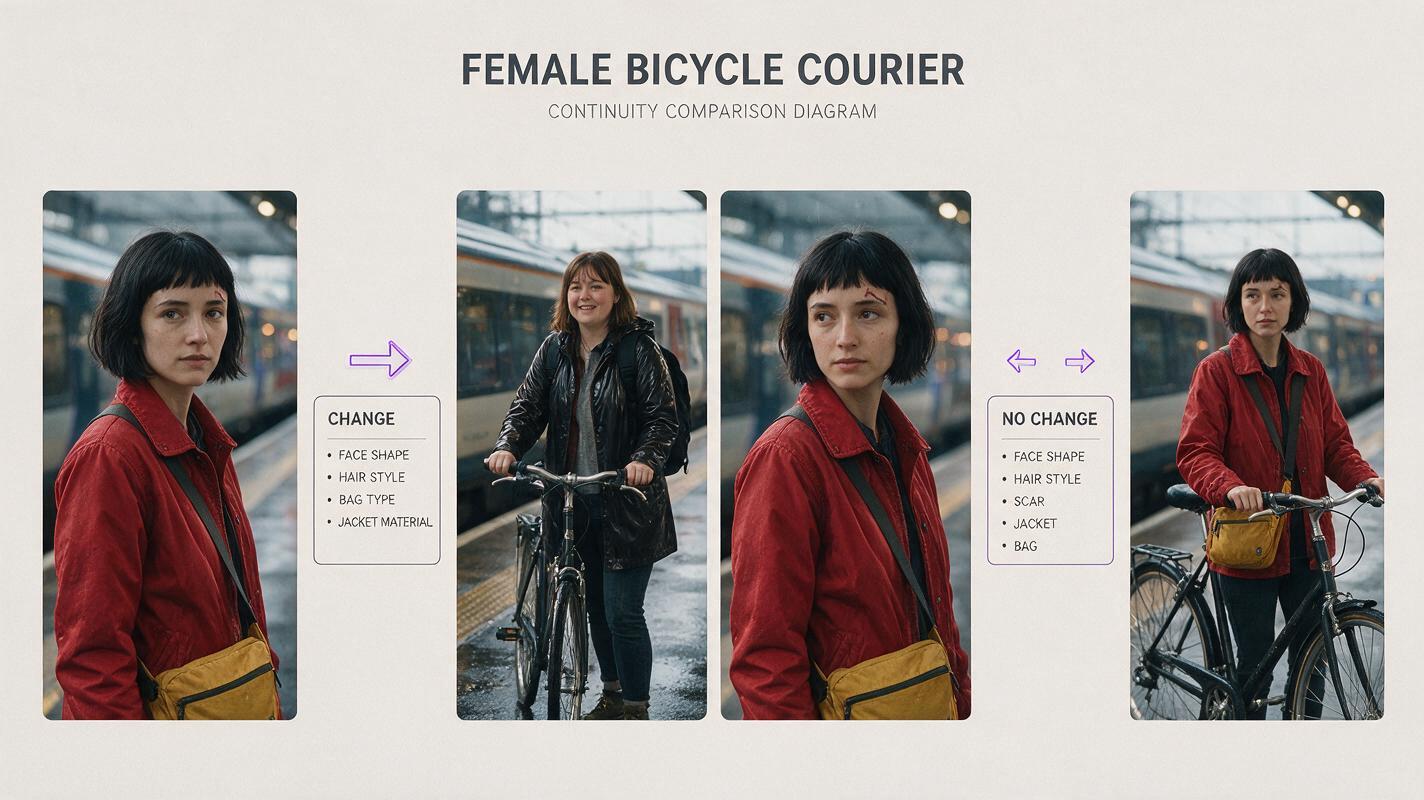
3 Ways to Improve Character Consistency
| Approach | Best use | Main limitation |
|---|---|---|
| Repeat a text identity block | Fast concept tests and distant figures | Descriptions leave facial geometry open to interpretation |
| Reuse one portrait | Close-ups with similar angles | A single view provides weak side and back information |
| Reference sheet plus shot keyframes | Multi-shot stories and recurring characters | Requires more preparation before animation |
The third method is the focus here. A three-view reference defines identity, while individual keyframes define what the character and environment should look like at the beginning of each shot.
How MagicBoat Handles a Reference-First AI Video Workflow
MagicBoat brings image and video generation workflows into one account, making it practical to create references, compare outputs, and animate approved frames without committing the whole project to one model. You can use image models such as Seedream, Flux, or GPT Image for character and scene development, then test suitable ai video models such as Seedance or Kling for motion.
Model choice still matters. One model may preserve facial identity better in a restrained close-up, while another may handle a walking camera or environmental movement more naturally. Generate short tests from the same keyframe and prompt rather than changing the prompt, source image, and model at once.
Continuity rule: approve identity in still images first. If the face or costume is already wrong in the keyframe, animation will usually amplify the error rather than repair it.
Step 1 — Create a Three-View Character Reference Sheet
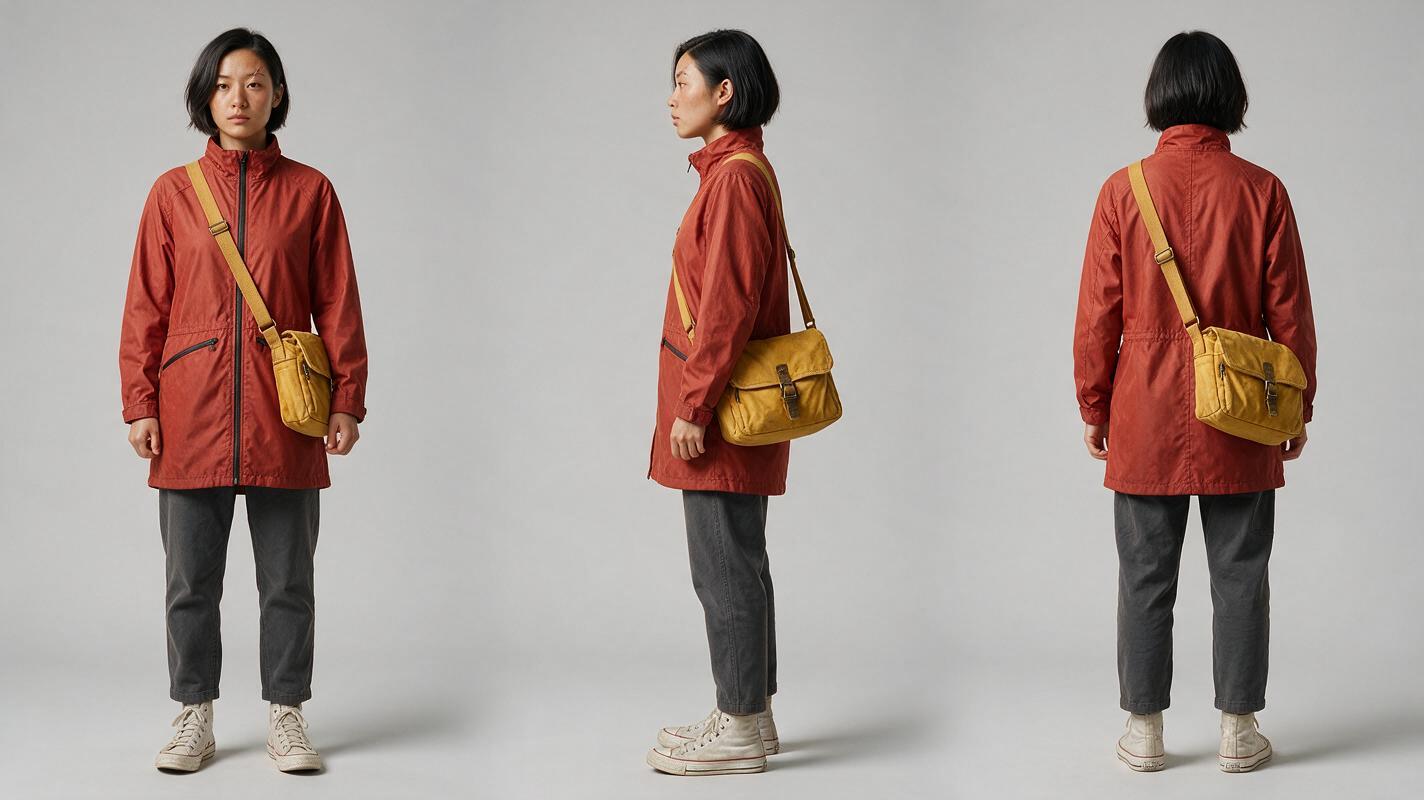
Begin with one photorealistic sheet showing the same person from the front, side, and back. Use a neutral background, even lighting, and simple posture. Avoid dramatic shadows, props covering the torso, crossed arms, or three-quarter portraits masquerading as true side views.
For this film, the courier has a few stable identity anchors: a narrow oval face, short black bob, small scar through the left eyebrow, matte red rain jacket, charcoal trousers, mustard messenger bag, and white high-top shoes. These details are specific enough to recognize but simple enough to reproduce.
Reusable visual prompt: courier character sheet
Photorealistic three-panel character reference sheet of the exact same fictional 27-year-old East Asian female bicycle courier in all panels, narrow oval face, warm medium-light skin, dark brown almond-shaped eyes, short straight black bob tucked behind the right ear, subtle small scar through the left eyebrow, matte brick-red waterproof jacket with two black zip pockets, plain charcoal straight-leg trousers, worn white high-top shoes, mustard canvas cross-body messenger bag resting at the left hip. PANEL 1: true front view. PANEL 2: true left-side profile. PANEL 3: true back view with the messenger-bag strap and bob haircut clearly visible. Neutral relaxed posture, arms slightly separated from torso, closed mouth, no bicycle, no helmet, no text, no logo. MANDATORY LAYOUT: landscape 16:9, three equal full-body panels, identical scale and eye line, neutral light-gray seamless studio background. MANDATORY CAMERA: eye-level camera, 70mm lens look, camera square to each required view, no three-quarter angle, no wide-angle distortion. Soft even studio lighting, realistic skin pores and fabric texture, editorial casting photography.Expected result: one sheet in which all three panels clearly depict the same actor and outfit. Regenerate if the side profile changes the nose, jaw, haircut, or apparent age. Save the cleanest sheet as the project’s identity master.
Step 2 — Generate a Clean Location Plate
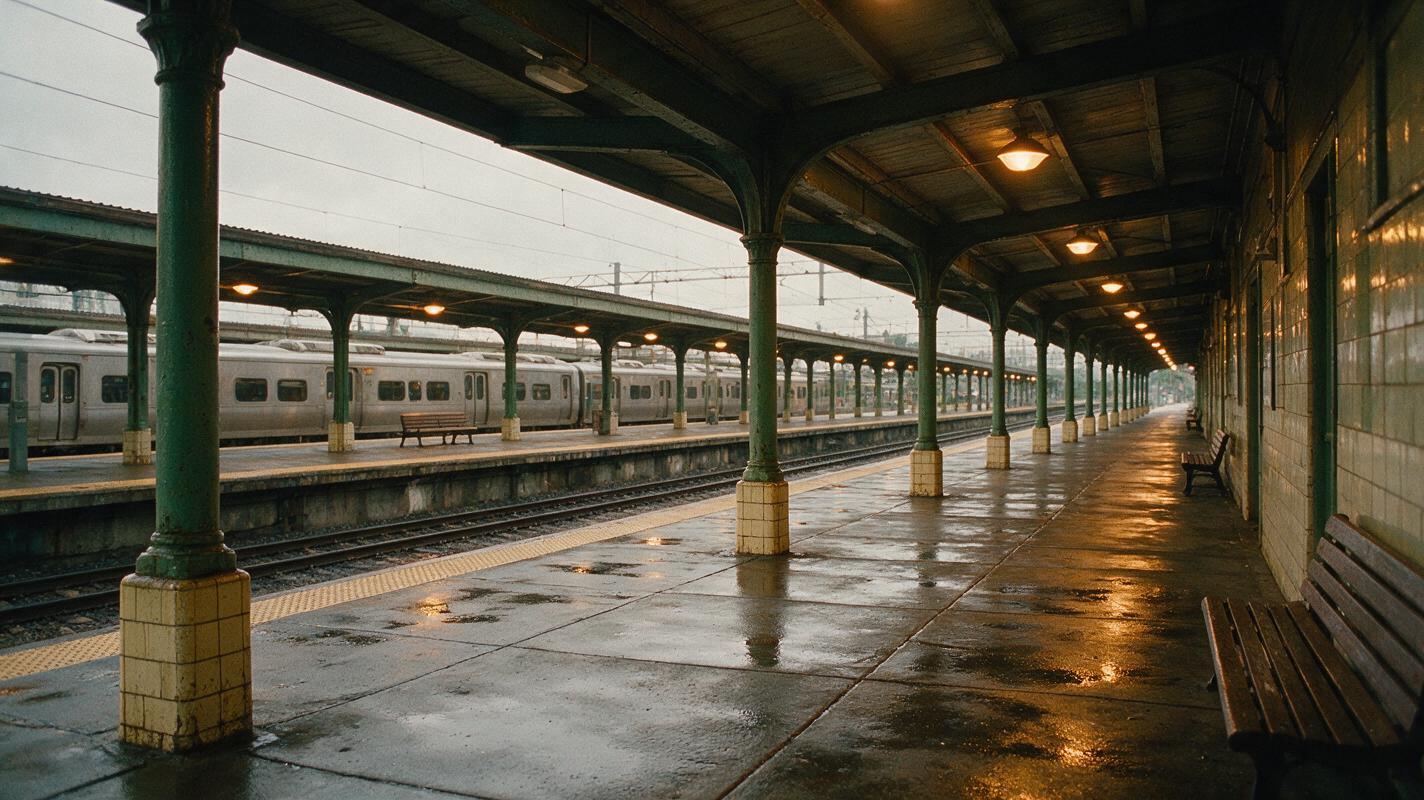
Create the environment without the character first. An empty location plate establishes architecture, weather, color, and light without forcing the image model to solve identity at the same time. It also gives every later shot a shared visual vocabulary.
Our microfilm uses an older suburban railway platform after rain. Repeating elements include green iron columns, cream tiles, amber practical lights, wet concrete, and a stationary silver train across the tracks.
Reusable visual prompt: rainy station location
Cinematic editorial-realism establishing image of an older suburban railway station platform just after evening rain, wet concrete reflecting warm amber ceiling lamps, green-painted iron columns, aged cream wall tiles, simple wooden benches, a stationary silver commuter train across the tracks, fine rain visible beyond the canopy, believable signs present only as indistinct shapes with no readable words, no people, no logos. MANDATORY CAMERA: eye-level true three-quarter view from near the front-right end of the platform, 32mm lens look, camera height 1.6 meters, strong leading lines toward the distant vanishing point. MANDATORY LAYOUT: landscape 16:9, open foreground space on the right for a character to enter, train held in the left-middle background, natural depth and uncluttered silhouette areas. Photorealistic 35mm film still, restrained teal-and-amber palette, soft overcast exterior light mixed with practical station lighting, realistic reflections rather than mirror-like pavement.Expected result: a believable setting with enough open space to place the courier. Keep this plate nearby when designing all three keyframes so that columns, tile colors, and weather remain related.
Step 3 — Build One Approved Keyframe for Each Shot
Plan the sequence as separate still images rather than asking for a complete film immediately:
- Shot A: wide view as the courier enters from the right.
- Shot B: medium side view as she stops and checks the station clock.
- Shot C: close-up as she hears the approaching train and looks left.
Use the character sheet as the identity reference and the station plate as the location reference where the selected image model supports reference input. If only one reference can be used, prioritize the character sheet and describe the station using the same locked environment block in every prompt.
IDENTITY LOCK: the same 27-year-old East Asian female courier from the supplied reference, narrow oval face, short straight black bob tucked behind the right ear, small scar through the left eyebrow, matte brick-red rain jacket, charcoal trousers, mustard messenger bag at left hip, worn white high-top shoes.

ENVIRONMENT LOCK: older suburban railway platform after rain, green iron columns, aged cream tiles, amber practical lamps, wet concrete, silver commuter train across the tracks, restrained realistic color.

SHOT B: medium full side view as the courier stops beside a green column and raises her chin slightly to check an overhead clock outside the frame. Her left hand holds the messenger-bag strap; her right hand stays relaxed and visible. MANDATORY CAMERA: eye-level true left-side three-quarter profile, camera near front-left, 50mm lens look, no overhead angle. MANDATORY LAYOUT: landscape 16:9, courier occupying the center-right third, clear headroom, column behind rather than crossing her face, realistic station depth. Cinematic editorial realism, natural skin, wet fabric edges, consistent wardrobe construction, no duplicate person, no extra bag, no readable text.
Expected result: three frames that look like consecutive shots from one production. Compare them at the same size. Check eyebrow scar position, hair parting, jawline, jacket pockets, bag strap direction, shoe shape, and apparent height before animating anything.
Step 4 — Animate Each Keyframe With Restrained Motion
Animate shots separately. A keyframe already contains composition and identity, so the motion prompt should describe movement rather than redescribe the entire image. Excessive adjectives can encourage the model to reinterpret the scene.
The courier pauses beside the column, breathes naturally, and tilts her chin upward by a few degrees as if checking a clock. Her left hand maintains a steady grip on the messenger-bag strap. The camera performs a very slow, smooth push-in. Fine rain continues beyond the platform canopy; distant train lights create subtle reflections on the wet concrete. Preserve the exact face, short bob haircut, eyebrow scar, red jacket construction, mustard bag, body proportions, station architecture, and realistic cinematic style from the source image. No speaking, no running, no large head turn, no wardrobe transformation, no additional person, no camera shake.For Seedance or Kling tests, begin with modest subject motion and a simple camera move. A slow push-in, gentle lateral track, or nearly locked camera is easier to control than a rapid orbit. If available settings vary by model, keep duration short for the first test and avoid pushing motion intensity to an extreme.
Expected result: the still frame comes alive without being recomposed. The courier should remain recognizable throughout the clip, while environmental motion stays secondary.
Step 5 — Compare Continuity and Repair Only the Weak Shot
Export a representative frame from the beginning, middle, and end of every clip. Place the frames in sequence and inspect the character as though they were casting photographs.
- Face: Do jaw width, nose shape, eye spacing, and apparent age stay stable?
- Hair: Does the bob remain the same length, side, and texture?
- Wardrobe: Are the jacket pockets and bag strap structurally consistent?
- Scale: Does the courier retain believable height relative to station objects?
- Motion: Do hands and limbs remain anatomically coherent?
- Environment: Do columns, tiles, rain, and color grading belong to one station?
If only Shot B drifts, regenerate Shot B. Do not rebuild the reference sheet and every other shot. Change one variable at a time: reduce the head turn, remove the camera move, shorten the action, or switch the video model while retaining the same source keyframe.
Expected result: a usable sequence assembled from the strongest generation of each shot, rather than one long generation with an unrecoverable error in the middle.
Keep the Same Character Across Future Projects
Store a small continuity pack for recurring work:
- The original three-view character sheet.
- One neutral close-up with clear eyes and facial texture.
- One full-body frame showing exact clothing construction.
- The unchanged identity-lock prompt.
- A short list of features that must never change.
- Approved frames from previous scenes for visual comparison.
Give alternate outfits their own reference sheets. “Same person, different clothing” is easier to control when the new costume is established as a still image before it appears in video.
Alternative: Use Motion Transfer for Complex Performance
When the scene depends on precise choreography, gestures, or body rhythm, use a clean performance clip as the motion source instead of describing every movement. Choose footage with one visible performer, an unobstructed body, a stable camera, and movements that fit the proportions and framing of the target character.
Motion transfer can improve action timing, but it does not remove the need for a strong character reference. Fast turns, crossed limbs, and hands passing over the face can still cause identity or anatomy errors.
Alternative: Repair a Good Shot With Face Swap
If the body motion, lighting, and composition are successful but the face drifts, a targeted face swap may be more efficient than regenerating the entire shot. Use a clear, front-facing identity image with similar lighting and expression.
This works best when the generated head shape and viewing angle already resemble the source. It is less convincing when hair occludes the face, the head turns fully away, or strong motion blur removes facial detail. After replacement, inspect the jaw boundary, ears, skin tone, and transitions around the hairline frame by frame.
Where This Workflow Falls Short
- Extreme angle changes: A three-view sheet helps, but unusual low angles and severe foreshortening may still alter facial structure.
- Long continuous clips: Identity and costume errors become more likely as the model has more time to depart from the source frame.
- Fast physical action: Running, spinning, falls, and objects crossing the face create difficult occlusions.
- Detailed accessories: Tiny jewelry, patterned fabric, lettering, and complicated bag hardware may mutate between shots.
- Exact architectural continuity: Separately generated station views may not form a geometrically perfect physical set.
For narrative clarity, favor short shots, recognizable identity anchors, motivated cuts, and camera angles that do not demand missing visual information.
FAQ
Can I keep a character consistent using text prompts alone?
You can improve consistency by repeating an exact identity block, but text alone is less reliable than a visual reference. It is most suitable for early concepts, distant figures, or characters whose precise facial identity is not critical.
Should every shot use the same seed?
A repeated seed may help under some model and workflow combinations, but it does not guarantee identity across different compositions. Treat it as a supporting control, not a replacement for reference images and approved keyframes.
How much movement should I request in the first test?
Start with one subject action and one restrained camera instruction. For example, request a slight upward glance with a slow push-in. Add environmental details or larger motion only after identity remains stable.
Should I generate one long clip or several short shots?
Several short shots are easier to direct and repair. They let you select the strongest output for each camera setup without discarding an otherwise successful sequence because of one late-stage mutation.
What should I do if the face is consistent but the clothes change?
Make the wardrobe description structural: specify material, color, pocket count, fasteners, bag position, and visible footwear. Use a full-body reference, because a portrait does not provide enough clothing information.
Can this workflow handle multiple recurring locations?
Yes. Create a clean location plate and a fixed environment prompt for each setting. Keep separate continuity packs for the character, station, apartment, street, or any other returning environment.
Final Checklist
- Create a true front, side, and back character sheet.
- Choose simple, recognizable identity and wardrobe anchors.
- Generate the empty location before placing the character.
- Approve one still keyframe for every planned shot.
- Keep identity and environment blocks unchanged.
- Animate each keyframe with restrained motion.
- Compare start, middle, and end frames across all clips.
- Regenerate or repair only the shot that fails.
Ready to build a recurring on-screen character? Create your first AI video free and test the reference-first prompts above across multiple models.
Keywords
character consistency, AI video tutorial, image to video, Seedance prompts, Kling prompts, prompt engineering, AI video workflow