How to Make an AI Character Sit Down Naturally in Image to Video
Create a believable sitting shot by designing a movement-safe reference frame, placing the character beside—not inside—the chair, and prompting the action as a short sequence of physical phases. This image-to-video workflow uses Seedance, Kling, or Veo options in MagicBoat, with motion transfer and face swap reserved for targeted alternatives and repairs.
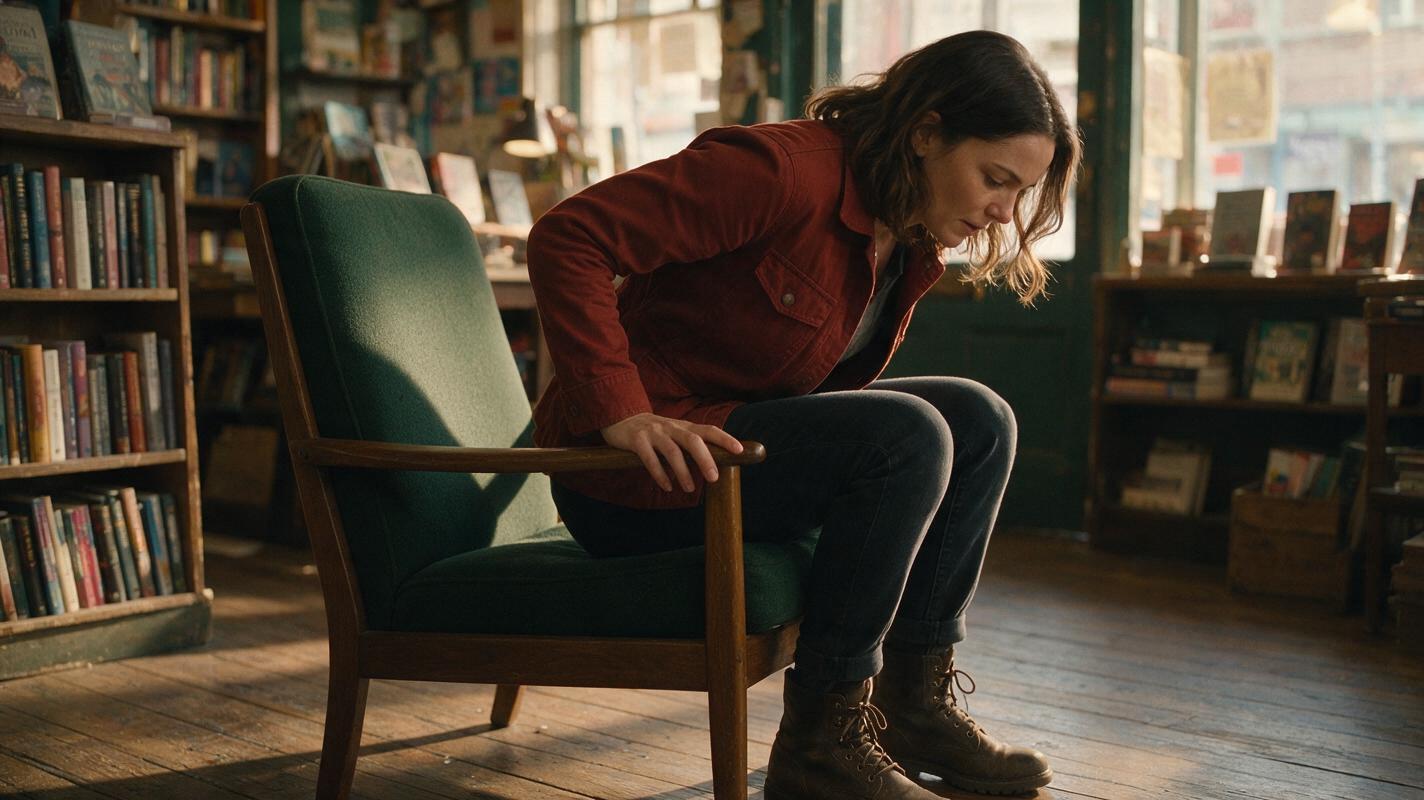
Table of contents
TL;DR: Build the contact before you animate it
The fastest way to make an AI character sit naturally is to begin with a clean three-quarter reference frame in which the character stands beside a fully visible chair, then describe the action as a sequence: turn, reach back, bend, make contact, and settle. In an image to video workflow, restrained camera movement and a short, single-purpose clip usually preserve the chair, limbs, and identity better than a prompt that combines sitting with dialogue, gestures, and a moving camera.
This tutorial builds one cinematic sitting shot while addressing the failures that commonly ruin it: knees passing through furniture, the chair changing shape, the character dropping vertically, hands merging with armrests, and the face drifting during the turn.
Why AI sitting shots often look physically wrong
Sitting is harder than it appears because several spatial relationships must change in the correct order. The hips move backward and downward, the knees bend, the torso counters the weight shift, and the feet remain planted until the body reaches the seat. At the same time, the model must preserve the chair as a rigid object.
When a prompt says only “the woman sits in the chair”, the video model has to invent every transition. Typical symptoms include:
- Vertical collapse: the character sinks straight down without shifting weight backward.
- Furniture intersection: thighs, coat tails, or hands pass through the seat and armrests.
- Chair morphing: the seat widens, rotates, or grows an extra leg to accommodate the body.
- Foot sliding: both feet drift across the floor instead of supporting the descent.
- Identity drift: the face changes when the head turns away and returns.
- Premature contact: the body appears seated before the hips reach the cushion.
Treat sitting as a contact event, not as a pose change. The approach, weight shift, first contact, and final settling phase all need readable screen time.
Three ways to create a believable sitting action
| Approach | Best for | Main trade-off |
|---|---|---|
| Reference-first image animation | Cinematic shots with controlled wardrobe, location, and composition | The starting frame must leave enough movement space |
| Text-to-video generation | Fast concept tests without a prepared still | Identity and chair geometry can vary between attempts |
| Performance-driven motion transfer | Precise timing, posture, and body mechanics | The source performance needs clear joints and matching camera geometry |
The main workflow below uses a reference image because it lets you solve composition and furniture geometry before asking the video model to solve motion.
How MagicBoat handles the sitting-shot workflow
MagicBoat provides one account for testing multiple image and video generation approaches. You can create a reference still with image models such as Seedream, Flux, or GPT Image, then compare video outputs from options such as Seedance, Kling, and Veo without rebuilding the creative brief for each model.
The practical division of labor is:
- Still-image generation: lock the character, chair, wardrobe, lighting, and camera angle.
- Seedance or Kling prompt tests: animate one short sitting action using the same source image.
- Veo or another available video option: test an alternative interpretation when body mechanics remain unstable.
- motion transfer: replace generated choreography with a recorded performance when timing matters more than improvisation.
- Face swap: repair a successful body performance if only the facial identity has drifted.
Model availability and supported inputs can change, so use the controls presented for the selected model rather than assuming that every option accepts the same reference types or duration settings.
Step 1 — Build a movement-safe character reference
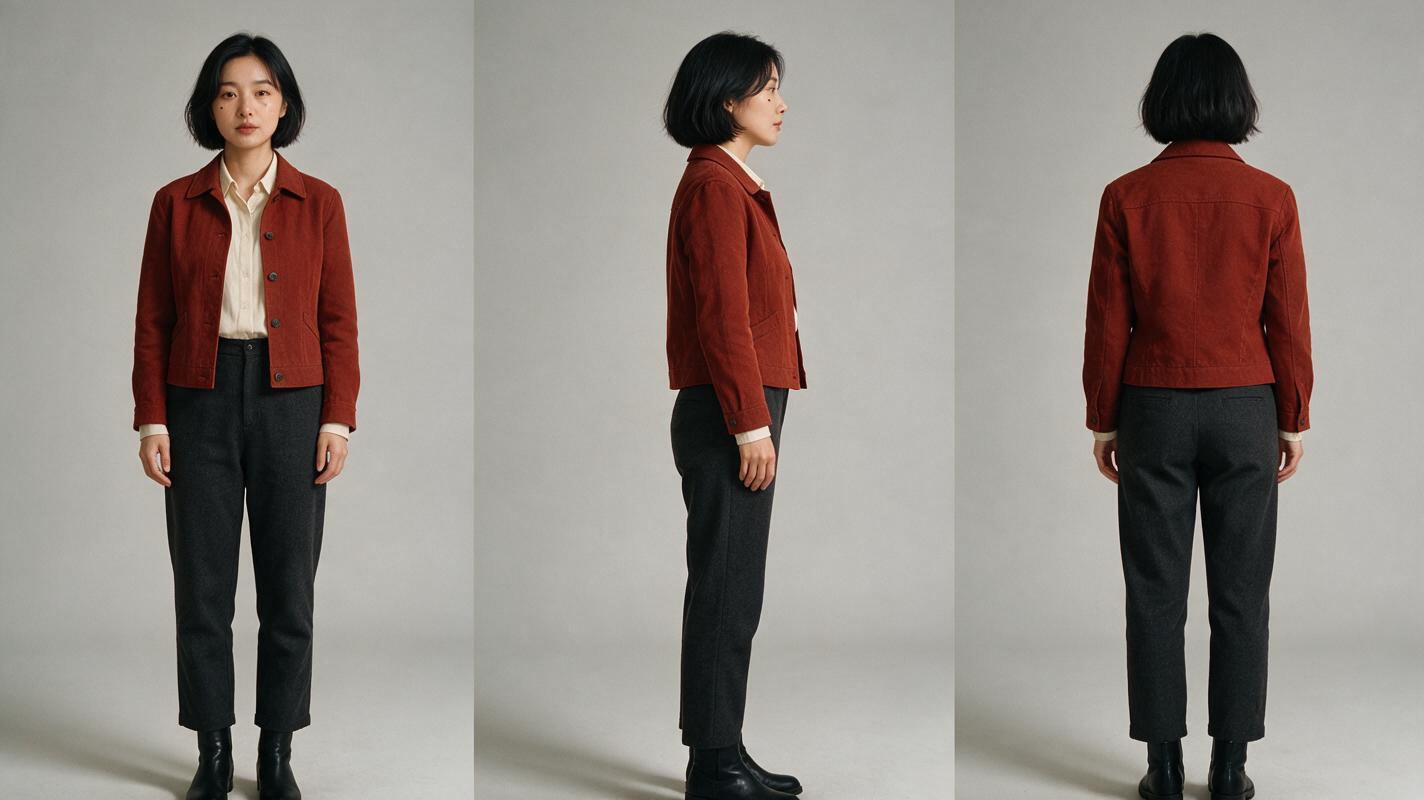
Create a photorealistic three-panel sheet before composing the scene. Use the same neutral expression, fitted wardrobe, hairstyle, and identifying details in the front, side, and back views. Avoid long coats, floor-length dresses, oversized sleeves, and accessories that hide the hips or knees during your first test.
A fitted jacket and straight-leg trousers make the leg bend and hip position easier for the video model to interpret. Include the shoes because their shape and sole contact matter during the weight shift.
Reusable character-sheet prompt
Photorealistic three-panel character reference sheet of the same 32-year-old East Asian woman in every panel, oval face, warm beige skin, straight chin-length black bob tucked behind the left ear, dark brown eyes, small beauty mark below the right eye, calm neutral expression. She wears a fitted rust-red wool jacket over a cream crew-neck shirt, charcoal straight-leg trousers, and simple black leather ankle boots. Show exactly three full-body views: front view on the left, strict right-side profile in the center, back view on the right. Preserve identical facial structure, body proportions, hairstyle, clothing construction, colors, and footwear across all panels. Neutral light-gray seamless studio background, soft even photographic lighting, realistic skin and fabric texture, no props, no chair, no text, no labels, no duplicated limbs. MANDATORY LAYOUT: landscape 16:9, three equal vertical panels, one complete character per panel, head and shoes fully visible, consistent scale and eye level. MANDATORY CAMERA: full-body camera at waist height, 70mm portrait-lens appearance, level horizon, no wide-angle distortion.Expected result: one identity reference that clearly defines the face, body proportions, trouser silhouette, and shoes without introducing scene-specific shadows.
Step 2 — Create a chair-safe starting frame
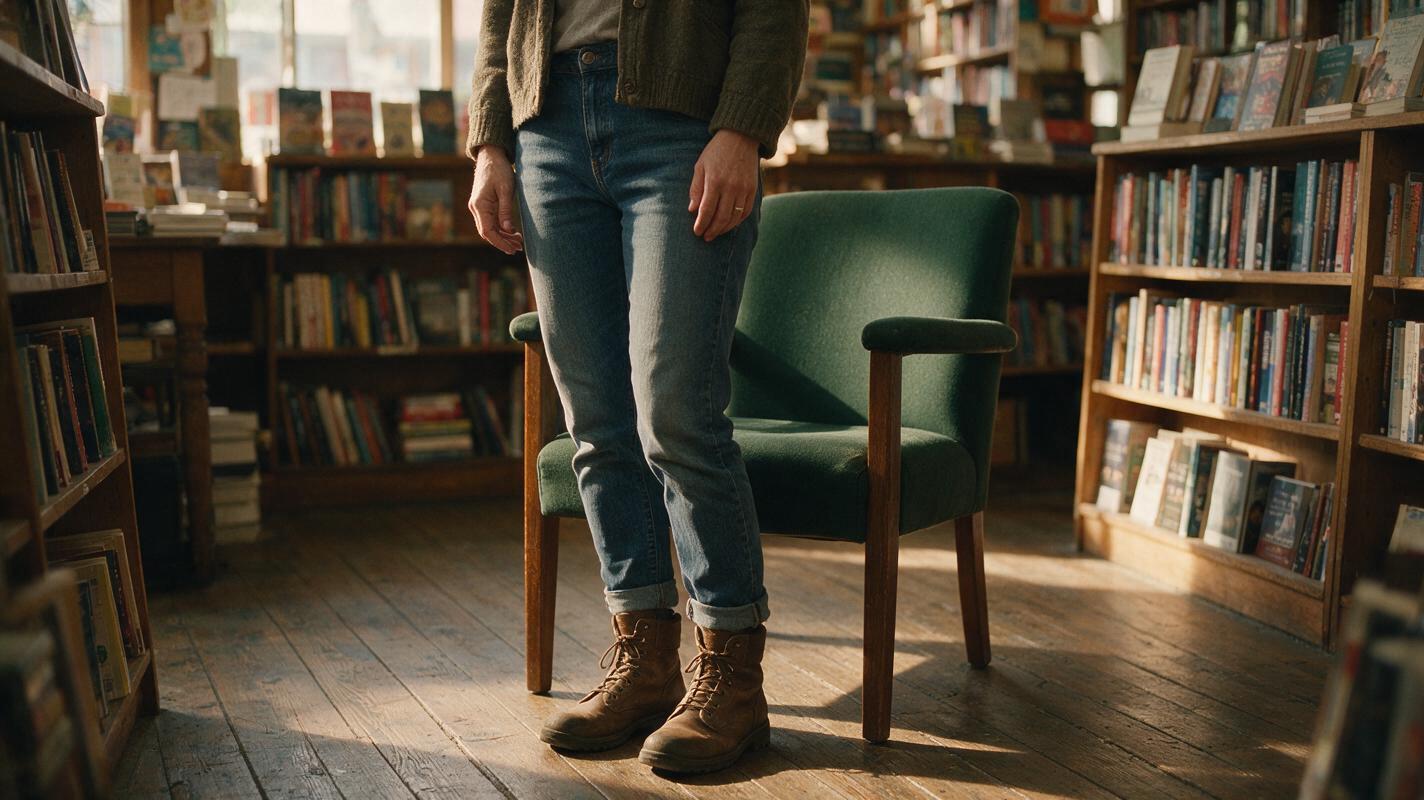
Generate the shot as a still before animating it. Place the character half a step in front of and slightly to the side of the chair. The seat, back, front legs, and near armrest should remain visible. Do not begin with the character overlapping the seat; that ambiguity encourages fused geometry in the first video frames.
A true three-quarter camera angle is safer than a frontal view because it reveals the distance between the hips and the chair. It also shows both the knee bend and the backward movement needed to sit.
Reusable location-frame prompt
Cinematic editorial-realism still inside a lived-in independent bookshop reading corner in late afternoon. The same 32-year-old East Asian woman from the reference sheet stands half a step in front of and slightly left of a dark green upholstered wooden armchair, preparing to sit but still fully upright. She wears the identical fitted rust-red wool jacket, cream crew-neck shirt, charcoal straight-leg trousers, and black leather ankle boots. Her body is angled about 35 degrees away from the chair, both feet clearly planted and separated, arms relaxed, hands fully visible, chair seat unobstructed. Warm window light enters from camera-left; shelves, a small side table, and worn timber flooring create a believable location. Realistic anatomy, rigid chair geometry, natural fabric folds, subtle film grain, restrained color grade. MANDATORY CAMERA: true three-quarter view from the character's front-right, camera at waist height, medium-wide framing from head to floor, 50mm lens appearance, level horizon, locked composition. MANDATORY SPATIAL LAYOUT: visible gap between hips and seat, chair back and all four legs structurally coherent, no body-chair overlap, no objects behind the knees, landscape 16:9. No text, no extra people, no duplicate furniture, no cropped feet.Expected result: a cinematic starting frame with enough negative space for the hips to travel backward and downward while the chair remains readable.
Step 3 — Prompt the movement as five physical phases
Use the still as the input frame and request one action only. Keep the camera locked during the first pass. The most useful prompt order is subject continuity, action phases, physical constraints, camera behavior, and final state.
Base Seedance or Kling prompt
The woman preserves the exact face, chin-length black bob, rust-red jacket, cream shirt, charcoal trousers, black ankle boots, and natural body proportions from the input image. She performs one slow, physically realistic sitting action: first she turns her hips slightly toward the armchair; then she shifts her weight onto the foot nearest the chair; she reaches her right hand back to lightly locate the near armrest; both knees bend while her hips travel backward and downward; her hips make clear contact with the center of the cushion; finally her torso settles upright and her right hand relaxes on the armrest. Both feet remain planted with only a small natural adjustment. The chair stays rigid, stationary, and unchanged. Clothing follows the body naturally without passing through the seat. Calm neutral expression, subtle breathing only after she is seated. Locked camera, level horizon, constant focal length, continuous real-time motion, no cut, no zoom, no camera orbit. End with a stable seated pose held briefly.If the model offers a negative-prompt field, keep it concrete rather than stylistic:
body passing through chair, floating hips, sliding feet, extra limbs, fused fingers, duplicated chair legs, changing chair shape, face change, haircut change, sudden camera move, jump cut, accelerated motion, standing up againExpected result: a continuous shot in which the body approaches the seat through a visible knee bend instead of snapping from standing to seated.
Step 4 — Compare models without changing the shot brief
Run the same source image and core action through two available video models. Do not rewrite the character, location, or choreography between tests. Otherwise, you will not know whether a better result came from the model or from the changed prompt.
| Test | Keep fixed | What to inspect |
|---|---|---|
| Seedance prompt test | Input frame, action order, locked camera, final pose | Contact timing, facial stability, chair structure |
| Kling prompt test | The same input and semantic constraints | Foot planting, knee bend, hand-to-armrest contact |
| Optional alternative | The same visual brief | Whether a different motion interpretation resolves the main defect |
Choose the take with the best full-body mechanics, even if its face is slightly less accurate. A face-only defect can sometimes be repaired later; a thigh passing through the chair usually requires regeneration.
Expected result: two directly comparable takes and a clear reason for selecting one, rather than a collection of unrelated generations.
Step 5 — Diagnose intersections with a before-and-after test
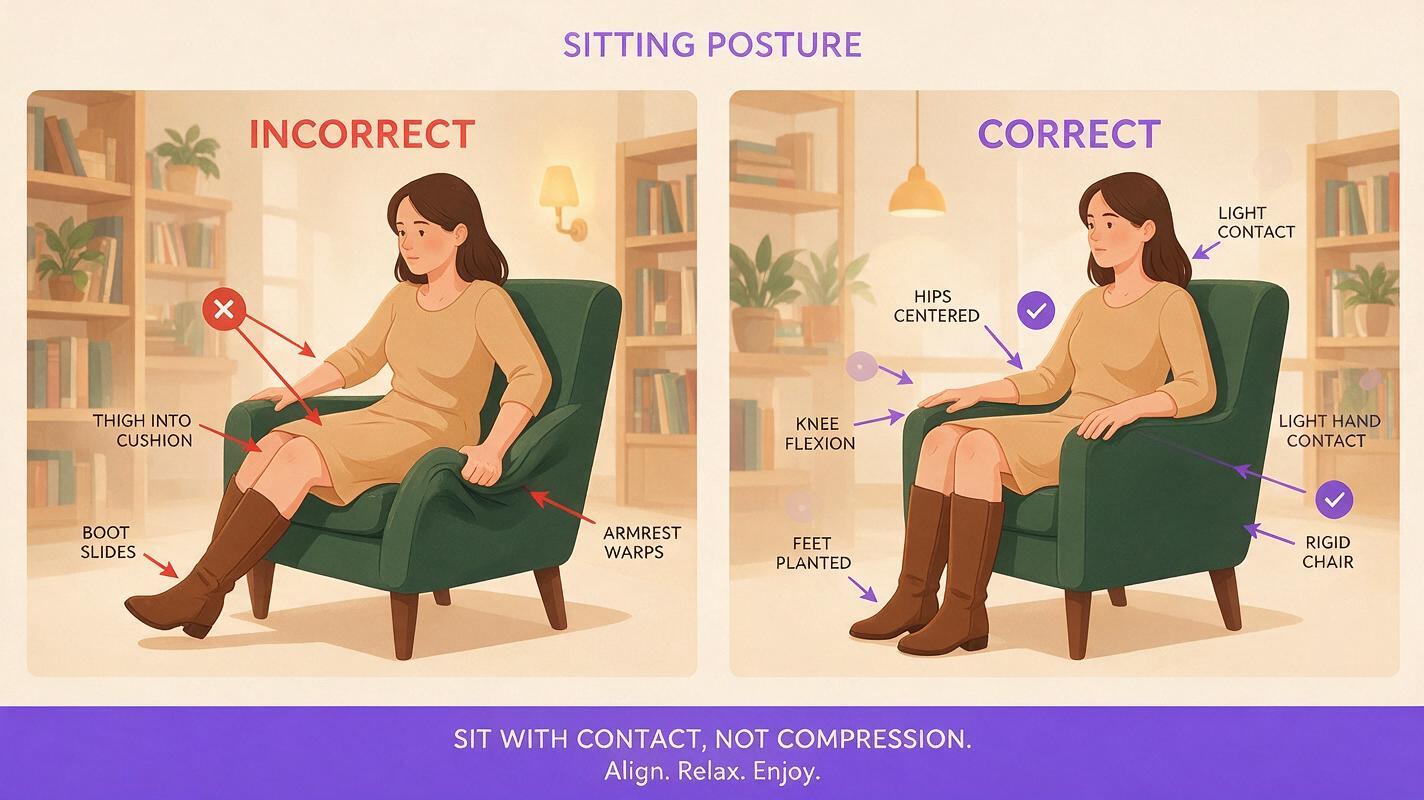
Review the clip frame by frame around first contact. The critical interval begins when the knees start bending and ends when the cushion supports the hips. Look at the silhouette between the thighs and seat, the location of both feet, and the shape of the near armrest.
Reusable failure-comparison prompt
Instructional cinematic before-and-after comparison showing the same photorealistic East Asian woman in a rust-red fitted jacket, cream shirt, charcoal trousers, and black ankle boots sitting in the same dark green upholstered wooden armchair inside a warm independent bookshop. LEFT FRAME labeled only by visual composition, not written text: failed sitting moment with hips unnaturally intersecting the chair back, one thigh passing through the cushion, one foot sliding, and the near armrest slightly warped; anatomy should remain non-graphic and suitable for technical analysis. RIGHT FRAME: corrected sitting moment with hips centered above the cushion, both knees bending naturally, feet planted, right hand lightly contacting the armrest, rigid chair geometry, and clear separation between body and furniture. Match identity, wardrobe, location, lighting, camera height, and color grade across both frames. MANDATORY LAYOUT: landscape 16:9 split-screen with two equal panels and a narrow neutral divider, failed state on left and corrected state on right. MANDATORY CAMERA: identical true three-quarter view from front-right in both panels, waist-height camera, 50mm lens appearance, level horizon, medium-wide head-to-floor framing. No interface, no logos, no extra people, no abstract graphics.Use this diagnostic order:
- Chair integrity: confirm that the back, cushion, arms, and legs do not change shape.
- Hip path: check for a backward-and-downward arc rather than a straight drop.
- Foot support: confirm at least one stable load-bearing foot throughout the descent.
- Hand contact: inspect fingers only after the larger body mechanics pass.
- Identity: compare the face before the turn, during profile, and after settling.
Expected result: one named failure that can be isolated in the next generation instead of a vague attempt to “make everything more realistic.”
Step 6 — Repair one failure at a time
Return to the successful base prompt and alter only the line related to the failed behavior. Long lists of corrections can compete with one another and destabilize parts that already worked.
If the character drops vertically
Emphasize a slow backward hip movement before downward motion; the knees begin bending while the hips remain in front of the cushion, then the hips travel backward to meet the seat.If the feet slide
The left boot remains firmly planted as the load-bearing foot throughout the descent; the right boot makes only one small heel adjustment and then stops.If the chair warps
The armchair is a rigid, stationary physical object with unchanged cushion width, straight wooden arms, four fixed legs, and no deformation during contact.If the hand merges with the armrest
Her right palm hovers just above the wooden armrest, then makes light contact with relaxed, clearly separated fingers; the hand never grips or passes behind the armrest.If hand contact remains unreliable, remove it. A natural sit with both hands near the thighs is better than an elaborate support gesture with fused fingers.
Expected result: a revised take that improves the principal defect while preserving the original composition and identity.
Step 7 — Trim around the successful action
Do not keep unstable frames merely because they were generated. Find the first frame where the character is clearly preparing to move and the last frame where the seated pose remains stable. Remove unwanted idle time, late facial drift, or any attempt by the model to make the character stand again.
For an edit, cut into the shot shortly before the weight shift and leave a brief settled hold at the end. That hold gives you room to transition into a close-up, dialogue shot, or insert.
Expected result: a concise sitting shot with a readable beginning, one complete action, and a stable endpoint suitable for editing.
Keep the same sitting action across projects
Save three reusable assets: the character sheet, the clean standing frame, and the approved motion prompt. When moving to another location, preserve the character description, body-to-chair spacing, camera height, and action phases. Change only the environment, furniture design, and lighting.
Chair dimensions matter. A low lounge chair requires deeper knee flexion and more backward travel than a dining chair. Regenerate the starting frame rather than placing a new chair under an already seated body.
Alternative: use motion transfer for exact body mechanics
Record a performer sitting from the same three-quarter angle when generated motion repeatedly fails or when precise timing is essential. Keep the full body and chair visible, avoid loose clothing, maintain steady framing, and perform slowly. The target character should have similar proportions and stand at a comparable distance from the chair.
Motion transfer is especially useful for a distinctive pause, cautious descent, exhausted collapse, or comedic hesitation. However, the source chair and generated chair must occupy compatible screen space; motion alone cannot correct a contradictory scene layout.
Alternative: replace minor identity drift with face swap
Use face swap only when the body performance, chair contact, lighting, and head orientation are already successful. Supply a reference that matches the visible angle as closely as possible. A frontal portrait is a weak repair source for a deep profile frame.
Do not use face replacement to hide major head deformation, occlusion errors, or a changing hairstyle. Those defects affect more than facial identity and are better handled by regenerating the shot.
Where this workflow falls short
- Complex furniture: rocking chairs, stools, transparent acrylic seats, and ornate armrests introduce additional geometry problems.
- Long garments: coats, skirts, and loose fabric may merge with the cushion during contact.
- Fast performances: sudden drops give the model fewer frames to resolve knee, hip, and chair relationships.
- Heavy occlusion: frontal chairs, tables, or foreground objects can hide the exact contact the model needs to construct.
- Multiple simultaneous actions: sitting while removing a coat, speaking, holding a drink, and moving the camera multiplies failure points.
When the shot remains unstable, split it into two clips: a standing approach that ends near the chair and a shorter descent that begins from that corrected frame.
FAQ
Should I use text to video or image to video for a sitting shot?
Use image to video when wardrobe, identity, chair design, and composition matter. Text to video is useful for quick blocking tests, but it gives the model more visual decisions to invent.
What is the safest camera angle?
A waist-height three-quarter view usually exposes the hip path, knee bend, feet, and chair seat simultaneously. Avoid starting with a tight crop or a perfectly frontal chair.
How long should the action be?
Choose a duration that allows the turn, descent, contact, and final hold to remain distinct. If the available duration compresses the action, simplify the preparation rather than asking for faster movement.
Can the character talk while sitting down?
Yes, but establish the body motion first. Add dialogue or lip movement only after you have a stable sitting take, because facial performance competes for attention during the head turn.
Why does the chair change shape?
The model may reinterpret partially hidden furniture during body contact. Start with an unobstructed seat, describe the chair as rigid and stationary, and select a view that keeps its structural edges visible.
Can face swap fix the entire shot?
No. It can address localized facial identity drift, but it cannot reliably repair incorrect legs, body-chair intersections, altered furniture, or broken motion timing.
Final checklist
- Use a three-view character sheet with visible hips, knees, and footwear.
- Place the character beside the chair with a visible body-to-seat gap.
- Choose a waist-height three-quarter camera angle.
- Prompt turn, weight shift, knee bend, contact, and settling in order.
- Keep the camera locked during the first successful test.
- Compare models with the same input frame and prompt structure.
- Repair only one physical failure per regeneration.
- Use face swap only after the body mechanics pass.
Ready to test the sitting prompt? Create your first ai video free with MagicBoat and compare the available models using the same reference frame.
Keywords
image to video, AI video tutorial, character consistency, Kling prompts, Seedance prompts, motion transfer, prompt engineering