How to Keep Lighting Consistent in an Image-to-Video Sequence
Keep lighting consistent by defining one lighting bible, generating reusable location plates, and animating each shot without asking the video model to redesign the illumination. This reference-first image-to-video workflow shows how to preserve light direction, color temperature, exposure, and practical fixtures across a cinematic sequence.
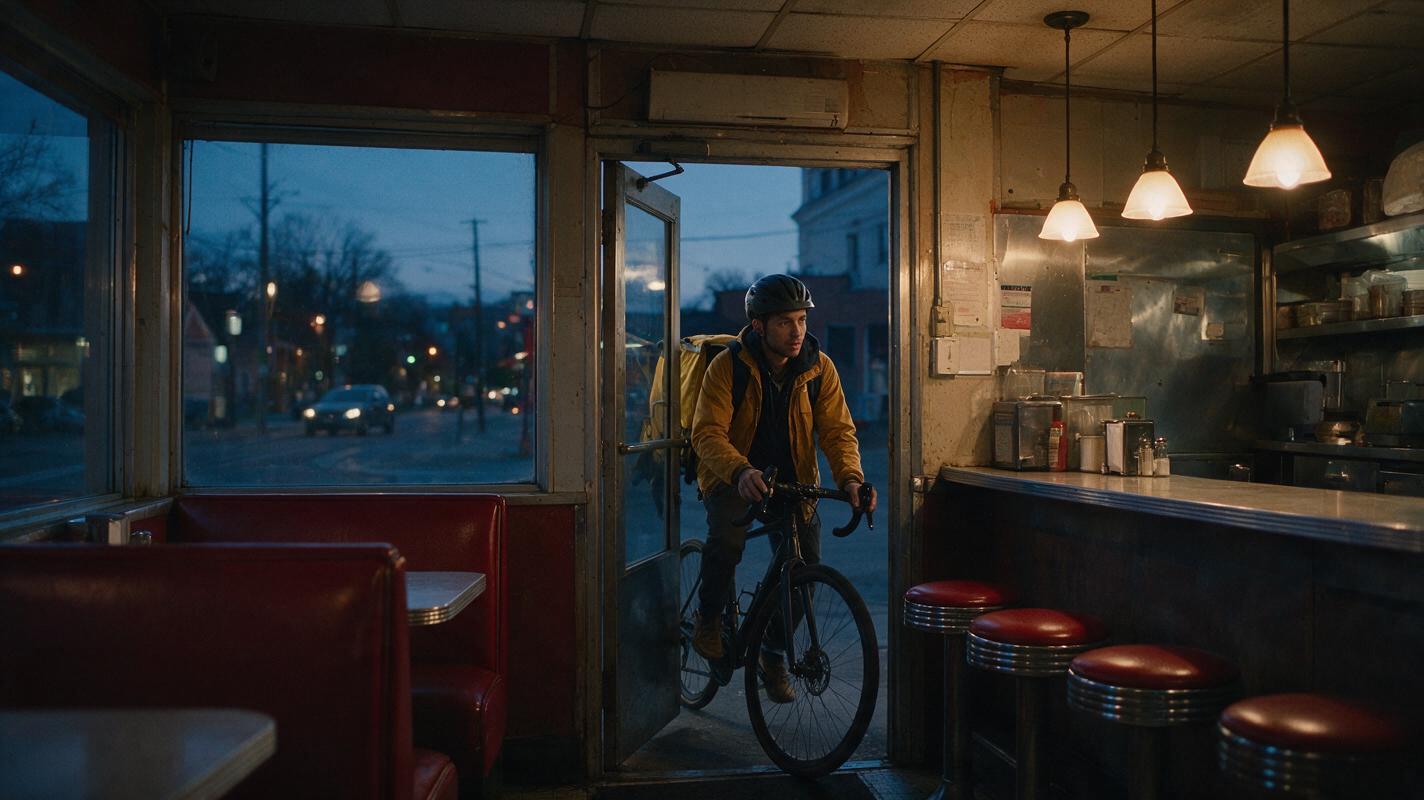
Table of contents
TL;DR: Lock the light before you animate
The fastest way to maintain consistent lighting in an image to video sequence is to establish the location, light direction, color temperature, and exposure in still keyframes first. Then animate those approved frames with motion-only prompts instead of asking every video generation to reinterpret the entire scene.
This tutorial builds a three-shot evening sequence featuring the same bicycle courier entering a neighborhood diner. The method works for short films, music videos, advertisements, and any AI video workflow in which separate clips must look as though they were photographed during the same minute.
Why AI video lighting changes between shots
A prompt such as cinematic diner at dusk describes a mood, but it does not define a reproducible lighting arrangement. One generation may place warm sunlight behind the subject, another may create a cold blue window, and a third may brighten the room as if it were midday.
Typical continuity failures include:
- Reversed key light: the face is illuminated from camera-left in one shot and camera-right in the next.
- Changing time of day: dusk becomes night, golden hour, or overcast daylight.
- Unstable practical lights: ceiling lamps switch on, disappear, multiply, or change color.
- Exposure jumps: a wide shot is dark and atmospheric while its close-up is evenly bright.
- Moving shadows: stationary furniture casts shadows in different directions.
- Skin-tone drift: warm facial highlights become pale, green, or strongly orange.
Video models can create attractive illumination, but aesthetic quality is not the same as continuity. The solution is to treat lighting as production design: specify it once, record it clearly, and protect it in every subsequent prompt.
Three ways to control lighting continuity
- Reference-first generation: create approved still frames with matching illumination, then animate them. This is the main workflow and gives the most control.
- Text-only continuity: repeat a compact lighting block in every text-to-video prompt. This is fast, but interpretation can vary between shots.
- Frame-chain continuity: use a frame from one successful clip as the visual basis for the next shot. This can preserve atmosphere, although composition may become repetitive.
For an edited sequence with several camera angles, use the first method as the foundation and the other two only when they solve a specific problem.
How MagicBoat handles a lighting-consistent workflow
MagicBoat brings image generation and video models into one account, so you can create references and compare motion results without rebuilding the project around a single model. Seedream, Flux, or GPT Image can be used to develop character and location stills, while Seedance and Kling can be tested for animation. A text to video pass is also useful for exploring a lighting concept before committing to reference frames.
| Production task | Useful model category | What must remain fixed |
|---|---|---|
| Character reference | Image generation | Face, hair, clothing, skin tone |
| Location master | Image generation | Windows, fixtures, palette, light direction |
| Shot keyframes | Image generation | Lighting bible and scene geography |
| Shot animation | Seedance or Kling | Exposure, shadows, fixture state, identity |
| Localized repair | Face swap or corrected-frame regeneration | Original motion and scene illumination |
Use model comparison to evaluate motion, not to redesign the shot. Feed Seedance and Kling the same approved keyframe and substantially the same motion instructions.
Step 1 — Build a lighting bible before generating shots
A lighting bible is a short block of reusable constraints. It should describe physical sources rather than relying only on emotional adjectives. For the diner sequence, define the sun, window, practical lamps, fill level, white balance, and protected elements.
LIGHTING BIBLE
Time: blue hour, approximately ten minutes after sunset
Primary source: cool blue ambient light entering through the west-facing front window, screen-left
Practical source: warm tungsten pendant lamps above the counter, all switched on
Face lighting: soft cool edge on the subject's left side, restrained warm fill on the right cheek
Exposure: natural low-light exposure, highlights protected, shadows retain detail
Palette: cool blue exterior, warm amber interior, neutral skin tones
Continuity locks: no sunlight, no extra lamps, no neon, no flashing light, no change in fixture state
Keep this block identical across the sequence. Add shot-specific composition and action beneath it rather than rewriting the illumination from memory.
Expected result: every keyframe begins from the same physical lighting logic, even when the framing changes.
Step 2 — Create a neutral character reference
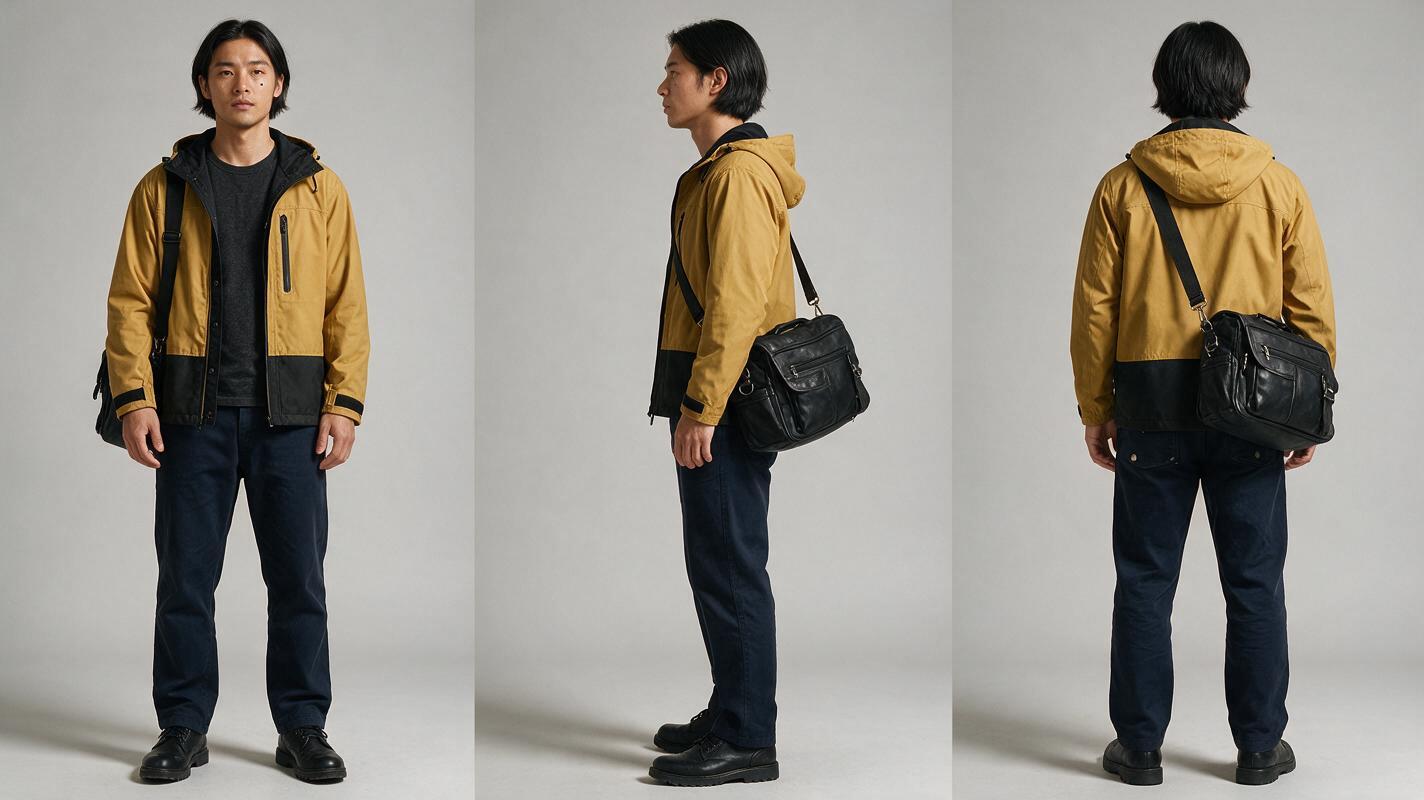
Generate the recurring character under neutral studio illumination before placing her in the diner. A neutral sheet separates identity decisions from scene-lighting decisions and gives you a clean reference if warm practical light later changes her apparent skin tone or hair color.
Reusable visual prompt: Photorealistic three-panel character reference sheet, landscape 16:9, the same 28-year-old East Asian bicycle courier in all three panels, athletic build, oval face, short black bob tucked behind the ears, small mole beneath the left eye, mustard-yellow waterproof jacket over a charcoal shirt, dark navy trousers, black messenger bag, exact clothing and body proportions repeated; left panel front view, center panel true left-side profile, right panel back view; neutral light-gray seamless studio background, soft neutral daylight-balanced illumination, natural skin texture, editorial wardrobe photography, no dramatic shadows, no props except the worn messenger bag, no text, no labels, no duplicated limbs. MANDATORY CAMERA AND LAYOUT: full-body eye-level camera, 70mm portrait perspective, three equal vertical panels with identical subject scale, feet fully visible, generous margin around the figure.
Reject sheets where the jacket changes length, the bag switches shoulders, or the hairstyle differs between panels. Those inconsistencies will become harder to diagnose after atmospheric lighting is introduced.
IDENTITY BLOCK
28-year-old East Asian woman, athletic build, oval face,
short black bob tucked behind both ears,
small mole beneath the left eye,
mustard-yellow waterproof cycling jacket,
charcoal shirt, dark navy trousers,
black messenger bag worn from right shoulder to left hip
Expected result: one clear source of truth for identity, costume color, silhouette, and accessories.
Step 3 — Generate one wide location master
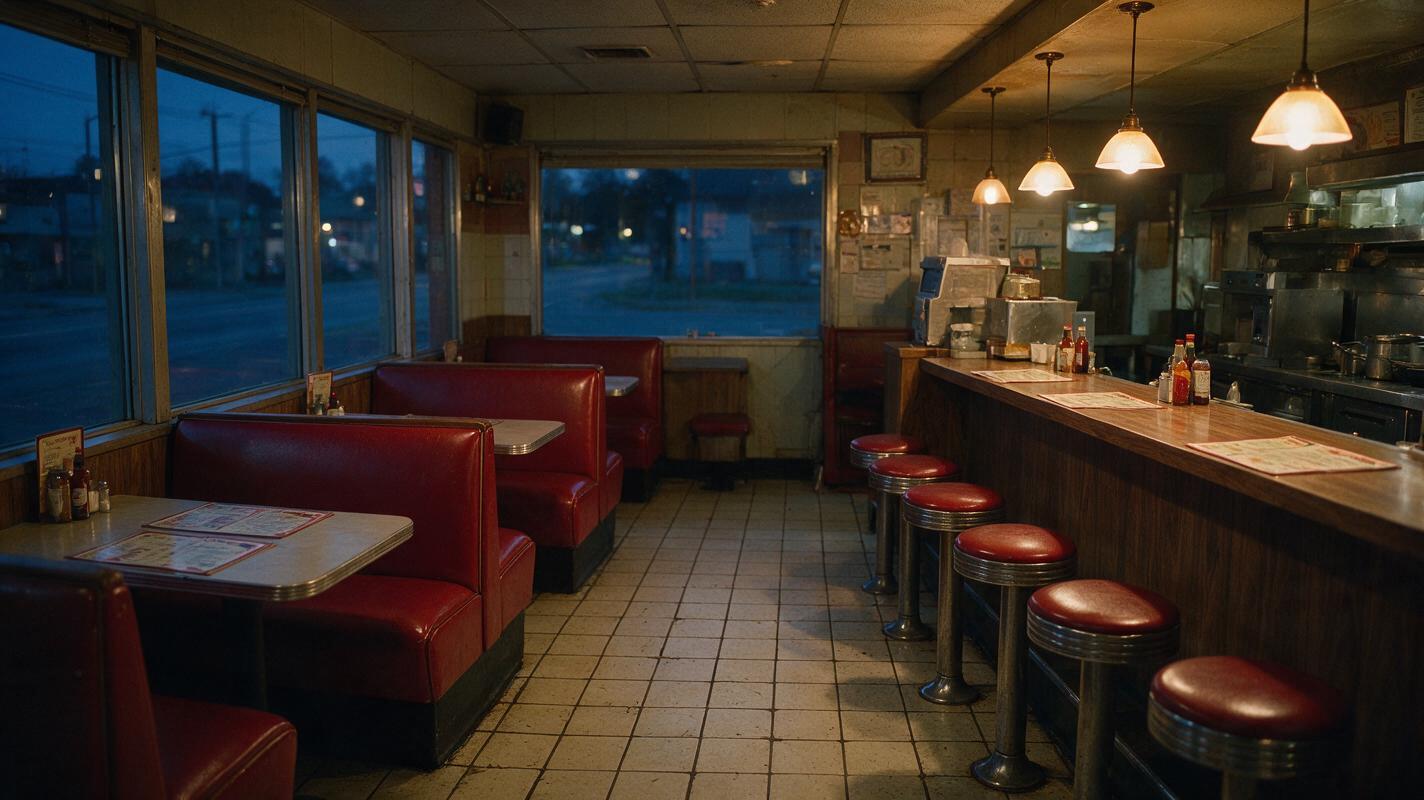
Next, create an empty establishing image of the diner. This frame defines where illumination originates and where permanent objects sit. Keeping it empty makes the windows, lamps, booths, and counter easier to inspect.
Reusable visual prompt: Cinematic editorial-realism photograph of a small lived-in neighborhood diner at blue hour, empty of people, worn cream tile floor, walnut counter on the right, four red vinyl booths on the left, large west-facing front window on screen-left showing a deep blue evening street, three warm tungsten pendant lamps above the counter, all lamps switched on, subtle reflections on chrome stools, believable menus and condiment bottles without readable branding, natural low-light exposure, protected lamp highlights, detailed shadows, realistic film grain, no neon, no daylight beams, no additional fixtures. MANDATORY CAMERA: eye-level 24mm wide shot from the entrance looking diagonally toward the counter, camera locked, front window visible on the left and all three pendant lamps visible on the right, landscape 16:9.
Check four continuity anchors:
- The large window stays on screen-left.
- The three pendant lights remain above the right-side counter.
- The cool window light and warm practical light remain visibly distinct.
- No uncontrolled source, such as a ceiling panel or neon sign, appears.
Expected result: a location master that defines both scene geography and the motivated source of every important highlight.
Step 4 — Derive three shot keyframes from the same lighting plan
Create the sequence as still frames before producing video. Use the character sheet, location master, identity block, and lighting bible as references for each composition.
| Shot | Composition | Lighting requirement |
|---|---|---|
| A | Wide entrance shot | Cool edge from the left window; warm pendants visible on right |
| B | Medium shot at the counter | Warm cheek fill increases slightly, but the cool left edge remains |
| C | Close-up looking toward the menu | Same source direction; protected pendant bokeh behind her |
For each shot, append a concise composition block to the unchanged identity and lighting blocks:
SHOT B COMPOSITION
Medium waist-up shot of the courier standing at the counter.
She faces three-quarters toward screen-right and rests her bag against her hip.
The west-facing window remains off-frame to screen-left but motivates the cool edge light.
One warm pendant is visible above and behind her on screen-right.
Natural 50mm perspective, shallow but believable depth of field.
Preserve the mustard jacket color; do not turn it orange or green.
Do not compensate for a closer camera by inventing brighter light. A close-up can reveal more facial detail while retaining the same source direction and low-light character.
Expected result: three frames that cut together convincingly before any motion is added.
Step 5 — Animate motion without reopening the lighting design
Upload each approved keyframe to Seedance or Kling and prompt only for action, camera behavior, environmental motion, and explicit continuity protection. Avoid decorative phrases such as more cinematic lighting, because they invite the model to relight the image.
Seedance-style motion prompt
The bicycle courier enters at a natural walking pace, slows beside the counter,
and turns her eyes toward the menu. Her messenger bag settles with restrained secondary motion.
The camera makes a slow, stable forward drift.
Preserve the exact blue-hour exposure, cool window light from screen-left,
warm pendant lighting from screen-right, fixture count, shadow direction,
facial identity, clothing colors, and diner layout from the input image.
No flicker, no light switching, no exposure ramp, no new reflections, no added people.
Kling-style motion prompt
Action: courier takes two measured steps, stops at the counter, then glances upward.
Camera: subtle stabilized push-in; no orbit and no reframing.
Environment: only minimal jacket and bag movement; pendant lamps remain stationary.
Continuity: retain input-frame lighting exactly—cool left edge, warm right fill,
low-light exposure, three pendants on, unchanged shadow direction and neutral skin tone.
Avoid: brightness pulsing, moving light, new lamps, neon, duplicated accessories,
face drift, costume recoloring, excessive background motion.
Generate short clips first. Longer actions create more opportunities for exposure breathing, moving shadows, and identity drift. Compare results at the beginning, midpoint, and final frame rather than judging only the opening image.
Expected result: motion is added while the still frame remains the visual authority for illumination.
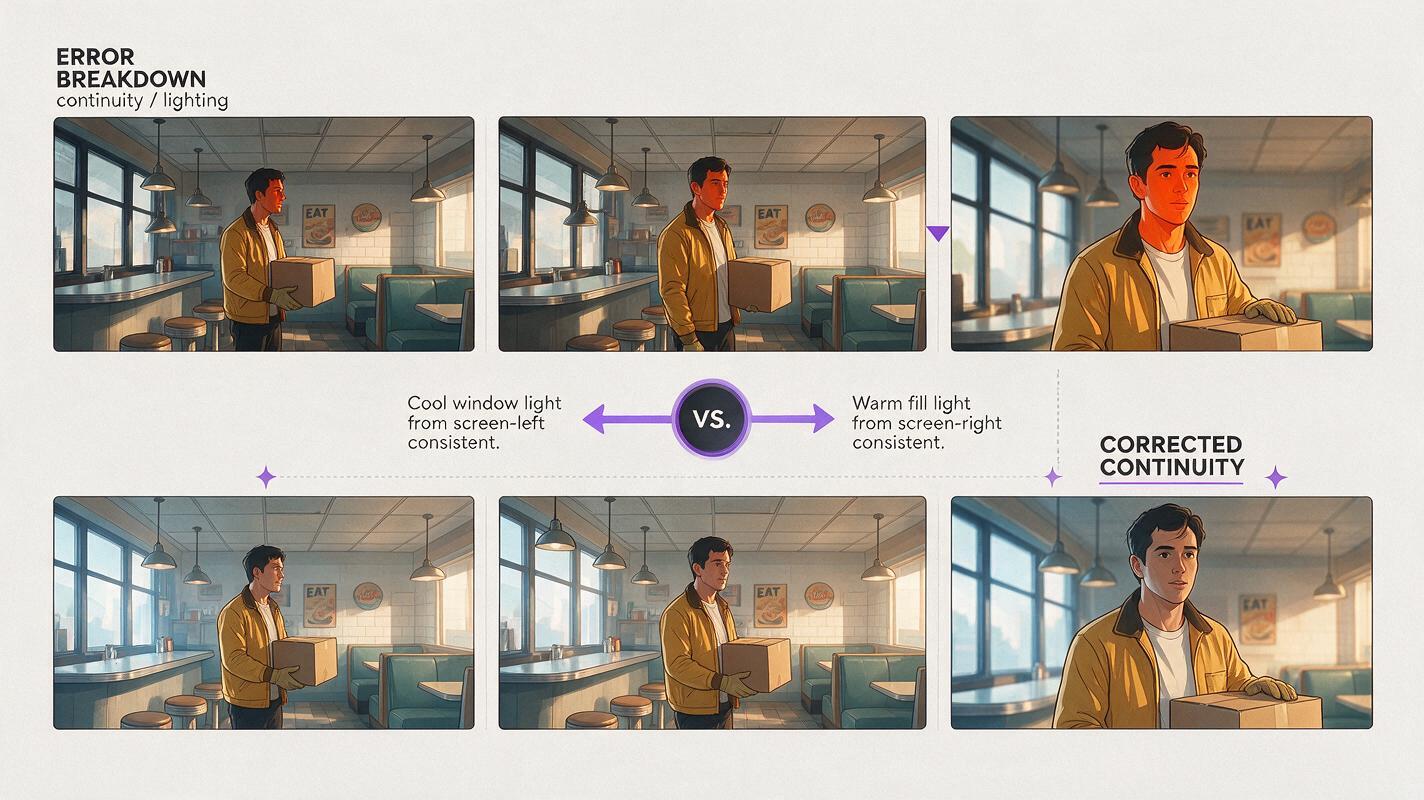
Step 6 — Diagnose lighting drift with a contact sheet
Extract the first, middle, and last frame from every clip and place them in a grid. Compare stable objects before evaluating the character: the white tiles, red booths, chrome stools, window, and pendant shades reveal color or exposure changes quickly.
Reusable visual prompt: Editorial diagnostic comparison board for an AI-generated diner sequence, landscape 16:9, two horizontal rows of three cinematic frames each; top row labeled conceptually as inconsistent results showing reversed face light, an extra pendant lamp, orange skin, and a brighter final exposure; bottom row showing corrected continuity with cool screen-left window light, warm screen-right practical fill, exactly three pendants, stable neutral skin, and matching shadow direction; the same mustard-jacket bicycle courier and the same diner composition appear across all frames. MANDATORY LAYOUT: clean six-frame contact sheet with equal gutters, top row visibly inconsistent and bottom row visibly corrected, no software interface, no logos, no decorative technology graphics, camera angles limited to wide, medium, and close-up editorial film frames.
Use this repair order:
- Fixture state: remove extra lights or regenerate if a lamp disappears.
- Light direction: reject shots where the key or edge reverses.
- Exposure: correct clips that visibly brighten or darken over time.
- Color temperature: check whites, skin, and the mustard jacket.
- Identity: repair facial drift only after the scene lighting is acceptable.
Change one variable per retry. If the clip pulses, add constant exposure throughout. If the model creates another fixture, emphasize the exact count. If the entire close-up is too warm, restate that the cool window edge remains visible on the subject's left side.
Expected result: you can identify whether a failed clip needs a small prompt correction, a new keyframe, or a complete regeneration.
Step 7 — Edit for perceived continuity
Even well-matched clips may differ slightly. Cut on body motion, an eyeline change, or the courier placing her bag down; viewers pay less attention to minor background variation during a motivated action.
- Place the wide shot first so the audience understands the window and pendant locations.
- Keep adjacent clips close in overall brightness.
- Avoid cutting from the brightest frame of one clip to the darkest frame of another.
- Trim unstable opening or ending frames rather than preserving the full generation.
- Use modest color correction only after selecting clips with matching source direction.
Color correction can align warmth and exposure, but it cannot convincingly repair shadows cast from opposite directions.
Expected result: the edited sequence feels like one continuous blue-hour encounter rather than three unrelated generations.
Keep the same lighting across future projects
Save a compact continuity package containing the character sheet, empty location master, lighting bible, identity block, approved shot frames, and one representative frame from the final grade. Name sources physically—west-facing window on screen-left—instead of using only mood terms such as moody or dramatic.
If you return to the location later in the story, decide whether time has advanced. A deliberate night version should receive a new lighting bible; it should not emerge accidentally because a model interpreted later differently.
Alternative: use frame chaining for a continuous move
For a sequence that should feel almost unbroken, extract a clean final frame from the first clip and use it to begin the next generation. Frame chaining can preserve exposure and palette because the next clip inherits a recent visual state.
However, do not chain indefinitely. Small errors accumulate: the diner may gain stools, the jacket may shift color, and the pendant spacing may change. Return to the approved master references after one or two links.
Alternative: repair identity with face swap
If the lighting, performance, and camera movement are successful but the face changes, use face swap as a localized identity repair. Choose a source portrait with a similar angle and expression, then inspect hairline boundaries, cheek shadows, and skin color frame by frame.
Do not use face replacement to rescue fundamentally incompatible illumination. A frontal portrait lit evenly from both sides will not naturally match a profile receiving cool edge light and warm side fill. For severe lighting mismatch, regenerate from a corrected keyframe.
Where this workflow falls short
- Complex moving lights: headlights, strobes, fireplaces, and rotating signs require temporal lighting behavior that a static reference cannot fully define.
- Reflective surfaces: mirrors, polished metal, and wet floors can introduce plausible but inconsistent highlights.
- Extreme camera rotations: an orbit reveals new walls and changes the apparent angle of every source.
- Long clips: exposure and fixture geometry have more time to drift.
- Mixed model interpretation: Seedance and Kling may animate the same frame differently, so choose outputs by visual continuity rather than expecting identical behavior.
When the story depends on a light switching on, a vehicle passing, or a character carrying a lamp, break the event into clear states: before the change, during the transition, and after the change. Approve a reference frame for each state.
FAQ
Can I keep lighting consistent with text-to-video prompts alone?
Yes, for simple shots. Repeat the same physical source description, fixture count, direction, and exposure constraints. Reference-first generation is more reliable when several angles must match.
Should every shot use exactly the same prompt?
Reuse the lighting and identity blocks exactly, but change the composition and action blocks. Copying one complete prompt can accidentally preserve the wrong framing or camera behavior.
Which matters more: color temperature or light direction?
Light direction usually matters more. Small warmth differences can often be graded, while reversed facial modeling and incompatible cast shadows are difficult to repair.
Why does a close-up look brighter than the wide shot?
The model may prioritize facial clarity and introduce flattering fill. State that the low-light exposure and source ratio must remain unchanged while facial detail stays visible naturally.
Can motion transfer preserve the lighting from my reference image?
It can help preserve the destination character and scene, but transferred body motion may alter clothing folds, self-shadowing, and facial angles. Use a restrained performance source captured from a compatible camera direction.
When should I regenerate instead of color-correcting?
Regenerate when a source changes direction, a fixture appears or disappears, shadows move unnaturally, or the subject is relit. Grade only modest differences in exposure, saturation, and warmth.
Final checklist
- Create a physical lighting bible before writing shot prompts.
- Build a neutral character sheet and an empty location master.
- Approve all keyframes as a sequence before animating any of them.
- Keep lighting instructions unchanged across Seedance and Kling tests.
- Ask the video model for motion, not a new lighting design.
- Compare first, middle, and last frames in a contact sheet.
- Regenerate reversed light and moving shadows; grade only minor differences.
- Archive approved references for later scenes.
Ready to test the workflow? Create your first ai video free on MagicBoat and compare the same lighting-controlled keyframe across multiple models.
Keywords
image to video, consistent lighting, ai video workflow, prompt engineering, seedance prompts, kling prompts, character consistency