How to Keep a Hero Prop Consistent in Image-to-Video Shots
Keep a hero prop consistent by creating a locked visual reference, generating each shot as a still first, and animating those approved frames with restrained image-to-video prompts. This workflow prevents logos, proportions, materials, and small identifying details from changing between shots.
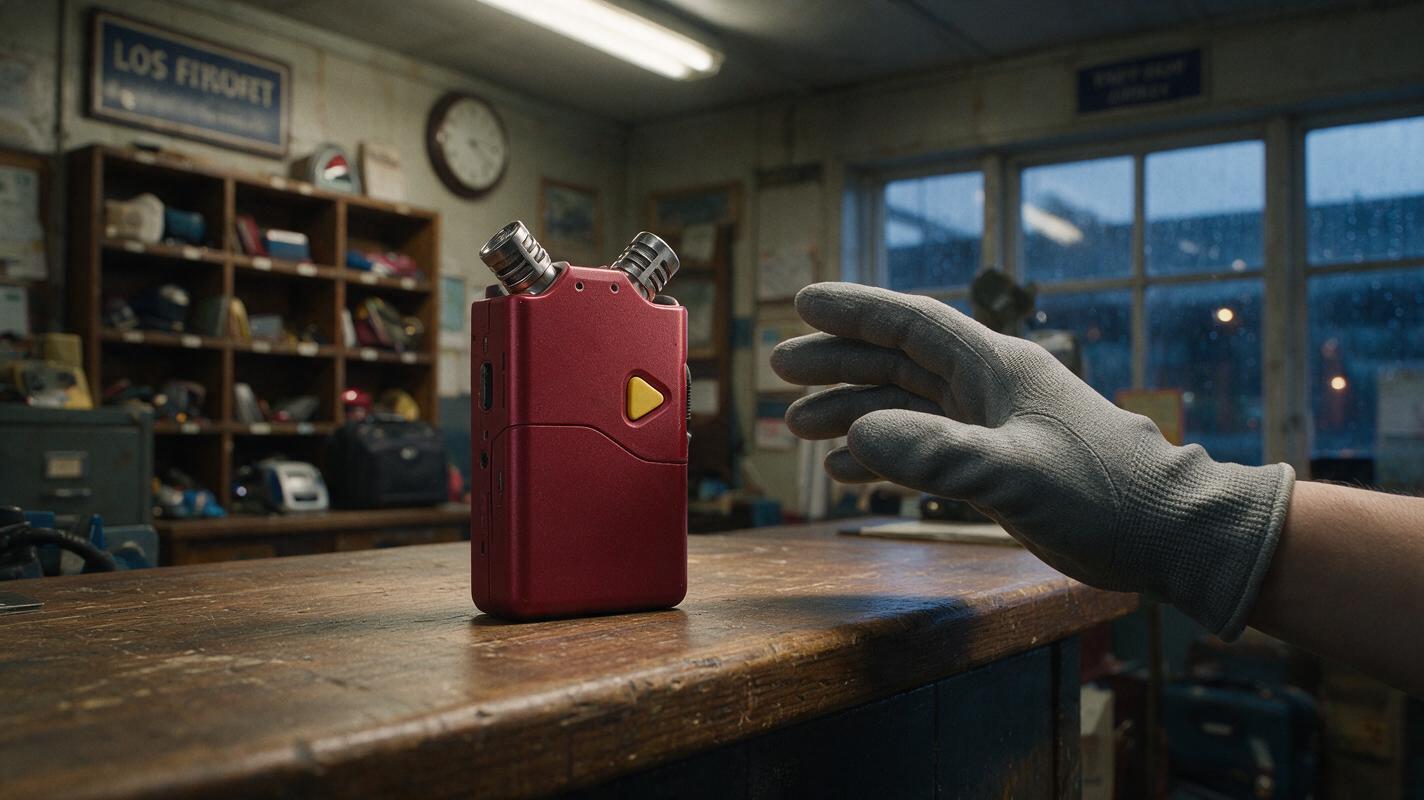
Table of contents
TL;DR: Lock the prop before you animate it
The fastest way to preserve a hero prop across an AI sequence is to treat it like a cast member: define its identity, create a reference sheet, generate approved shot-specific stills, and only then use image to video to add motion. Do not ask a video model to redesign, reposition, and animate the object in one pass.
This tutorial uses a distinctive red field recorder as the example, but the same workflow applies to a suitcase, pendant, fictional gadget, musical instrument, vehicle, package, or other story-critical object.
Core rule: the prop may change position and lighting, but its identity-defining geometry must remain unchanged.
Why hero props mutate between AI video shots
Video models understand familiar object categories better than exact object identities. A prompt such as “a red field recorder” may preserve the category while changing the number of buttons, moving the display, widening the body, replacing the microphone grille, or inventing a brand mark.
The problem becomes more visible across an edited sequence. One shot may show a narrow recorder with two black microphones; the next produces a square device with three silver capsules. Reflections can become physical seams, labels can turn into random lettering, and a strap may appear or disappear whenever the camera angle changes.
Common symptoms include:
- Geometry drift: the object becomes wider, thinner, taller, or asymmetrical.
- Feature migration: buttons, lenses, handles, ports, or decorative marks move between sides.
- Material drift: matte plastic becomes polished metal or glossy paint.
- Scale drift: the prop changes size relative to a hand, table, or vehicle interior.
- Duplication: the model adds a second copy during a pickup or reveal.
- Text corruption: labels and display characters mutate during motion.
Longer prose rarely solves these failures. The model needs a clear visual anchor, stable shot design, and limited motion responsibility.
Three ways to maintain object consistency
- Reference-first animation: create one canonical prop sheet, then derive every shot from it. This is the most reliable approach for edited narrative sequences.
- First-frame continuity: use the final frame of one clip as the visual foundation for the next shot when the camera transition allows it.
- Localized repair: preserve a successful clip and replace only a damaged frame range or small region instead of regenerating the whole performance.
The tutorial focuses on the first method and uses the other two as escalation options.
How MagicBoat handles a prop-consistency workflow
MagicBoat provides one account for trying multiple image and video models, which is useful because prop continuity has two separate tasks. Image models such as Seedream, Flux, or GPT Image can establish the approved object and shot frames, while available video options such as Seedance, Kling, and Veo can test different motion interpretations.
| Workflow stage | Model role | Main objective |
|---|---|---|
| Prop design | Seedream, Flux, or GPT Image | Lock shape, materials, colors, and identifying details |
| Shot keyframes | Image generation or image editing | Place the same object in each scene before motion |
| Animation | Seedance, Kling, or Veo | Add camera or object motion without redesigning the prop |
| Exploration | text to video | Test compositions before committing to continuity-critical shots |
| Repair | Corrected still plus image-to-video regeneration | Replace only the damaged segment |
Model availability can evolve, so choose from the options currently presented on MagicBoat. The transferable principle is to separate still-image approval from motion generation.
Step 1 — Build a prop identity card
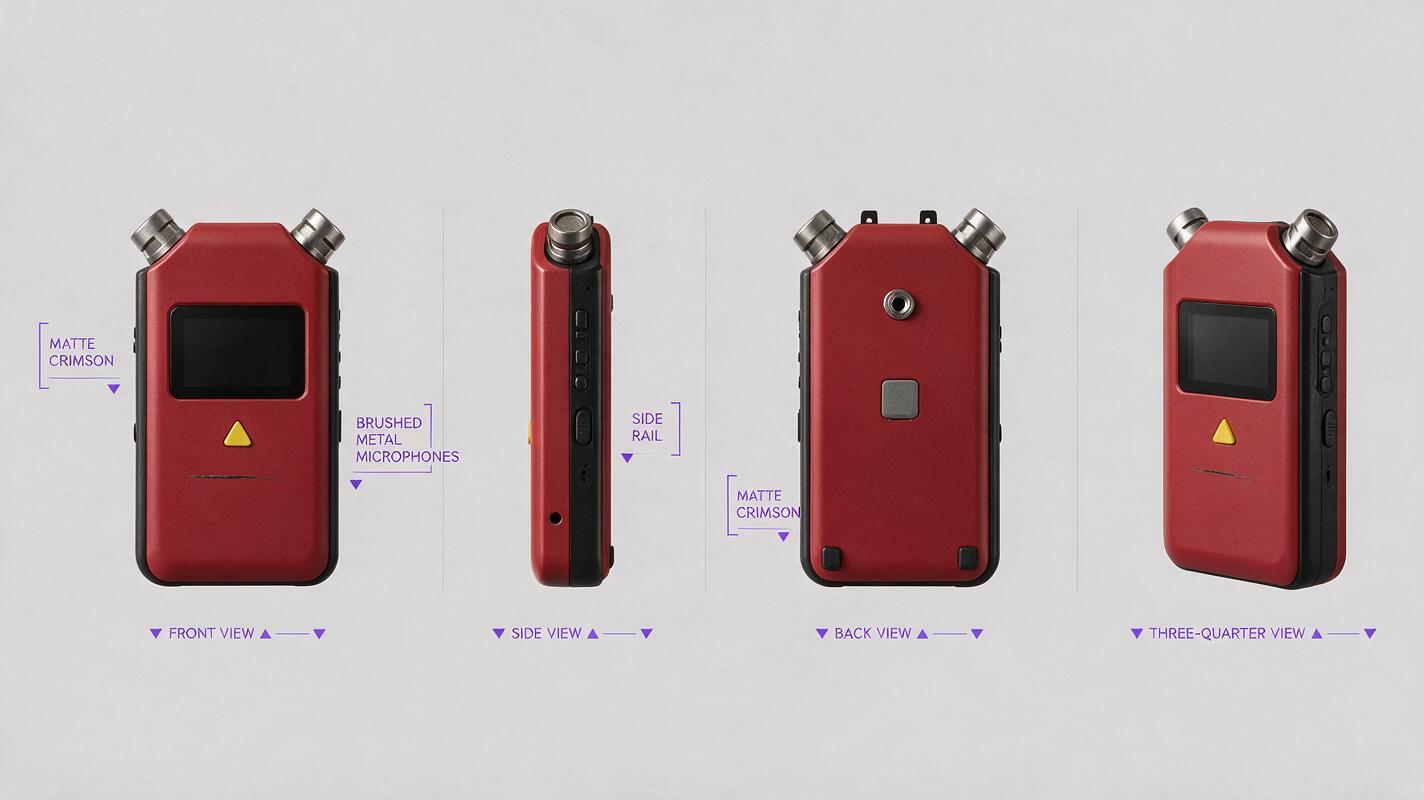
Create a clean reference board showing the object from front, side, back, and three-quarter views. Keep the background neutral and the lighting even. Avoid hands, dramatic shadows, shallow depth of field, or environmental clutter at this stage.
Define three types of attributes:
- Structural anchors: rectangular body, rounded corners, two microphone capsules, centered display.
- Material anchors: matte crimson shell, black rubber side rails, brushed-metal microphone grille.
- Unique anchors: one triangular yellow button and a narrow scratch below the display.
Limit unique anchors to one or two details. An object covered in tiny symbols and controls creates more opportunities for inconsistency.
Photorealistic industrial reference sheet of one fictional handheld field recorder, compact vertical rectangular body with softly rounded corners, matte crimson-red shell, black rubber rails on both sides, exactly two short brushed-metal microphone capsules at the top, one centered dark display, one triangular yellow button directly below the display, one narrow horizontal scratch beneath the button, no brand, no readable text, no extra controls. MANDATORY LAYOUT: four clearly separated views of the exact same object—front, left side, back, and true three-quarter front-right view—arranged in one landscape 16:9 reference board. MANDATORY CAMERA: eye-level product camera, orthographic appearance, minimal perspective distortion, equal scale in every panel. Neutral light-gray seamless background, soft even studio illumination, sharp detail across the entire object, physically realistic materials.Expected result: every panel should look like the same manufactured unit rather than four variations. Regenerate the sheet if button placement, microphone count, color, or body proportions change between views.
Step 2 — Write a compact prop lock
Convert the identity card into a reusable text block. This “prop lock” should remain identical in every still-image and video prompt. Do not replace fixed wording with synonyms between shots.
PROP LOCK: the same compact field recorder from the reference image; matte crimson rectangular body with rounded corners; black rubber side rails; exactly two brushed-metal microphone capsules; centered dark display; one triangular yellow button; one narrow scratch below the button; unchanged dimensions, control layout, materials, and color.Add a preservation line after the action:
Preserve the recorder's exact silhouette, microphone count, button position, scratch placement, and scale. Do not add labels, controls, straps, duplicates, or detachable parts.Expected result: the prop description becomes a stable production asset. Only the scene, camera, placement, and action should change from shot to shot.
Step 3 — Create one reusable location plate
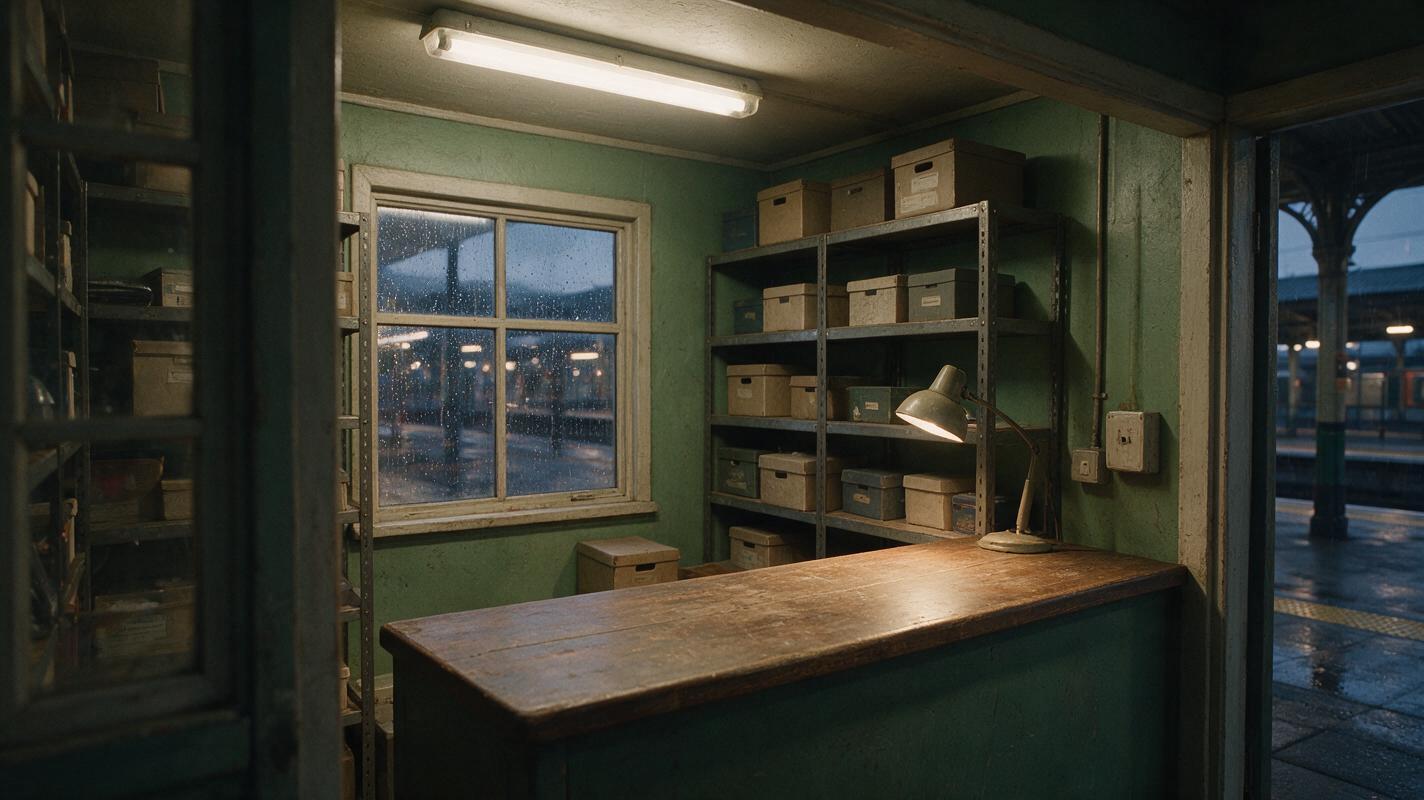
Build the environment without the hero prop first. For this sequence, use a believable railway lost-property office with a counter, shelving, fluorescent practical lights, and a rain-streaked window. An empty location plate gives you a stable source for multiple compositions.
Cinematic editorial photograph of a small lived-in railway lost-property office at dusk, worn wooden service counter in the foreground, labeled cardboard storage boxes without readable text on metal shelves, old desk lamp, rain-streaked window looking toward a softly blurred station platform, muted green walls, practical fluorescent ceiling light mixed with cool window light, no people, no handheld recorder, no logos. MANDATORY CAMERA: true three-quarter room view from near the front-right corner, camera height 1.5 meters, 35mm lens perspective, level horizon. MANDATORY LAYOUT: landscape 16:9 with clear empty counter space in the lower center for later prop placement. Natural textures, restrained cinematic color, realistic clutter, editorial film still.Expected result: a location that can support wide, medium, and insert shots without changing its architecture or color palette.
Step 4 — Generate every shot as a still first
Plan a short sequence with simple continuity:
- A wide shot shows the recorder on the service counter.
- A medium shot shows a gloved hand approaching it.
- An insert shows the thumb pressing the yellow button.
- A close-up shows the dark display illuminating.
Generate and approve each shot as a still image. Attach the prop sheet as the visual reference where the selected model supports reference input. Use the location plate as the scene reference or describe its fixed architecture consistently.
For the wide shot, use:
Use the supplied prop reference and location reference. The same crimson field recorder rests upright on the worn wooden counter in the railway lost-property office at dusk. PROP LOCK: the same compact field recorder from the reference image; matte crimson rectangular body with rounded corners; black rubber side rails; exactly two brushed-metal microphone capsules; centered dark display; one triangular yellow button; one narrow scratch below the button; unchanged dimensions, control layout, materials, and color. MANDATORY CAMERA: locked medium-wide shot from the room's front-right side, eye level, 50mm lens appearance, recorder shown in true three-quarter front-right view. Keep the recorder fully visible and approximately one-sixth of frame height. Preserve the office shelves, green walls, rain-streaked window, and mixed practical lighting. No person, no duplicate recorder, no text or logo.For the hand shot, preserve scale by naming the relationship explicitly:
A dark gray gloved hand enters from frame left and stops five centimeters from the recorder. The hand does not touch or cover the display, yellow button, microphones, or scratch. The recorder remains stationary and unchanged.Expected result: a set of stills that already cuts together. If the prop is wrong in a still, fix it before animation; motion will usually amplify the inconsistency.
Step 5 — Animate one dominant action per shot
Send each approved frame into a video model. Keep camera motion, object motion, hand motion, and environmental motion separate whenever possible. A shot asking for all four at once gives the model too many ways to reinterpret the prop.
Use a restrained Seedance-style motion prompt for the wide shot:
Locked camera. The recorder remains completely stationary and preserves its exact shape, dimensions, materials, button layout, two microphones, and surface scratch. Only subtle rain moves on the distant window and the desk lamp produces a barely perceptible natural exposure fluctuation. No camera movement, no object rotation, no new objects, no duplication, no readable text.For a Kling-style interaction shot, describe the motion in phases:
Locked close shot. A dark gray gloved thumb approaches slowly, makes one clean contact with the triangular yellow button, depresses it once, then holds. The recorder does not slide, bend, rotate, resize, open, or change design. Preserve exactly two microphone capsules and all reference-image geometry. The display remains dark until after button contact, then emits a soft amber glow. No second hand and no duplicate device.Expected result: the animation should look like the approved still becoming alive, not like a fresh interpretation of the scene.
Step 6 — Compare identity at fixed checkpoints
Do not judge continuity only while the clip is playing. Inspect the first frame, the frame immediately before contact, the contact frame, and the final frame. Compare each checkpoint against the identity card.
| Checkpoint | What to inspect | Reject when |
|---|---|---|
| First frame | Silhouette, color, scale | The generated clip already differs from the input |
| Pre-contact | Button and hand separation | The hand merges with the shell |
| Contact | Finger anatomy and button position | The control moves or a new control appears |
| Final frame | Microphones, display, scratch | Features disappear, multiply, or migrate |
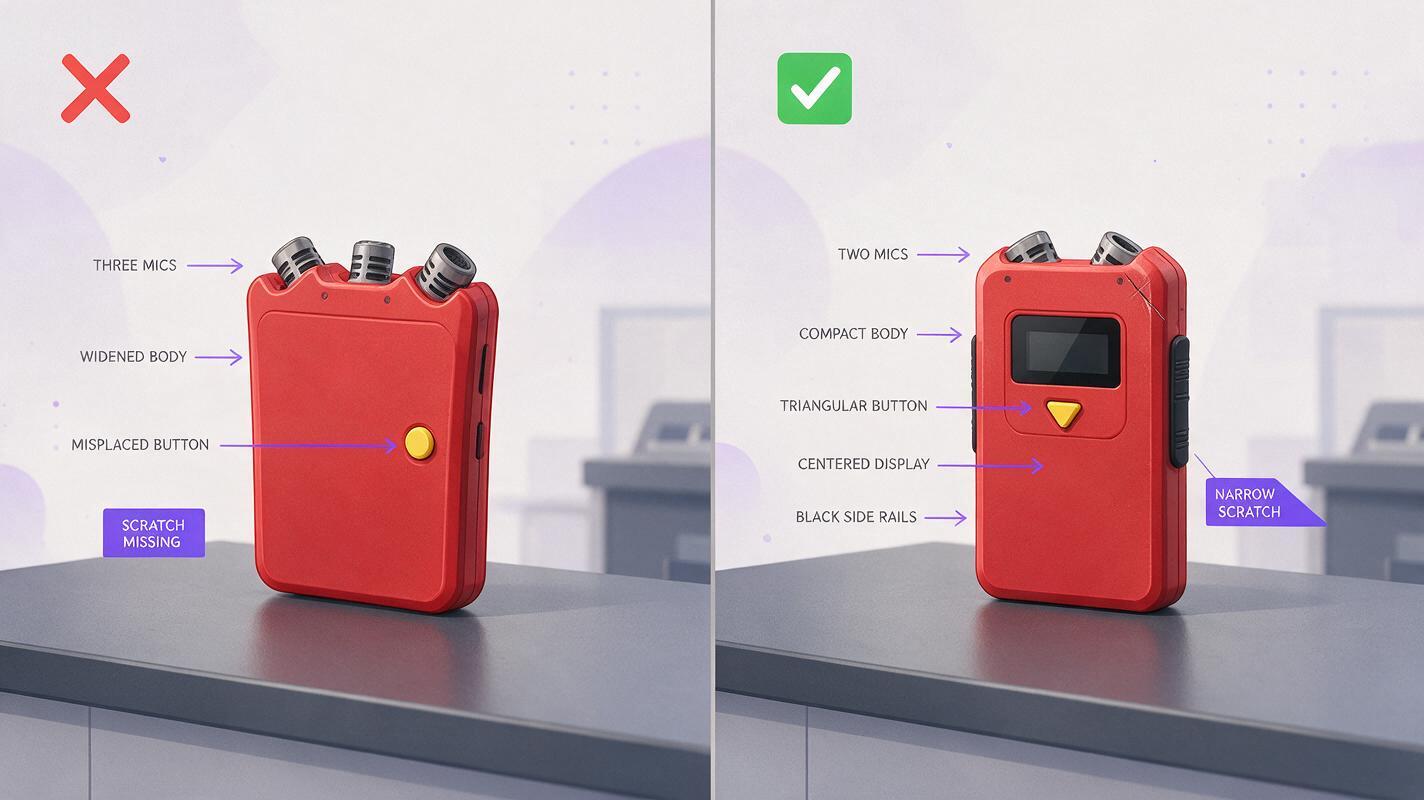
Create a side-by-side failure reference if collaborators are reviewing the sequence:
Editorial continuity comparison board showing two frames from the same fictional film scene. LEFT PANEL labeled only with a simple red X symbol: a mutated crimson field recorder with three microphone capsules, a widened body, misplaced round yellow button, and missing scratch. RIGHT PANEL labeled only with a simple green check symbol: the correct compact crimson recorder with rounded rectangular body, black side rails, exactly two microphone capsules, centered dark display, triangular yellow button, and narrow scratch below it. Both devices sit at identical scale on the same worn railway-office counter under matching light. MANDATORY LAYOUT: clean side-by-side 16:9 comparison with a thin neutral divider and equal panel widths. MANDATORY CAMERA: identical locked true three-quarter front-right product view in both panels, 50mm perspective, eye level. Photorealistic film-frame appearance, no logos, no readable words.Expected result: reviewers can identify structural drift instead of approving a clip because its movement merely feels cinematic.
Step 7 — Repair only the damaged segment
If the shot works until the hand touches the device, preserve the successful section. Extract or recreate the last correct frame, repair the object in that still using the identity sheet, and animate forward from the corrected image.
Use this repair instruction:
Replace only the malformed recorder with the exact recorder from the supplied reference. Preserve the hand pose, finger contact point, counter, shadows, camera position, crop, depth of field, and background unchanged. Restore exactly two microphones, the triangular yellow button, centered display, black side rails, and narrow scratch. Do not alter the glove or add text.Then regenerate a short continuation with minimal movement:
Locked camera. Continue from the supplied corrected frame. The thumb remains in contact while the yellow button depresses slightly and the display gains a soft amber glow. Preserve all recorder geometry without redesign, rotation, resizing, duplication, or added controls.Expected result: a replacement segment that retains the original timing and composition while correcting the identity failure.
Keep the same prop across future projects
Store the reference sheet, prop lock, approved close-up, and one neutral three-quarter image together. When the object returns in another location, begin from those assets rather than reconstructing it from memory.
A practical asset pack contains:
- The canonical multi-view reference sheet.
- The exact reusable prop-lock paragraph.
- One clean front-right three-quarter image.
- One scale reference beside a familiar hand or tabletop object.
- A short list of forbidden changes.
- Approved color and lighting examples.
If the prop must age, break, open, or transform later, create a separate identity card for each story state. Label them conceptually as intact, damaged, and repaired rather than asking one prompt to improvise the change.
Alternative: use first-frame continuity for connected shots
When one shot directly follows another, take the last clean frame of the outgoing clip and use it to construct the incoming composition. This is especially useful for a push-in followed by an insert or for a hand carrying the prop from one side of a room to another.
However, do not force first-frame continuity across a radical angle change. A clean shot-specific still derived from the identity sheet is safer than stretching one frame into an angle it does not contain.
Alternative: use motion transfer when performance matters most
For complex carrying, opening, or operating motions, a recorded source performance can provide clearer timing than prose alone. Keep the prop unobstructed in the source clip, avoid fast hand crossings, and use a fictional prop design with simple contact points.
Motion guidance does not guarantee object identity. Continue using the reference sheet and inspect the contact frames, especially when fingers pass over buttons, handles, or hinges.
Alternative: use face swap only for nearby character drift
If a person handling the prop develops facial inconsistency while the object remains correct, face swap can be a targeted character repair. It is not an object-replacement tool and should not be used to fix altered controls, logos, materials, or silhouettes.
Where this workflow falls short
- Tiny lettering remains fragile. Treat critical text as a separate post-production element rather than expecting it to survive motion.
- Heavy occlusion hides identity anchors. A hand covering most of the prop leaves the model fewer visible constraints.
- Reflective objects can appear to reshape. Moving highlights may be interpreted as seams, openings, or new components.
- Extreme rotations expose unseen geometry. Include every required angle in the reference sheet before requesting a full turn.
- Mechanical transformations need state references. A closed and open device should have separate approved designs.
- Long shots accumulate errors. Shorter clips with editorial cuts are generally easier to validate and repair.
FAQ
Can I keep a prop consistent using text prompts alone?
You can maintain broad characteristics, but exact geometry is less dependable without a visual reference. Text is best used to reinforce a supplied identity sheet, not replace it.
Should the prop reference include a hand for scale?
Keep the canonical sheet hand-free. Add a separate scale-reference image if size is important, because hands can distract the model from the object’s clean silhouette.
How many views should a prop sheet contain?
Use front, side, back, and three-quarter views as a practical baseline. Add top, bottom, open, or damaged views only when those surfaces or states appear in the sequence.
Should I animate the wide shot or close-up first?
Test the close-up first. It exposes geometry and interaction failures quickly. Once the model can preserve the object at close range, wider shots are easier to approve.
What should I do if one model keeps changing the prop?
Keep the same input frame and core prompt, then test another available video model. Compare structure rather than overall visual style, and change only one prompt variable at a time.
Can this method preserve a real commercial product?
The reference-first method can help with shape and material continuity, but small labels and exact typography may still distort. Review usage rights and add critical packaging text during conventional post-production when accuracy is required.
Final checklist
- Create one neutral multi-view prop identity card.
- Choose a few visible structural and material anchors.
- Reuse the exact same prop-lock wording in every prompt.
- Generate and approve each shot as a still before animation.
- Request one dominant motion per clip.
- Inspect first, contact, and final frames at full size.
- Repair from the last correct frame instead of restarting.
- Create separate references for intact, damaged, or transformed states.
Keywords
image to video, object consistency, AI video tutorial, prompt engineering, Seedance prompts, Kling prompts, AI video workflow
Ready to test the workflow? Create your first ai video free with the prop-sheet prompt above.