How to Create Image-to-Video Dialogue With Correct Eyelines
Build believable shot-reverse-shot dialogue by locking the room geography in a master frame, deriving both close-ups from the same screen axis, and animating restrained performances separately. This reference-first workflow prevents crossed eyelines, changing backgrounds, identity drift, and distracting mouth or hand motion.
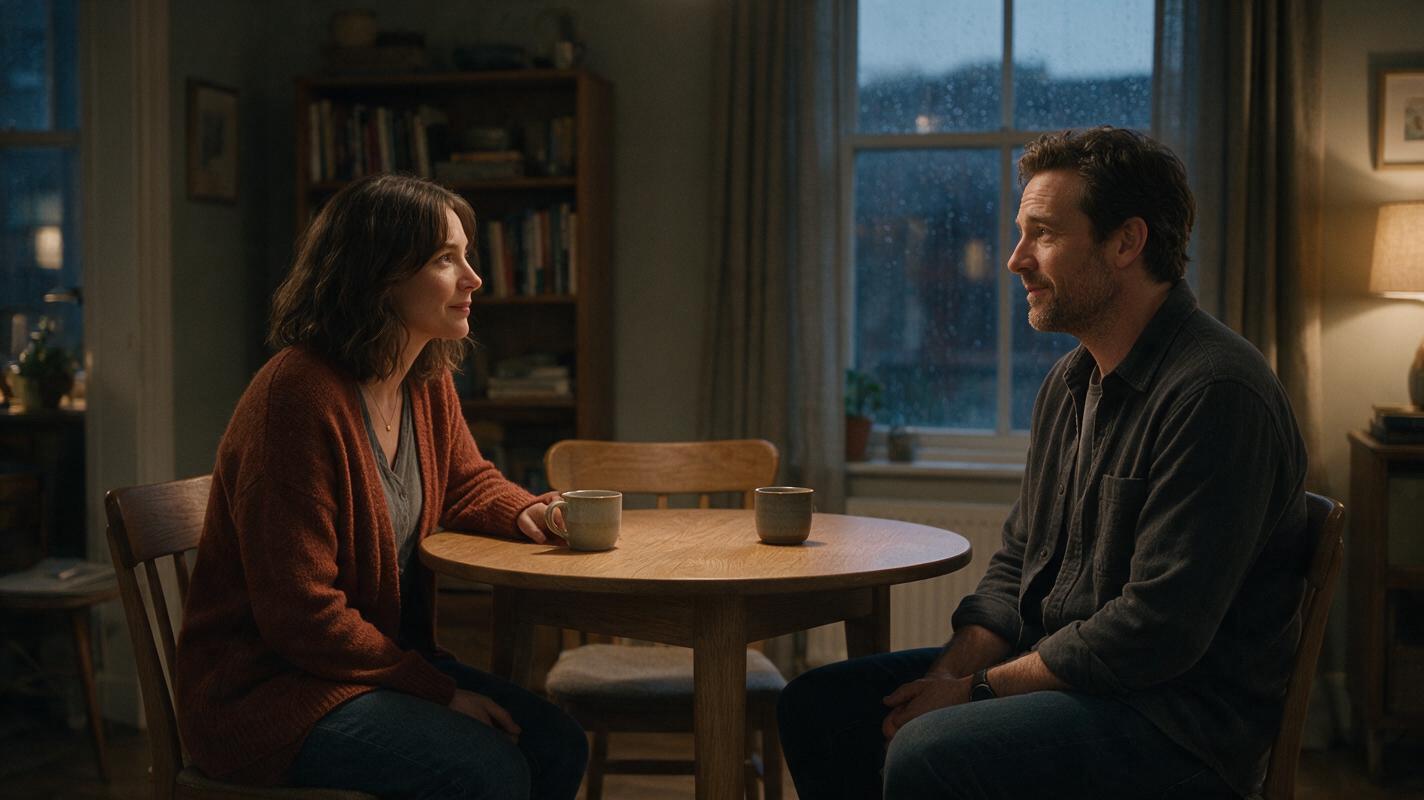
Table of contents
TL;DR: Build the scene before animating the conversation
The fastest way to create believable AI dialogue is to establish both characters in one master image, derive each reverse angle from that shared geography, and animate the shots separately with restrained motion. This reference-first image to video workflow gives the model fewer opportunities to swap screen positions, redirect the actors’ gaze, or redesign the room between cuts.
The central rule is simple: if Character A appears on the left of the master frame, A should look screen-right in the close-up; Character B remains on the right and looks screen-left. Treat those directions as locked production facts rather than optional prompt details.
Why AI dialogue scenes develop broken eyelines
A two-person conversation looks simple, but it depends on several forms of continuity operating at once. The audience must understand where each person is sitting, which direction each person faces, and whether the two close-ups belong to the same room.
Generating every angle independently often creates concrete continuity errors:
- Both actors look in the same direction. Instead of facing each other across the cut, both appear to address someone outside the scene.
- The screen axis flips. Character A moves from the left side of the conversation to the right without a neutral transition.
- The background contradicts the master shot. A window, lamp, doorway, or wall decoration changes position between angles.
- Close-ups lose identity. Hair length, age, wardrobe details, or facial proportions drift when a new prompt reconstructs the person.
- Performance becomes excessive. Large gestures, constant head turns, and unstable mouth movement distract from an otherwise usable exchange.
A dialogue edit cannot repair contradictory spatial information. Resolve geography in the still images before asking a video model to create performance.
Three ways to build an AI dialogue sequence
- Independent text-generated shots: fast for exploration, but the least reliable option for matching identity, wardrobe, and room layout.
- One master frame plus derived reverse angles: the best balance of control and flexibility for most scenes.
- One continuous two-shot: useful when the exchange is short and subtle, although both faces receive fewer pixels and simultaneous motion is harder to stabilize.
This tutorial uses the second approach. You will prepare two character references, establish a room-wide master image, create matching over-the-shoulder frames, animate each shot, and assemble the conversation around reactions rather than continuous speaking.
How MagicBoat handles a reference-first dialogue workflow
MagicBoat brings image and video models into one free multi-model platform, so the same project can move from reference design to motion without committing every experiment to one model. Seedream, Flux, or GPT Image can be used to explore character sheets and composition, while Seedance, Kling, and Veo can be compared for the resulting video shots when those models are available in the workflow.
The practical advantage is comparison, not a claim that one model wins every shot. A restrained close-up may behave differently from an over-the-shoulder composition, so test the same source frame and motion brief through more than one available text to video or reference-driven video option when a result remains unstable.
| Asset | Purpose | What must stay fixed |
|---|---|---|
| Character sheets | Define identity and wardrobe | Face, hair, age, clothing, distinguishing features |
| Master frame | Establish scene geography | Left-right positions, furniture, light direction, props |
| Reverse-angle stills | Define edit-ready coverage | Eyelines, screen direction, background landmarks |
| Animated clips | Add performance | Composition, identity, room structure |
Step 1 — Define two characters that cannot be confused
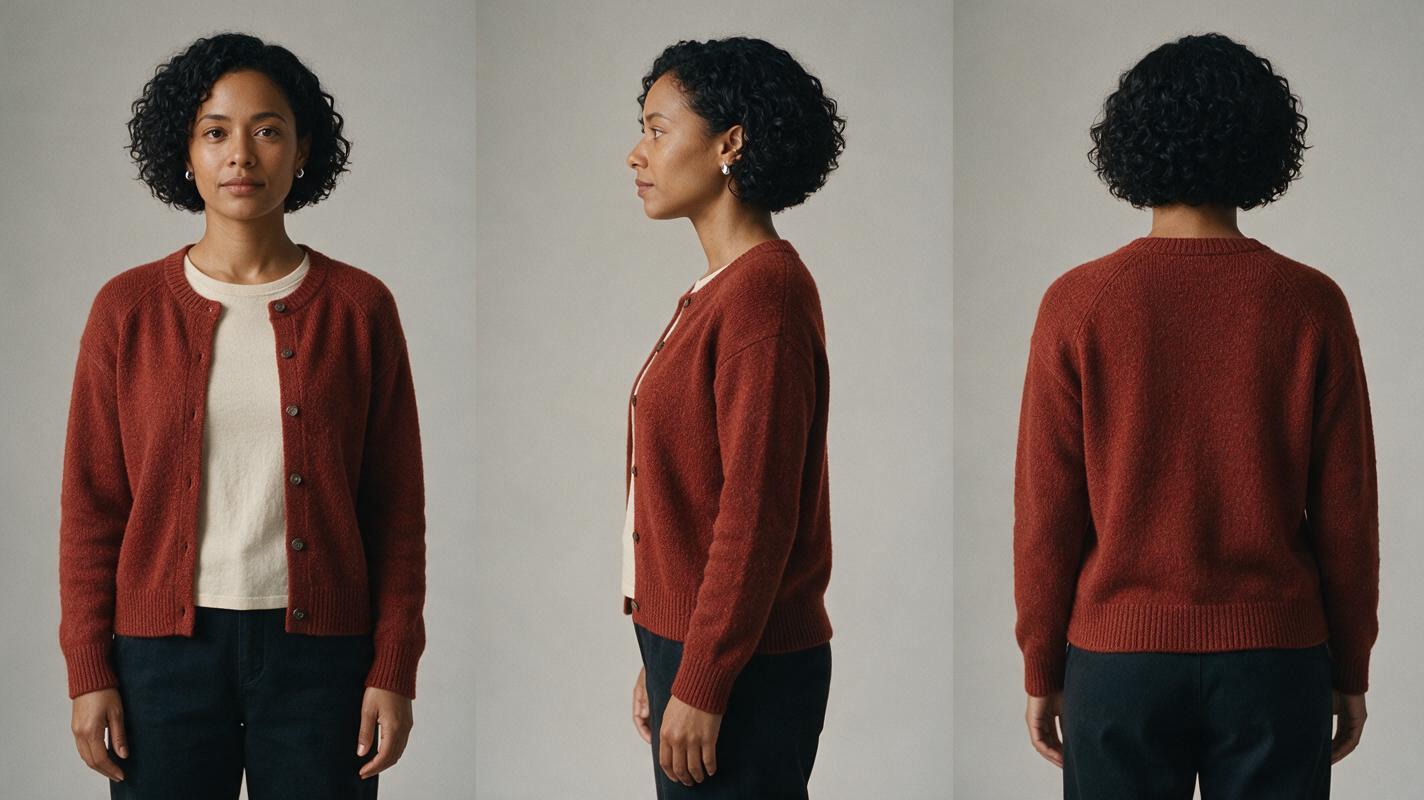
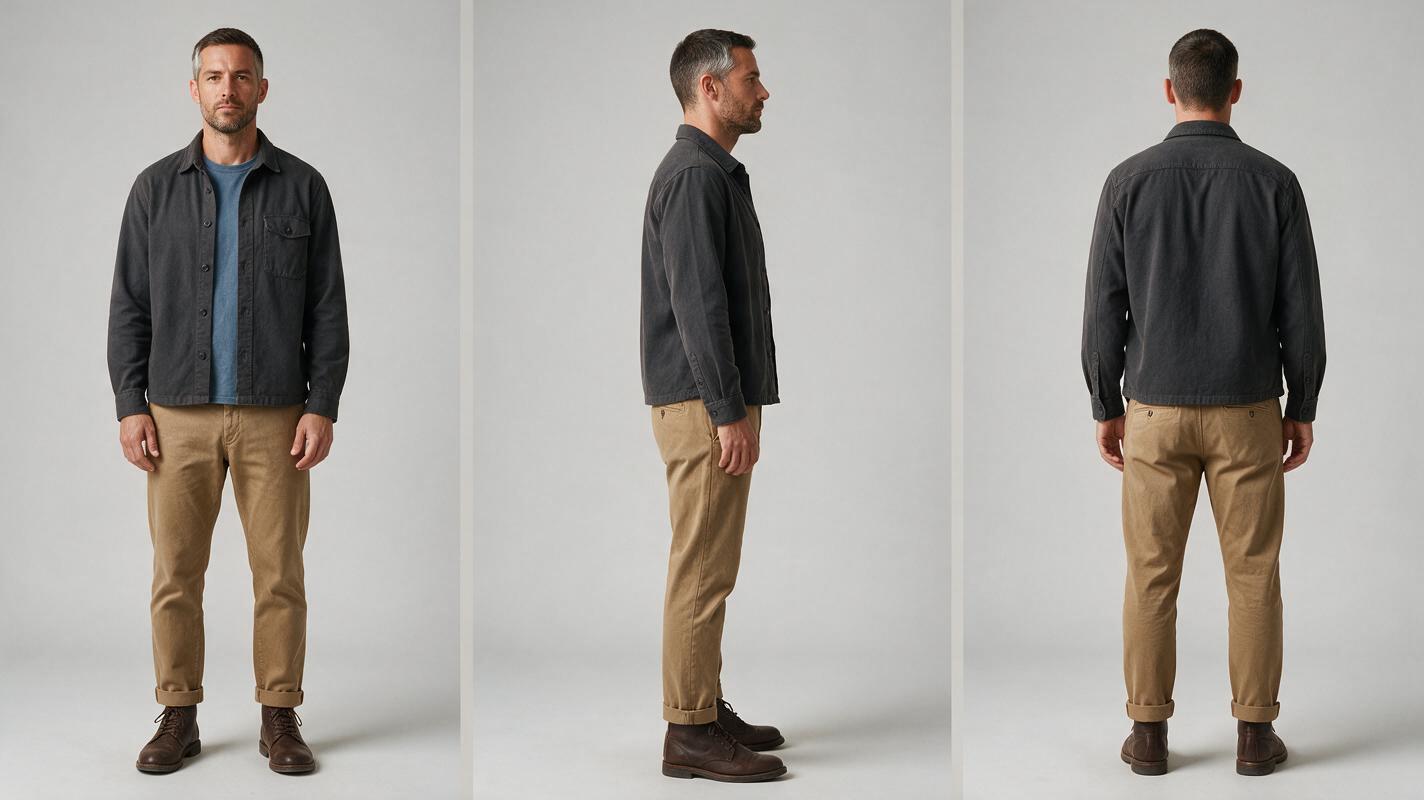
Create one three-view reference sheet for each speaker. Do not put both people on the same sheet: a model may blend their features or copy one person’s clothing onto the other. Give each character a distinct silhouette, hair shape, color palette, and facial landmark.
For this example, Mara is a documentary editor in a rust cardigan, while Daniel is an architect in a charcoal overshirt. Their clothing colors remain part of every later prompt.
Character A reference sheet
Photorealistic three-panel character reference sheet of the same woman, Mara, age 34, oval face, warm brown skin, short tightly curled black bob, small silver stud earrings, rust-red knitted cardigan over a cream crew-neck shirt, dark straight-leg trousers; show exact front view, exact left-side profile, and exact back view as three separate full-body panels; identical person, hairstyle, clothing, proportions, and neutral expression in every panel; neutral light-gray seamless studio background, soft even studio illumination, realistic skin and fabric texture, no props, no text, no labels. MANDATORY LAYOUT: landscape 16:9, three equal vertical panels ordered front, side, back, full body visible from head to shoes, consistent scale and camera height, no overlapping figures. MANDATORY CAMERA: eye-level, 70mm portrait perspective, orthographic-looking presentation, no wide-angle distortion.Expected result: one clearly identifiable person shown at a consistent scale from three useful identity angles.
Character B reference sheet
Photorealistic three-panel character reference sheet of the same man, Daniel, age 39, angular face, light olive skin, close-cropped dark brown hair with a subtle gray streak at the right temple, trimmed beard, charcoal cotton overshirt over a muted blue T-shirt, tan chinos, dark boots; show exact front view, exact right-side profile, and exact back view as three separate full-body panels; identical person, hairstyle, beard, clothing, proportions, and neutral expression in every panel; neutral light-gray seamless studio background, soft even studio illumination, realistic skin and fabric texture, no props, no text, no labels. MANDATORY LAYOUT: landscape 16:9, three equal vertical panels ordered front, side, back, full body visible from head to shoes, consistent scale and camera height, no overlapping figures. MANDATORY CAMERA: eye-level, 70mm portrait perspective, orthographic-looking presentation, no wide-angle distortion.Expected result: Daniel remains visually distinct from Mara even in a small over-the-shoulder frame.
Step 2 — Lock the room geography in a master frame
Generate a wide two-shot before creating either close-up. The master must answer five questions: Who is on the left? Who is on the right? Where are they looking? What separates them? Which background landmarks belong behind each person?
Use an asymmetrical but readable location. Here, Mara sits on frame-left with a bookcase behind her; Daniel sits on frame-right with a window behind him. A small circular table establishes the space between them.
Cinematic editorial-realism still of Mara and Daniel having a quiet evening conversation in a lived-in apartment dining room; Mara, matching her reference sheet exactly, sits frame-left in a rust cardigan and looks screen-right toward Daniel; Daniel, matching his reference sheet exactly, sits frame-right in a charcoal overshirt and looks screen-left toward Mara; a small round oak table separates them, two untouched ceramic cups on the table, bookcase behind Mara, tall rain-streaked window behind Daniel, warm practical lamp on the left balanced by cool evening window light, natural posture, restrained emotion, realistic skin and fabric, coherent furniture geometry. MANDATORY CAMERA: locked eye-level wide two-shot, camera perpendicular to the line between the actors, 40mm lens, no Dutch angle, no orbit, both faces visible in three-quarter profile. MANDATORY LAYOUT: landscape 16:9, Mara fixed in left third, Daniel fixed in right third, clear negative space between faces, no extra people, no duplicated bodies, no text.Expected result: a spatial contract for the entire sequence. Save this frame unchanged and use it whenever a later generation starts to contradict the room.
Step 3 — Derive both reverse angles from the same axis
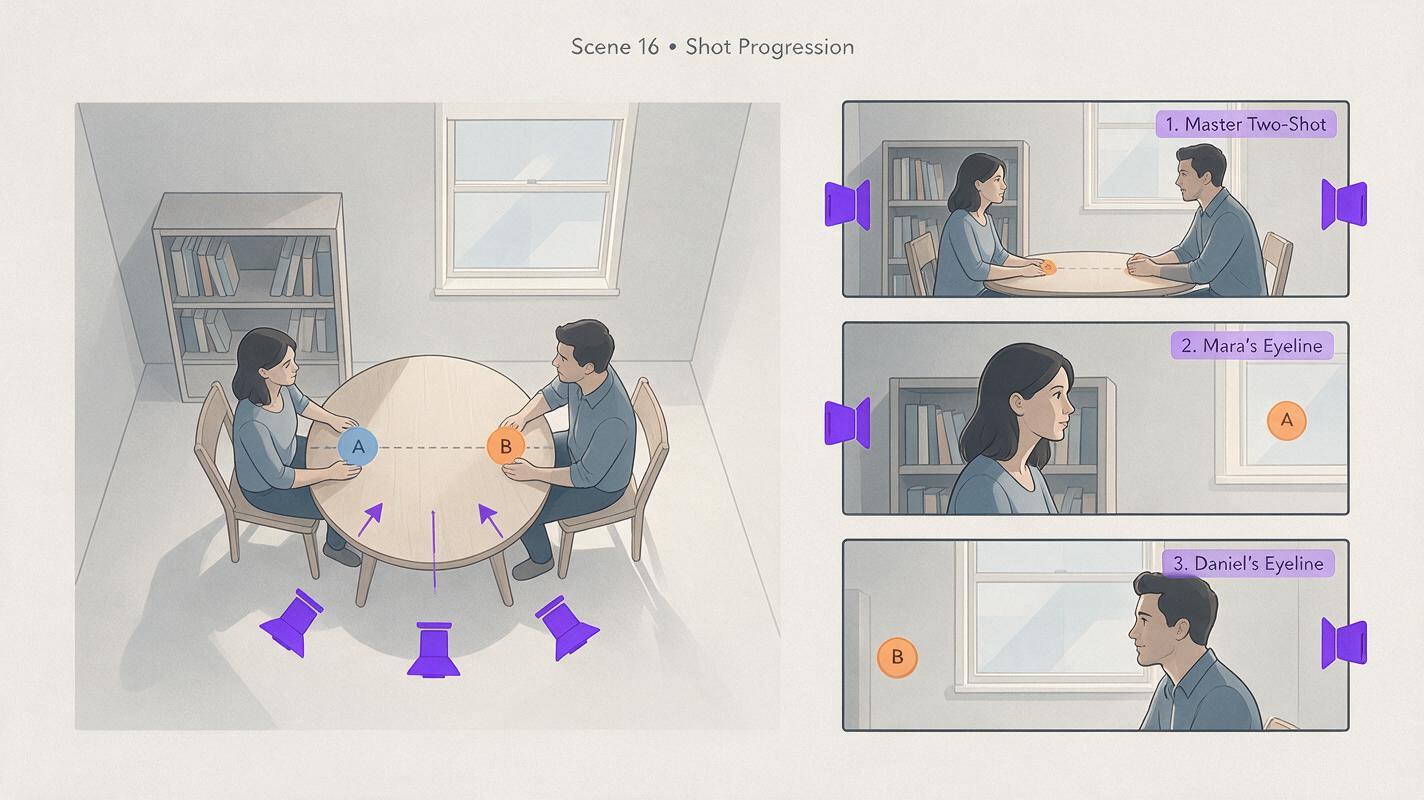
Create Mara’s close-up first. Because she occupies frame-left in the master, she must look toward screen-right. Show a soft, out-of-focus piece of Daniel’s shoulder at the right edge to reinforce the eyeline without asking the model to render two detailed faces.
Over-the-shoulder dialogue close-up of Mara in the established apartment dining room, matching the Mara reference exactly, rust cardigan and cream shirt unchanged, bookcase and warm practical lamp softly visible behind her; Mara occupies the left-center of frame and looks slightly screen-right at Daniel with attentive, restrained concern; only a soft out-of-focus edge of Daniel's charcoal shoulder appears in the right foreground; realistic skin, shallow depth of field, cinematic editorial realism. MANDATORY CAMERA: true over-the-shoulder angle from near Daniel's front-left position, eye-level, 75mm lens, camera remains on the same side of the conversation axis as the master shot. MANDATORY LAYOUT: landscape 16:9, Mara's eyes near the upper-third line, looking room on the right, no second visible face, no extra limbs, no text.Then reverse the logic for Daniel. He remains on the right side of the conversation and looks screen-left. Mara’s rust shoulder can occupy the left foreground.
Over-the-shoulder dialogue close-up of Daniel in the established apartment dining room, matching the Daniel reference exactly, charcoal overshirt, gray temple streak, and trimmed beard unchanged, rain-streaked window and cool evening light softly visible behind him; Daniel occupies the right-center of frame and looks slightly screen-left at Mara with a measured, thoughtful expression; only a soft out-of-focus edge of Mara's rust-cardigan shoulder appears in the left foreground; realistic skin, shallow depth of field, cinematic editorial realism. MANDATORY CAMERA: true over-the-shoulder angle from near Mara's front-right position, eye-level, 75mm lens, camera remains on the same side of the conversation axis as the master shot. MANDATORY LAYOUT: landscape 16:9, Daniel's eyes near the upper-third line, looking room on the left, no second visible face, no extra limbs, no text.Expected result: the two frames point visually toward each other when placed side by side. If they appear to look in parallel directions, correct the stills now rather than hoping motion will solve the error.
Step 4 — Animate restrained performances, not full conversations
Animate each close-up independently. Keep the camera locked and request one primary action per clip. A small inhale, blink, or chin movement reads as acting; combining speech, hand gestures, torso turns, and camera motion often damages identity or composition.
Use this motion brief for Mara’s listening shot:
Locked-camera close-up. Mara maintains her screen-right eyeline toward Daniel. She listens in silence, makes one natural blink, takes a subtle breath, and lowers her chin by a few millimeters as her expression shifts from concern to understanding. Her shoulders remain relaxed and nearly still. Preserve her face, short curled hair, rust cardigan, framing, background, and foreground shoulder exactly. No camera movement, no gaze toward camera, no speaking mouth motion, no hand movement, no background changes.For Daniel’s response, keep the visible speaking action short:
Locked-camera close-up. Daniel maintains his screen-left eyeline toward Mara and delivers one short, calm sentence with restrained natural mouth movement, followed by a brief closed-mouth pause. One small blink near the end; no head turn. Preserve his facial structure, beard, gray temple streak, charcoal overshirt, framing, rain-streaked window, and foreground shoulder exactly. No camera movement, no broad gesture, no gaze toward camera, no background changes.Expected result: short clips with stable faces and edit points before and after the main expression. If speech motion becomes unstable, use the shot as a reaction and place the line over the other character’s listening close-up.
Step 5 — Build reactions before adding more speaking shots
Reaction shots are the most useful safety layer in a dialogue edit. They hide imperfect mouth motion, compress pauses, and let the audience register emotional changes. Generate at least one clean listening clip for each character, even if the script initially gives that person no pause.
- Keep the mouth closed or naturally relaxed.
- Use one blink rather than repeated blinking.
- Keep the original eyeline fixed throughout the shot.
- Avoid touching the face, cup, or table unless the interaction is essential.
- Leave a quiet moment at the start and end for easier cutting.
A useful coverage plan is master shot, Mara listening, Daniel speaking, Daniel pausing, Mara responding, and a final master shot. The wide frames reorient the viewer if a close-up feels spatially ambiguous.
Step 6 — Edit for screen direction and emotional timing
Place the master frame first, even if it appears for only a short moment. Cut to the listener just before the other person finishes a line; audiences often read the reaction as more important than the mouth forming every word.
Review the sequence once without audio. The visual conversation should still make sense. Check these four items at every cut:
- Gaze: Mara looks right and Daniel looks left.
- Landmarks: the bookcase stays with Mara; the window stays with Daniel.
- Light: warm lamp and cool window illumination do not swap sides.
- Scale: adjacent close-ups use compatible head sizes and camera heights.
If one clip has excellent performance but a brief identity defect, trim around the bad frames before regenerating the entire shot. Regenerate when the gaze direction, room structure, or face shape is wrong for most of the clip.
Keep the same dialogue set across projects
Archive a compact continuity pack containing both character sheets, the clean master frame, each approved reverse-angle still, and a written geography note. The note can be as short as: “Mara left, looking right, bookcase behind; Daniel right, looking left, window behind; warm source left, cool source right.”
For a later scene in the same room, begin from those assets rather than describing the apartment from memory. Change one production variable at a time, such as wardrobe or time of day, so you can identify what caused any continuity drift.
Alternative: use motion transfer for a specific performance
When a scene depends on a precise shrug, pause, or posture change, a recorded performance can provide clearer timing than prose alone. Keep the source actor seated, fully visible, and on the correct side of the frame. Avoid hands crossing the face and preserve the destination character’s required screen direction.
Motion transfer is most useful for body timing. It does not remove the need for character references, compatible framing, or a locked room layout.
Alternative: replace a drifting face after the motion works
If a generated clip has the correct eyeline, timing, and background but the face changes briefly, a targeted face replacement can be more efficient than rebuilding the performance. Use a clean identity reference from the matching camera side and inspect the hairline, jaw, ears, and foreground occlusion after processing.
Do not use this repair for a shot with the wrong head direction or incorrect room geometry. Those are structural failures and should be regenerated from the approved still.
Where this workflow falls short
- Long spoken passages remain demanding. Facial identity and mouth shapes have more time to drift, so shorter clips are easier to control.
- Foreground shoulders can mutate. Keep them soft, small, and away from the speaking character’s jaw.
- Glasses and facial hair require extra review. Reflections, frames, and beard edges may fluctuate during mouth or head motion.
- Crossing the room needs new coverage. Once a character changes sides, create a neutral wide shot that visibly establishes the move before using the reversed geography.
- Generated speech motion may not match final audio precisely. Reaction shots and off-screen lines remain valuable editorial tools.
FAQ
What is the 180-degree rule in an AI dialogue scene?
Imagine a line running between the two characters. Keeping the camera on one side of that line preserves their left-right relationship. Crossing it without an establishing shot makes both characters appear to face the same direction or exchange places.
Should I generate the master shot or close-ups first?
Generate the master first. It defines positions, gaze directions, lighting, props, and background landmarks that the close-ups must inherit.
Can I create both close-ups from text alone?
Yes, but independent text prompts are more likely to redesign the characters or room. Using the master frame and character sheets as visual references makes the two angles easier to match.
How much head movement should a dialogue close-up contain?
Start with almost none: one blink, a breath, or a slight chin adjustment. Add larger movement only when the simpler version is stable and the story genuinely requires it.
What should I do when both characters look screen-right?
Return to the still frames and regenerate one angle with an explicit opposite eyeline, matching foreground shoulder placement, and the correct background landmark. Do not attempt to disguise a persistent direction error through faster cutting.
Do I need a visible foreground shoulder in every reverse shot?
No. A clean single can work if gaze direction and background geography are unambiguous. The shoulder is a useful spatial cue, but it also adds an occlusion that can become unstable.
Final checklist
- Create a separate three-view sheet for each recurring character.
- Establish left-right positions in one wide master frame.
- Keep the camera on one side of the conversational axis.
- Give Mara screen-right looking room and Daniel screen-left looking room.
- Preserve background landmarks across every angle.
- Animate one restrained action per clip.
- Generate listening reactions before expanding the speaking coverage.
- Review the finished sequence without audio before finalizing it.
Ready to test the workflow? Create your first ai video free on MagicBoat and compare the same reverse-angle frames across available models.
Keywords
image to video, AI dialogue scene, shot reverse shot, eyeline matching, character consistency, Seedance prompts, Kling prompts, AI video workflow