How to Turn a Phone Clip Into an AI Character With Motion Transfer
Use a clean full-body phone recording as the motion source, create a reference image with unmistakable identity anchors, and transfer the performance before adding cinematic styling. This workflow preserves timing and body language more reliably than asking a text-to-video model to invent the entire performance.
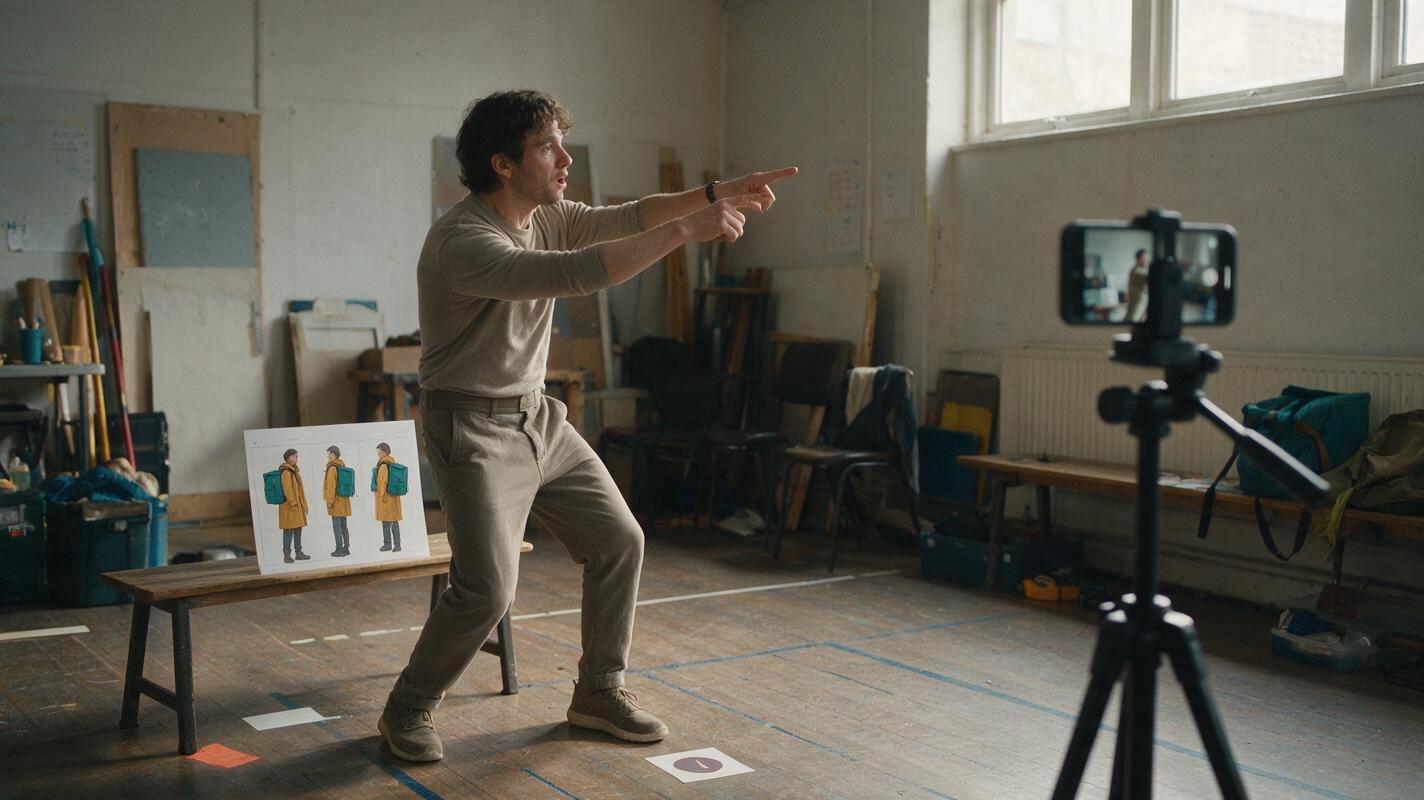
Table of contents
Turn a Simple Recording Into a Directed Character Performance
The fastest way to convert a real performance into a stylized AI character video is to record the movement first, then use motion transfer to apply it to a carefully designed full-body character. Keep the source clip short, make every limb visible, and test identity and motion before adding an elaborate location or camera move.
This tutorial turns a phone recording of an actor walking, stopping, turning, and pointing into a cinematic scene featuring a fictional courier in a rain-soaked pedestrian underpass. The same workflow works for gestures, fitness demonstrations, short acting beats, fashion movement, and social video performances.
TL;DR: Record a stable full-body performance, generate a front-facing character reference, transfer the movement, and inspect the result frame by frame. If the body motion works but the identity drifts, repair the face or regenerate from a corrected keyframe rather than discarding the whole performance.
Why Phone-to-Character Transfers Often Fail
Motion transfer is not simply a visual costume change. The model must infer the actor’s pose over time, map it onto a different body, preserve the target character, and reconstruct details hidden by movement. A weak source recording creates ambiguity that no elaborate prompt can fully remove.
Common symptoms include:
- Sliding feet: the actor’s shoes leave the frame, overlap, or move against a featureless floor.
- Broken hands: fingers are too small in the source, hands cross the torso, or gestures happen too quickly.
- Identity drift: the face changes when the character turns away from the reference angle.
- Body-shape flicker: loose clothing hides the shoulders, waist, elbows, or knees needed for pose estimation.
- Background warping: a moving source camera is interpreted as subject motion or competes with the desired cinematic camera.
- Motion smoothing: a sharp stop, point, or head turn becomes slower and less expressive than the original performance.
The practical solution is to simplify the input before increasing the visual ambition of the output.
Three Ways to Turn Recorded Motion Into an AI Character
| Approach | Best for | Main trade-off |
|---|---|---|
| Direct motion transfer | Preserving timing, gestures, and body language | Needs a clean, visible performer |
| Reference-first image animation | Protecting costume, face, and scene composition | May approximate rather than copy motion |
| Text-guided performance generation | Shots without usable source footage | Provides the least exact control over timing |
This guide begins with direct transfer. It then uses reference-first animation and localized identity repair as fallback options.
How MagicBoat Handles a Phone-to-Character Workflow
MagicBoat provides one account for trying multiple image and video models within a connected ai video workflow. Image models such as Seedream, Flux, or GPT Image can be used to establish the fictional character, while available video models and transfer tools can be tested against the same source performance.
The useful advantage is comparison. One model may preserve a fast arm gesture well while another produces a cleaner face or more stable clothing. Keep the source clip, character description, framing, and output duration consistent when comparing results so that the model is the main variable.
A practical pipeline looks like this:
- Record a clean motion source on a phone.
- Create a full-body target character and three-view identity sheet.
- Trim and analyze the performance.
- Run a short motion-transfer test.
- Inspect anatomy, identity, contacts, and background stability.
- Repair or regenerate only the weak section.
Step 1 — Record a Transfer-Friendly Phone Clip
Place the phone on a tripod or stable surface at approximately waist-to-chest height. Record in a bright room or shaded outdoor area where the performer is evenly lit. The actor should remain fully visible from head to shoes with extra space above, below, and beside the body.
For the example performance, use this simple action:
- Stand still for a brief neutral pose.
- Walk forward for three measured steps.
- Stop with both feet clearly planted.
- Turn the torso slightly to the left.
- Point toward the camera with the right hand.
- Hold the final pose briefly.
Wear fitted clothing with visible separation between the arms, torso, and legs. Avoid long coats, reflective fabric, floor-length skirts, and sleeves that cover the hands. A plain wall and a floor with visible texture make foot placement easier to understand.
CAPTURE SPECIFICATION
Framing: full body, head and both shoes visible throughout
Camera: locked, no zoom, no digital stabilization crop changes
Angle: eye-level to chest-level, nearly frontal
Lighting: bright, soft, even illumination
Performance: three steps, stop, torso turn, right-hand point, final hold
Avoid: crossed limbs, hands behind back, rapid spins, motion blur, occlusion
Expected result: a short, stable clip in which a viewer can identify the position of both hands, elbows, knees, and feet in every moment.
Step 2 — Build a Three-View Character Reference
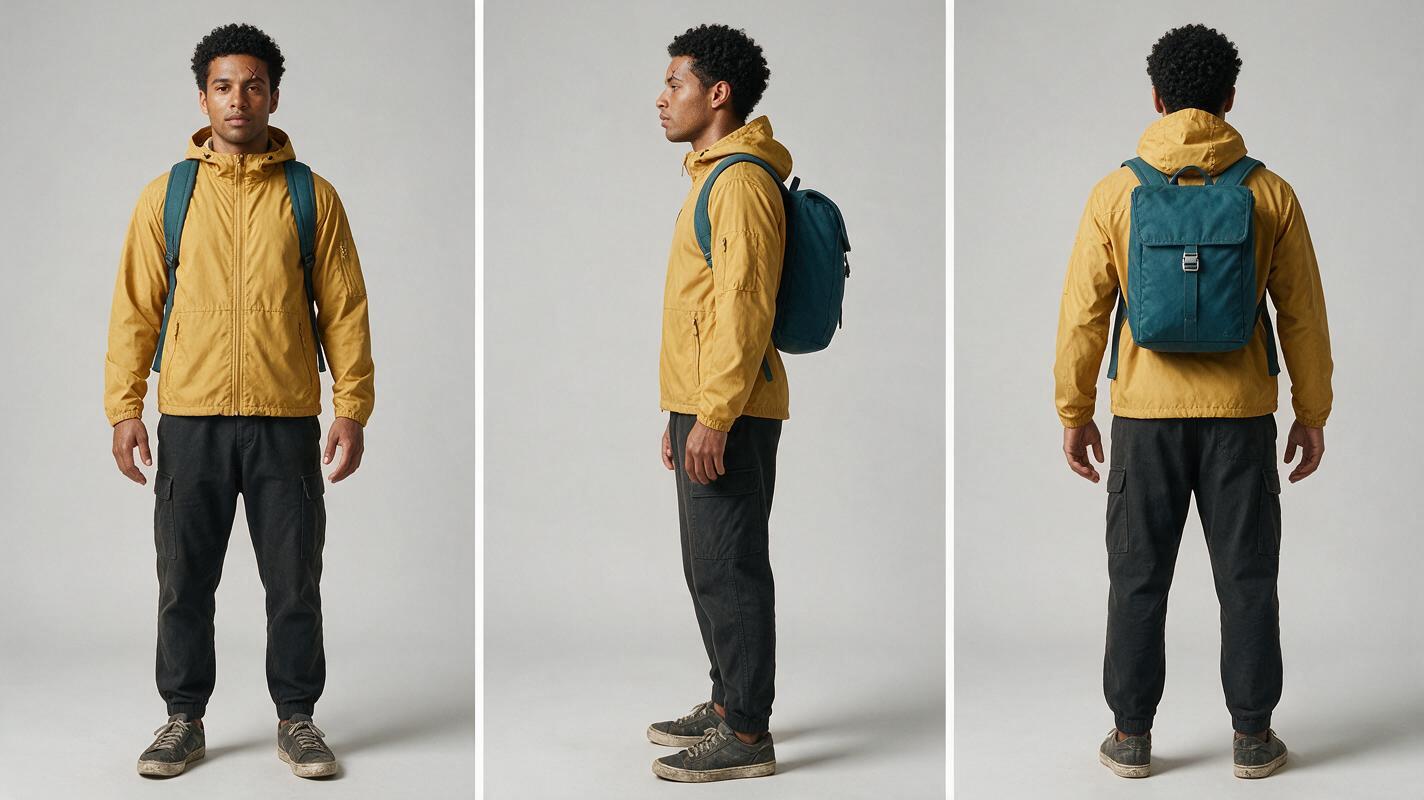
Create the character before choosing the final cinematic location. The character needs an identifiable face, a readable silhouette, and costume details that remain visible during movement. For this example, the target is a young adult bicycle courier wearing a mustard rain shell, charcoal trousers, and a teal backpack.
Generate a three-panel sheet, then use the front view as the primary full-body identity reference. The side and back views provide a visual source of truth when evaluating turns.
Photorealistic three-panel character reference sheet of the same fictional 26-year-old bicycle courier in every panel, oval face, medium-brown skin, short tightly curled black hair, narrow scar through the left eyebrow, mustard-yellow rain shell with matte fabric, charcoal tapered cargo trousers, worn dark-gray trainers, compact teal backpack with one silver buckle; panel one exact front view in a relaxed neutral stance, panel two exact left-side profile, panel three exact back view; identical body proportions, clothing, hair, backpack, and lighting across all panels; neutral expression, arms resting slightly away from the torso, hands fully visible, complete body from head to shoes. MANDATORY LAYOUT: three equal vertical panels arranged left to right as front, side, back, with no overlap and no extra people. MANDATORY CAMERA: full-body orthographic-style reference photography, camera at waist height, level horizon, no wide-angle distortion. Neutral light-gray seamless studio background, soft even studio illumination, photorealistic editorial wardrobe reference, landscape 16:9, no text, no labels, no logo.Reject a sheet if facial features, backpack shape, jacket length, or shoe design change between panels. Those inconsistencies become competing instructions during transfer.
Expected result: one coherent identity that can be recognized from the front, side, and back without relying only on clothing color.
Step 3 — Map the Performance Before You Transfer It
Trim dead time from the source, but retain a short neutral pose at the beginning and a held pose at the end. These stationary moments give the generation stable entry and exit states.
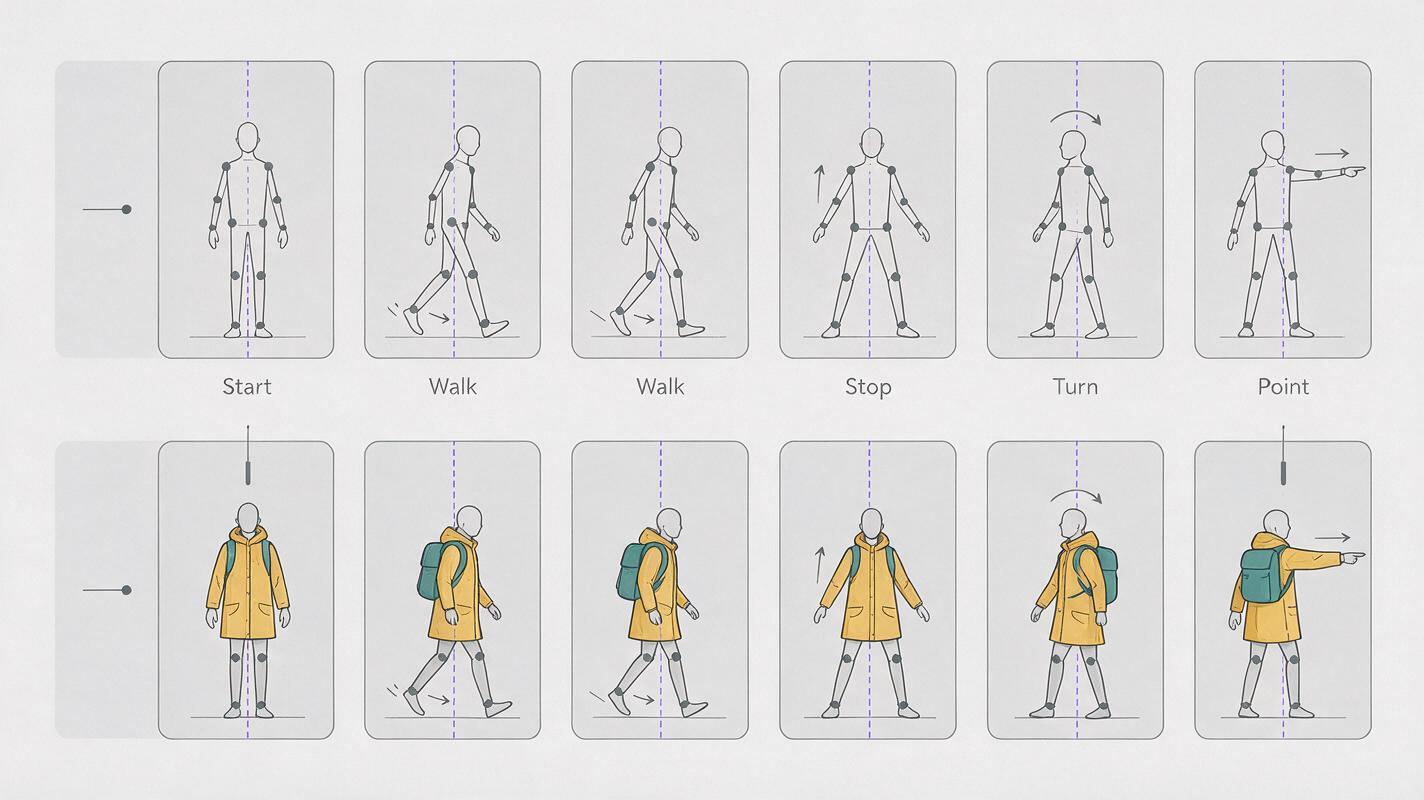
Break the action into motion landmarks:
- Start: balanced neutral stance.
- Travel: three forward steps with natural arm swing.
- Contact: both feet settle without sliding.
- Turn: shoulders rotate left while the hips remain readable.
- Gesture: right elbow rises, forearm extends, index direction points forward.
- Finish: the character holds the pointing pose.
Do not ask the transfer to invent a moving camera yet. First determine whether the target character can reproduce these landmarks with a locked viewpoint.
Create a clean editorial workflow diagram showing six sequential frames of one full-body performer: neutral stance, first walking step, third walking step, planted stop, left torso turn, right-hand point. Beneath the sequence, show a second aligned row containing the same six poses performed by a fictional courier in a mustard rain shell and teal backpack. Use simple realistic human silhouettes with visible joint positions, thin arrows indicating direction, and clear one-to-one vertical alignment between source and target poses. MANDATORY LAYOUT: two horizontal rows of six equally sized frames, source row above target row, left-to-right chronology, generous white margins, no software interface. MANDATORY CAMERA: consistent locked frontal full-body view in every frame, camera at waist height, level horizon. Clean editorial diagram, light-gray background, charcoal lines, muted mustard and teal accents, landscape 16:9, minimal labels limited to Start, Walk, Stop, Turn, Point, Hold, no logo.Expected result: a short transfer plan with six observable checkpoints, making it easier to distinguish a motion failure from a cosmetic imperfection.
Step 4 — Run a Controlled Motion-Transfer Test
Use the trimmed phone clip as the motion source and the clean front-view character image as the visual target. If the workflow accepts descriptive guidance, state what must remain fixed rather than rewriting the full action already present in the source.
Transfer the source performer's full-body movement to the referenced fictional courier. Preserve the exact action timing: three measured steps forward, complete stop, slight torso turn to the left, right arm extends into a clear pointing gesture, then a stable final hold. Maintain the courier's oval face, short tightly curled black hair, scar through the left eyebrow, mustard rain shell, charcoal trousers, dark trainers, and compact teal backpack. Preserve realistic foot-floor contact, natural joint articulation, five fingers per hand, consistent body proportions, and a locked eye-level camera. Do not add extra steps, camera movement, secondary characters, props, speech, exaggerated fabric motion, or scene transitions.Generate the shortest useful test that contains the complete action. A compact test is easier to inspect and cheaper to repeat than a long cinematic sequence containing several unrelated movements.
Compare the result with the source at the six landmarks from the previous section. The output does not need pixel-identical poses, but its rhythm and action order should remain recognizable.
Expected result: the courier performs the source action with stable clothing, grounded feet, and a recognizable face while the camera remains still.
Step 5 — Add the Cinematic Location Without Losing the Performance
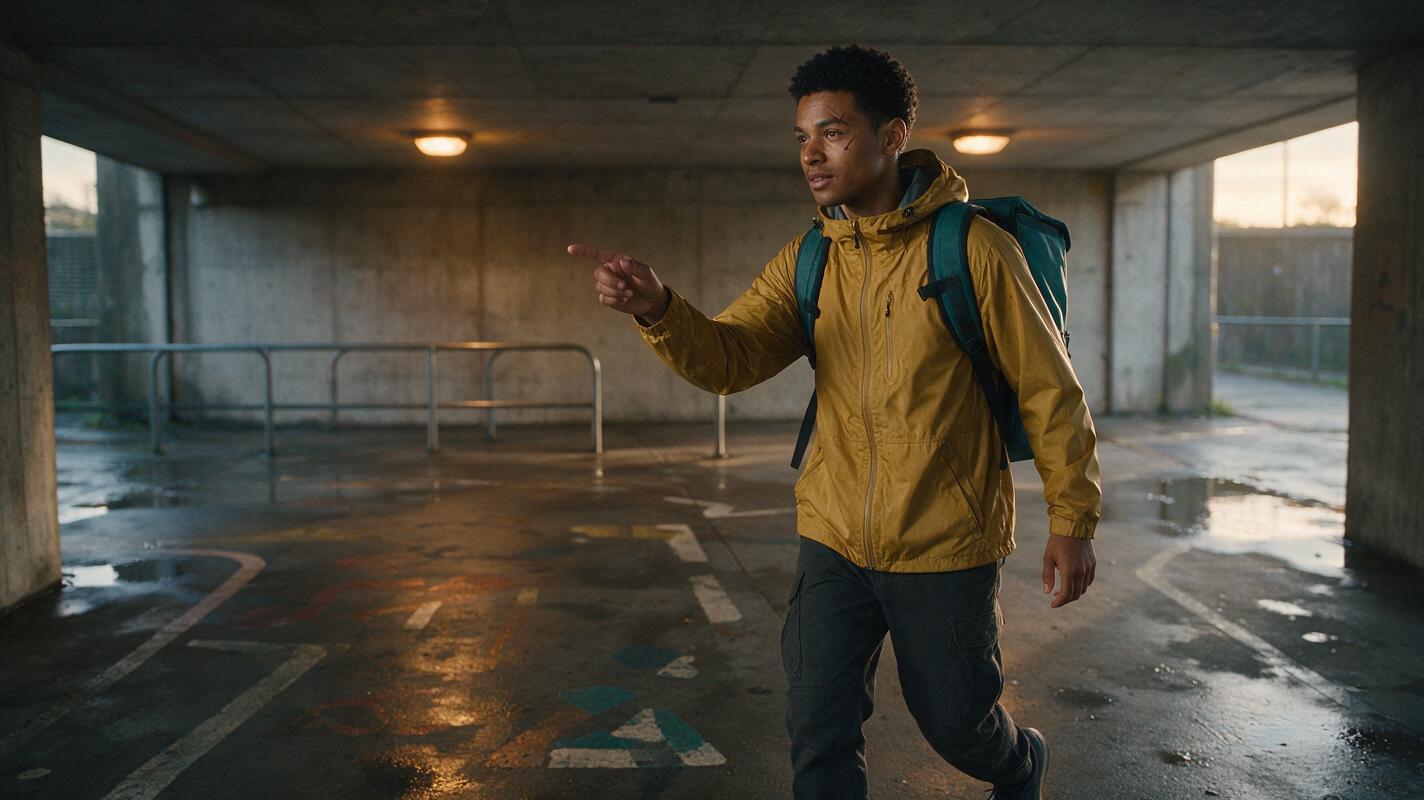
Once the neutral test works, introduce the final setting. Use a believable location with strong perspective cues and enough light to preserve the face and hands. In this example, the courier appears in a wet pedestrian underpass at dawn.
Keep the camera restrained. A very slow push-in can add depth, but a fast orbit or handheld chase introduces new variables at the exact moment the model is already reconstructing a moving body.
Cinematic editorial-realism sequence in a lived-in concrete pedestrian underpass just after dawn, damp floor reflecting soft amber ceiling lights, faded directional paint, metal bicycle railing, scattered rainwater near the entrances. The same fictional courier with medium-brown skin, short tightly curled black hair, left-eyebrow scar, mustard rain shell, charcoal cargo trousers, dark trainers, and teal backpack walks forward three steps, plants both feet, turns the torso slightly left, points toward the camera with the right hand, and holds. Preserve the transferred timing and exact costume. MANDATORY CAMERA: full-body medium-wide framing, camera near front-right in a true three-quarter view, camera at chest height, level horizon, only a subtle slow push-in, no orbit and no handheld shake. Natural body mechanics, grounded shoes, readable hands, realistic wet-concrete reflections, subdued film contrast, 16:9, no additional people, no text, no logo.Inspect the new result beside the controlled test rather than judging it alone. If the neutral version is correct but the cinematic version fails, the location or camera instruction is overloading the shot.
Expected result: the original performance remains readable while the location, reflections, and restrained camera movement make it feel like a directed film shot.
Step 6 — Diagnose and Repair Only the Broken Region
Review the video at normal speed and then frame by frame. Classify the defect before choosing a repair:
| Defect | Likely cause | Best response |
|---|---|---|
| Wrong step count | Source action was unclear or prompt added motion | Simplify guidance and repeat the transfer |
| Foot sliding | Occlusion, weak floor cues, or excessive camera motion | Return to a locked camera and visible floor |
| Face changes during turn | Reference lacks side-view information | Use a corrected keyframe or localized identity repair |
| Pointing hand deforms | Gesture is too fast or too small in frame | Slow the source gesture or use a closer second shot |
| Backpack changes shape | Accessory geometry is too complex | Simplify it in the reference image |
If only the face drifts, a targeted face swap can preserve a successful body performance. If the hand and arm are structurally wrong, face repair will not help; regenerate the affected action from a clean frame or simplify the gesture.
Expected result: a corrected clip produced through a focused repair, without sacrificing sections that already work.
Keep the Same Performer Across Future Projects
Archive more than the final video. Save the three-view sheet, the exact character description, the clean front-view image, one side-facing frame, the transfer prompt, and notes about gestures that worked reliably.
Use the same identity block at the beginning of every future prompt:
IDENTITY LOCK
Fictional 26-year-old bicycle courier
Medium-brown skin; oval face
Short, tightly curled black hair
Narrow scar through the left eyebrow
Mustard matte rain shell
Charcoal tapered cargo trousers
Worn dark-gray trainers
Compact teal backpack with one silver buckle
Change the action and location after this block. Avoid quietly changing age, hairstyle, jacket material, or backpack design between projects.
Alternative: Use Image to Video for a Difficult Gesture
If direct transfer repeatedly breaks one important pose, extract or create a strong keyframe of that pose and use an image to video workflow for a separate insert. A close or medium shot of the pointing gesture can hide the transition from the full-body transfer while giving the hand more pixels and a simpler motion path.
This approach is especially useful for hand-object interactions, seated actions, or moments where the performer crosses their arms over the body. It trades exact whole-body timing for stronger control over the hero frame.
Where This Workflow Falls Short
- Occlusion remains difficult. A hand hidden behind the torso or a leg concealed by furniture must be reconstructed rather than transferred directly.
- Fast rotations can alter identity. A front-facing reference contains limited evidence for the back and side of the head.
- Finger accuracy is not guaranteed. Small, rapid gestures may need a closer shot or slower source performance.
- Different body proportions change mechanics. Transferring an adult performance to a much shorter, taller, broader, or nonhuman character can alter stride length and contact points.
- Speech is a separate problem. Body motion transfer does not automatically guarantee accurate lip synchronization or preservation of spoken audio.
- Complex camera movement competes with pose reconstruction. Add camera motion only after the body test is stable.
Motion Transfer FAQ
How long should the source phone video be?
Use the shortest clip that contains one complete action. Short clips with a neutral start and held ending are easier to evaluate and revise than long performances with many unrelated gestures.
Does the actor need to resemble the AI character?
No, but similar proportions reduce remapping difficulty. Large differences in limb length, height, or shoulder width can change foot placement and the apparent weight of the movement.
Should I remove the phone video background first?
Not always. A plain, high-contrast background is usually sufficient. Background removal can help when the actor overlaps clutter, but poor masking may erase hands, hair, or shoes needed for pose interpretation.
Can I use a moving handheld source clip?
You can test it, but a locked camera is more predictable. Stabilize or rerecord the source when camera shake causes the generated subject or background to pulse.
Why does the generated character add an extra step?
The source may not show a clear stop, or the prompt may encourage continued walking. Add a visible planted pause to the recording and explicitly state the step count and final hold.
When should I use face repair instead of regenerating?
Use face repair when the body motion, hands, clothing, and scene are already successful and only identity has drifted. Regenerate when the head orientation, limb structure, or timing is fundamentally wrong.
Final Checklist
- Record the entire body with both shoes and hands visible.
- Use a stable camera and even lighting.
- Begin and end with held poses.
- Create a consistent front, side, and back character sheet.
- Test motion against a simple background before adding cinematic styling.
- Check step count, foot contact, hand shape, identity, and costume separately.
- Repair local defects instead of replacing a successful performance.
- Save the reference sheet, identity block, source clip, and working prompt.
Ready to transform your own recording? Create your first ai video free and test this motion-transfer workflow now.
Keywords
motion transfer, AI character video, phone video to AI, character consistency, image to video, AI video workflow, prompt engineering