How to Create Realistic Hand Interactions in AI Video
The most reliable way to create realistic hand interactions in AI video is to begin with a contact-safe keyframe, divide the action into simple motion phases, and animate only one interaction at a time. This tutorial uses a barista passing a ceramic mug to show how image-to-video workflows reduce extra fingers, unstable grips, and props that merge with hands.
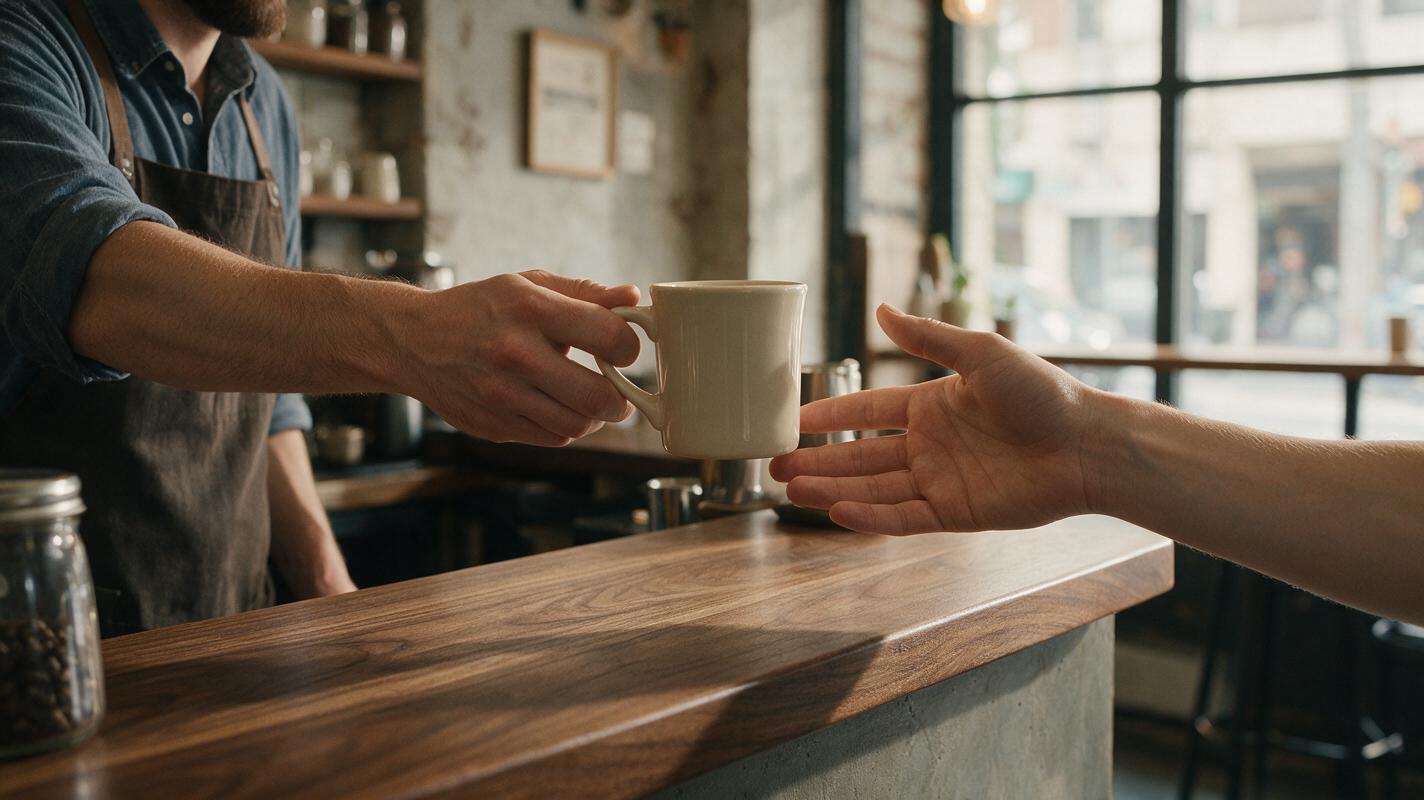
Table of contents
TL;DR
Start from a still image in which both hands, the prop, and every contact point are already anatomically clear. Then use an ai video model to animate one short action—reach, grasp, move, or release—rather than asking it to invent the entire interaction at once.
The fastest workflow is to create a clean keyframe of a barista holding out a mug, animate a restrained handoff with Seedance or Kling, and compare several short generations. If the grip is already wrong in the source image, regenerate the frame instead of expecting video prompting to repair it.
Why AI hand interactions break so easily
A hand touching an object creates a difficult structure problem. The model must preserve finger count, joint direction, object geometry, depth order, contact pressure, and motion continuity at the same time. A prompt such as “the barista passes a mug to the customer” also contains several hidden actions: reaching, gripping, transporting, receiving, changing ownership, and releasing.
Common failures include:
- Finger multiplication: new fingers appear when the hand rotates or crosses the mug.
- Prop fusion: fingertips, the handle, and the rim become one soft shape.
- Sliding contact: the mug moves before the hand applies believable force.
- Grip switching: the hand begins around the handle but finishes around the body of the mug.
- Depth-order errors: a finger that should pass behind the handle appears in front of it.
- Unmotivated duplication: a second mug or partial hand enters during the transfer.
These errors become more likely when hands are small in frame, hidden by sleeves, blurred, crossed over each other, or handling reflective and transparent objects.
Reusable visual prompt — failure-mode comparison
Create a photorealistic side-by-side editorial comparison in one landscape 16:9 frame. LEFT PANEL: a flawed AI-generated close medium shot of a barista handing a plain cream ceramic mug across a walnut café counter, showing an anatomically incorrect grip with an extra finger, one fingertip fused into the mug handle, and a slightly warped circular rim. RIGHT PANEL: the corrected version of the same composition, with exactly five fingers per visible hand, natural bent knuckles, clean separation between skin and ceramic, a stable round mug, and believable contact at the handle. MANDATORY CAMERA: eye-level true three-quarter view from the customer side, camera near front-right, 50mm documentary lens, both hands fully visible and uncropped. Warm window daylight, lived-in neighborhood café, restrained colors, realistic skin texture, no text, no logos, no interface elements.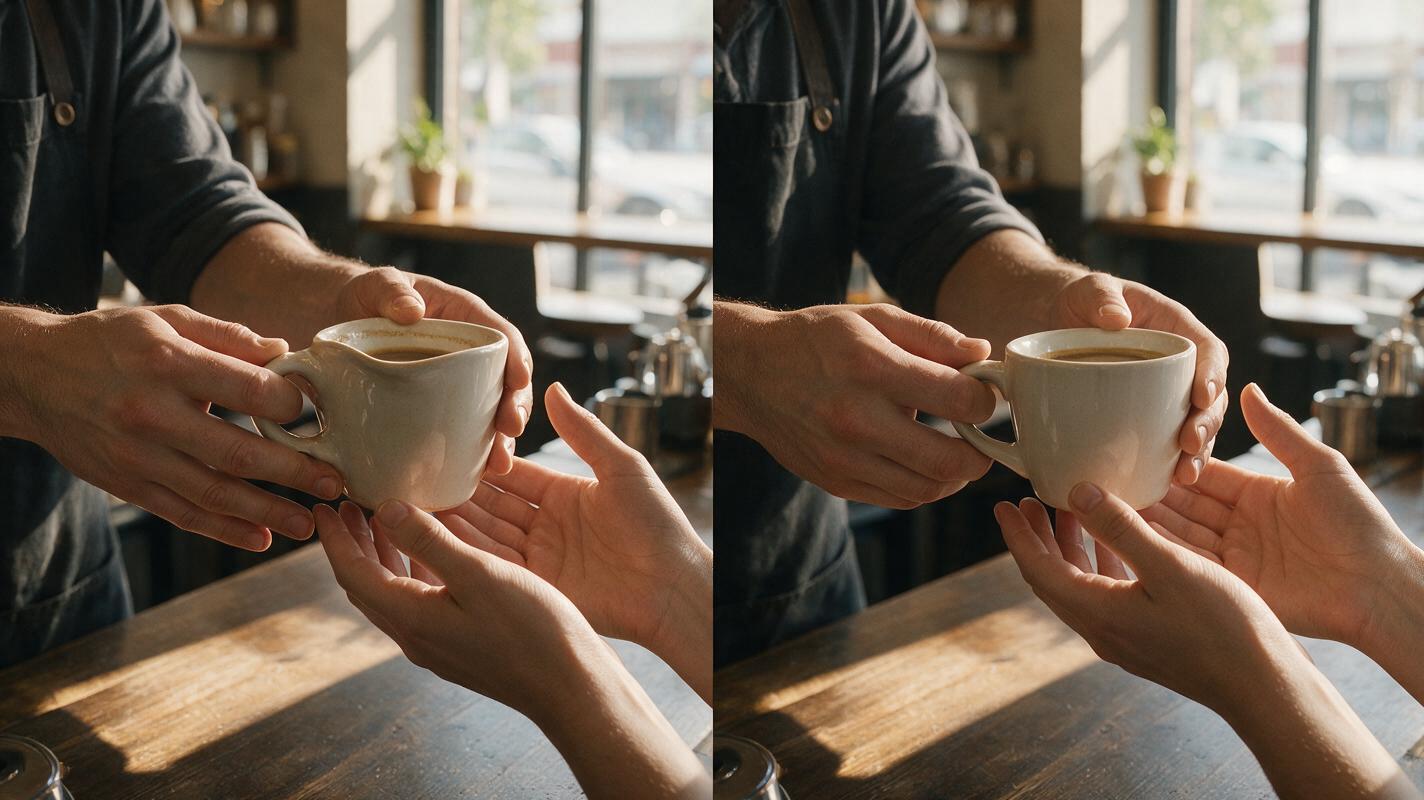
Three ways to create a believable prop interaction
| Approach | Best use | Main risk |
|---|---|---|
| Text-first generation | Exploring composition and overall action | The model must invent anatomy, prop shape, and motion together |
| Reference-first animation | Controlled reaches, lifts, passes, and placements | A weak source frame carries its defects into motion |
| Motion-guided performance | Actions requiring specific arm timing or body mechanics | Fast occlusion can still damage fingers and contact points |
This tutorial focuses on the second approach because it separates two problems: first establishing correct structure, then generating motion. Text-first and motion-guided alternatives are covered later.
How MagicBoat handles hand-focused AI video workflows
MagicBoat brings image-generation and video-generation models into one account, so the same task can be tested as a multi-model workflow. Seedream, Flux, or GPT Image can be used to develop a structurally clean starting frame. That frame can then move into an image to video workflow with Seedance or Kling, while another available video model can provide a comparison render.
The practical advantage is not that one model always produces perfect hands. It is that you can preserve the same source image and prompt logic while testing which model handles a particular grip, camera angle, and motion path most convincingly.
Contact-first rule: image models solve a single instant. Video models must solve every transition around that instant. Put the most important contact pose in the source frame whenever possible.
Step 1 — Reduce the interaction to one physical verb
Rewrite the scene as one action rather than a complete story. For the café example, do not begin with “the barista picks up a mug, walks to the customer, hands it over, and smiles.” Use extends, places, or releases.
A useful action specification is:
SUBJECT: barista behind a café counter
OBJECT: one cream ceramic mug with a large handle
ACTION: slowly extends the mug forward by 20 centimeters
CONTACT: right hand remains wrapped around the handle
CAMERA: locked close medium shot
PROTECTED ELEMENTS: finger count, mug rim, handle opening, counter edge
DURATION LOGIC: one continuous restrained movement
Expected result: a small, readable motion with fewer opportunities for grip changes. If the action requires multiple verbs, plan separate clips and cut between them.
Step 2 — Generate a contact-safe source frame
Create the still before generating motion. The mug should be opaque, conventionally shaped, and large enough for the fingers to remain visible. Avoid glass, polished metal, steam crossing the hand, deep shadows over the knuckles, or a handle hidden behind the palm.
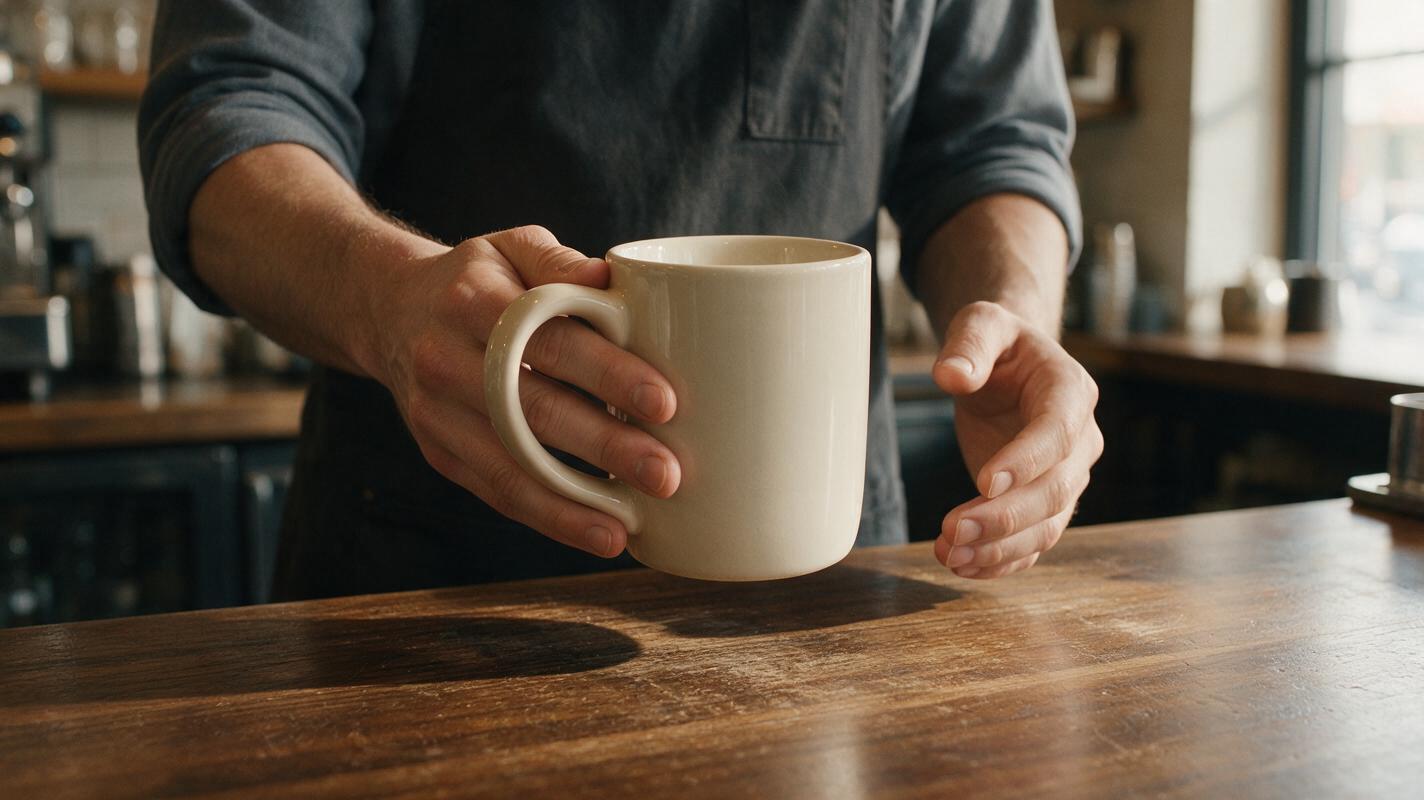
Use a three-quarter camera angle so the viewer can see the mug body, the handle opening, the thumb, and the curled fingers. A profile view often compresses those structures into one silhouette; a frontal view can hide the grip behind the object.
Reusable visual prompt — contact-safe café keyframe
Photorealistic cinematic editorial still of an adult barista behind a worn walnut counter in a believable neighborhood café, calmly offering one plain cream ceramic mug toward an off-camera customer. The barista's right hand grips only the large mug handle: thumb visible on top, four naturally curled fingers visible through and around the handle, clean separation between every finger and the ceramic. The left hand rests open on the counter and does not touch the mug. MANDATORY CAMERA: eye-level true three-quarter view, camera near front-right on the customer side, locked 50mm lens, close medium framing, both hands completely inside the frame with clear space around fingertips. The mug is upright with a circular rim and unchanged proportions. Warm side window light, subtle café background, realistic skin pores and fabric, shallow but not extreme depth of field, no steam crossing the hands, no jewelry, no text, no logos, no extra people, no duplicated objects.Expected result: one legible hand-object relationship. Inspect the full-resolution frame for five fingers, credible joints, a continuous handle opening, a circular rim, and a palm that does not dissolve into the mug.
Regenerate now if any structural defect is visible. Video generation usually amplifies an ambiguous grip rather than correcting it.
Step 3 — Protect the hand-object silhouette
Before animation, identify the edges that must remain stable. In this shot they are the mug rim, handle opening, thumb profile, four curled fingers, wrist, and counter line. These details form a visual contract for the clip.
Crop only if the hands remain comfortably inside the frame. Fingertips touching a frame edge are easily lost, while tiny hands provide too little detail for stable articulation. A close medium shot is usually safer than a wide café view.
Use this protection clause in the motion prompt:
Preserve exactly one mug and one visible right hand. Maintain five anatomically correct fingers, the original grip around the handle, a clean open handle shape, an upright circular mug rim, and clear separation between skin and ceramic throughout the shot.Expected result: the generator receives explicit priorities instead of treating every background object as equally important.
Step 4 — Divide the motion into contact phases
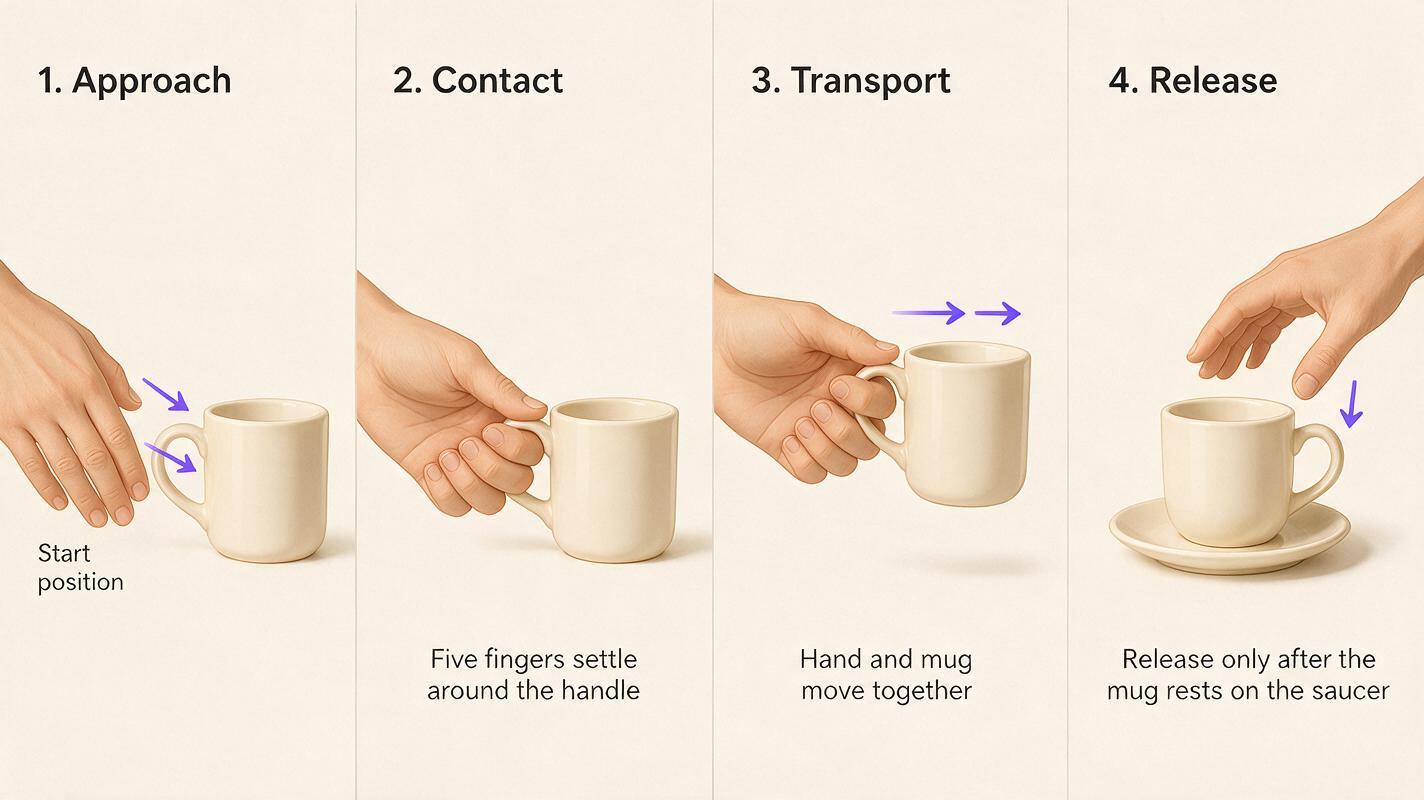
A convincing interaction follows a simple physical order. The hand establishes contact, force moves the object, and contact is maintained until an intentional release. Even when only one short phase appears in the final clip, thinking in this sequence helps expose impossible motion.
- Approach: the hand moves toward the object without premature object motion.
- Contact: fingers meet the handle and settle into a readable grip.
- Transport: hand and mug move as one unit.
- Release: the mug becomes supported elsewhere before the fingers open.
Reusable visual prompt — four-phase contact diagram
Create a clean four-panel instructional diagram on a warm off-white background showing the same realistic right hand and the same cream ceramic mug in sequential side views. PANEL 1 APPROACH: open hand five centimeters from the handle while the mug stays still. PANEL 2 CONTACT: thumb and four fingers settle around the handle. PANEL 3 TRANSPORT: hand and mug move together horizontally with a short subtle direction arrow. PANEL 4 RELEASE: mug rests securely on a saucer before the fingers open. MANDATORY LAYOUT: landscape 16:9, four equal panels arranged left to right, consistent scale and camera angle, hand fully visible in every panel, exactly five fingers, simple black panel labels, no decorative graphics, no software interface, no logos. Anatomically accurate editorial realism combined with restrained technical-diagram clarity.Expected result: a motion plan that respects cause and effect. For the first generation, animate only the transport phase because the starting image already contains the grip.
Step 5 — Write a restrained Seedance or Kling prompt
Keep the motion prompt shorter than the image prompt. The source frame already defines appearance, lighting, wardrobe, and location. Repeating or changing those details can encourage unnecessary reinterpretation.
Start with this model-neutral version:
The barista slowly extends the ceramic mug straight forward by about 20 centimeters. The wrist remains neutral and the right-hand grip stays fixed around the handle. Hand and mug move together as one rigid unit. The left hand remains still on the counter. Natural breathing only. Locked camera, no zoom, no reframing. Preserve exactly five fingers, one mug, the circular rim, the open handle, and clean skin-to-ceramic separation. No grip switching, no object duplication, no finger morphing, no sudden motion.For a Seedance prompt, keep the action chronological and state the protected structures after the motion. For a Kling prompt, the same concise order works well as a controlled test: subject, action, motion quality, camera, then preservation constraints. The goal is not to overload either model with cinematic adjectives.
Expected result: the barista's forearm advances while the mug and fingers retain their original relationship. Generate several short candidates rather than asking for a long performance immediately.
Step 6 — Compare motion, not just the final frame
Review each candidate frame by frame around the first movement and the motion midpoint. A clip can begin and end correctly while containing a malformed hand for only a few frames.
| Checkpoint | Accept | Reject |
|---|---|---|
| First movement | Mug waits for the hand and moves with it | Mug floats before the wrist moves |
| Midpoint | Handle and finger spacing remain readable | Finger count or grip changes |
| Maximum extension | Wrist remains naturally aligned | Wrist folds, stretches, or rotates abruptly |
| Background | Café geometry stays quiet | New mugs, arms, or customers appear |
Choose the take with the cleanest contact continuity, even if another candidate has more dramatic camera motion. Hand-focused shots benefit from restraint.
Step 7 — Repair the smallest possible section
If one or two frames fail, trim the clip before the defect or hide the moment with a cutaway. If the entire grip changes, return to the source frame or regenerate with less motion. A face repair cannot fix fingers, mug geometry, or incorrect depth order.
Useful editorial fixes include:
- Cut from the extending mug to the customer's reaction before the grip deteriorates.
- Use a closer insert of the mug arriving on the counter instead of showing a full hand-to-hand exchange.
- Split the handoff into an offering shot and a receiving shot, with the ownership change occurring between cuts.
- Slow only a structurally stable section rather than stretching malformed frames.
Expected result: a believable finished interaction assembled from stable motion, not a long clip that exposes every generation error.
Keep the same prop logic across projects
For repeated scenes, save a compact prop specification alongside the visual reference. Record the mug's material, color, handle side, relative size, and approved grip. Reuse the same wording across keyframes:
PROP ANCHOR: one matte cream ceramic mug, cylindrical body, large C-shaped handle facing camera-right, circular rim, no pattern, no logo
GRIP ANCHOR: right thumb above the handle, four fingers naturally curled around and through the handle, neutral wrist
This does not guarantee perfect continuity, but it removes avoidable contradictions such as changing handle direction, material, or grip between shots.
Alternative: use motion transfer for larger body actions
If the action depends on precise shoulder, elbow, and torso timing—such as lifting a tray or placing a heavy box—record a slow reference performance with both hands visible. Use a simple opaque prop, even if it is only a stand-in with similar dimensions.
Keep the performer facing a three-quarter camera, avoid crossed wrists, and pause briefly at contact. Motion guidance can improve the path of the arms, but the generated character and prop still need enough visual separation for clean fingers.
Alternative: separate the handoff into two shots
A direct person-to-person transfer is harder because two hands overlap around one object. Replace it with an offering shot followed by a receiving shot:
- Shot A ends with the barista holding the mug near the customer.
- Shot B begins with the customer already holding the same mug.
- A reaction, close-up, or sound cue sells the ownership change across the cut.
This is often more convincing than forcing two independently generated hands to share the same handle on screen.
Where this workflow falls short
Reference-first generation cannot eliminate every anatomy error. Transparent glasses, reflective utensils, interlocked fingers, handshakes, buttoning clothes, typing, and two-person exchanges remain difficult because they create frequent occlusion and rapidly changing contact.
The workflow also trades spontaneity for control. A locked camera and limited motion are reliable, but they may feel less energetic than a freely generated scene. Once the basic interaction works, add camera movement in a separate test instead of combining a complex grip, body turn, expression change, and orbit in one prompt.
FAQ
Should the starting frame show the hand before or after contact?
Use the contact pose when the grip is the most important detail. Beginning after contact lets the video model concentrate on moving the hand and object together instead of inventing a grasp.
Are close-ups better for AI-generated hands?
Usually, provided the entire hand remains inside the frame. More visible detail helps, but extreme close-ups can make tiny anatomical changes obvious. A close medium shot is a practical compromise.
Should I include a negative prompt?
Use concise exclusions when the selected model supports them, or append a short “avoid” clause to the main prompt. Prioritize specific failures such as extra fingers, duplicate mugs, fused fingertips, grip switching, and warped handles.
Can face swap repair a hand interaction?
No. Face swap is useful when the performance is good but facial identity drifts. Hand anatomy, prop geometry, and contact timing require a new source frame, a new generation, or an editorial cut.
How long should the first test clip be?
Use the shortest duration that can clearly show one action. Short tests make it easier to identify the exact frame where contact breaks and reduce the temptation to combine several verbs.
Which model should I choose?
Test the same source frame and restrained prompt in more than one available video model. Keep the render that best preserves the grip and object structure; model performance can vary with the specific pose, prop, and camera angle.
Final checklist
- Use one opaque, conventionally shaped prop.
- Choose one physical verb for each clip.
- Show all fingers, the grip, and the object's contact surface in the source frame.
- Keep hands away from the frame edges and heavy occlusion.
- Animate hand and object as one unit during transport.
- Review the midpoint frame, not only the beginning and end.
- Cut around a brief defect; regenerate persistent structural errors.
- Create your first text to video test free on MagicBoat, then compare it with the reference-first result.
Keywords
ai video tutorial, realistic hand interactions, image to video, seedance prompts, kling prompts, prompt engineering, ai video workflow