Remove Manga Speech Bubbles Without Damaging the Artwork
Speech bubbles, captions and sound effects often cover artwork that must be reconstructed before a manga panel can become an animated shot. This guide shows how to build a clean plate with Nano Banana Pro while preserving ink lines, screentones, character anatomy and background perspective.
Table of contents
The clean-plate problem behind manga animation
Removing a speech bubble is easy only when it sits over empty space. In production manga, bubbles frequently cover hair, clothing, speed lines, furniture or architecture. Erasing the white shape leaves a hole; asking a model to “remove the text” can replace that hole with invented details that do not match the surrounding drawing.
The reliable solution is to create a clean plate: a restored version of the panel containing the artwork that might plausibly continue behind every bubble, caption and sound effect. For reference-guided image editing, nano banana pro can be used to reconstruct selected regions while the original panel remains the visual reference.
A successful clean plate should look uneventful. Viewers should not notice newly generated artwork, repeated textures or abrupt changes in line weight.
Decide what actually needs reconstruction
Do not remove every graphic element automatically. First decide what the animated shot needs to reveal. A bubble outside the camera crop may require no work, while a small caption over a character’s shoulder can become conspicuous when the camera pushes in.
Classify each obstruction before editing:
- Bubble over open tone: usually requires matching a flat screentone, gradient or paper texture.
- Bubble crossing line art: requires continuation of specific contours, hatching and nearby shapes.
- Tail touching a face or hand: needs careful anatomical reconstruction rather than broad generative filling.
- Caption over architecture: requires perspective-aware continuation of edges, windows, rails or floor lines.
- Integrated sound effect: may overlap action lines, debris and impact shapes that cannot be inferred from text removal alone.
Keep story-relevant typography if it belongs inside the world, such as a shop sign or phone display. Remove only the elements that will be replaced by subtitles, dialogue audio or motion design.
Build a protected source before editing
Work from the highest-resolution scan available. Cropped social-media images and compressed screenshots make reconstruction harder because screentones can turn into moiré patterns and thin ink lines may already be broken.
Create three working copies:
- Original reference: an untouched panel used to verify composition and drawing style.
- Edit plate: the image on which bubbles and captions will be reconstructed.
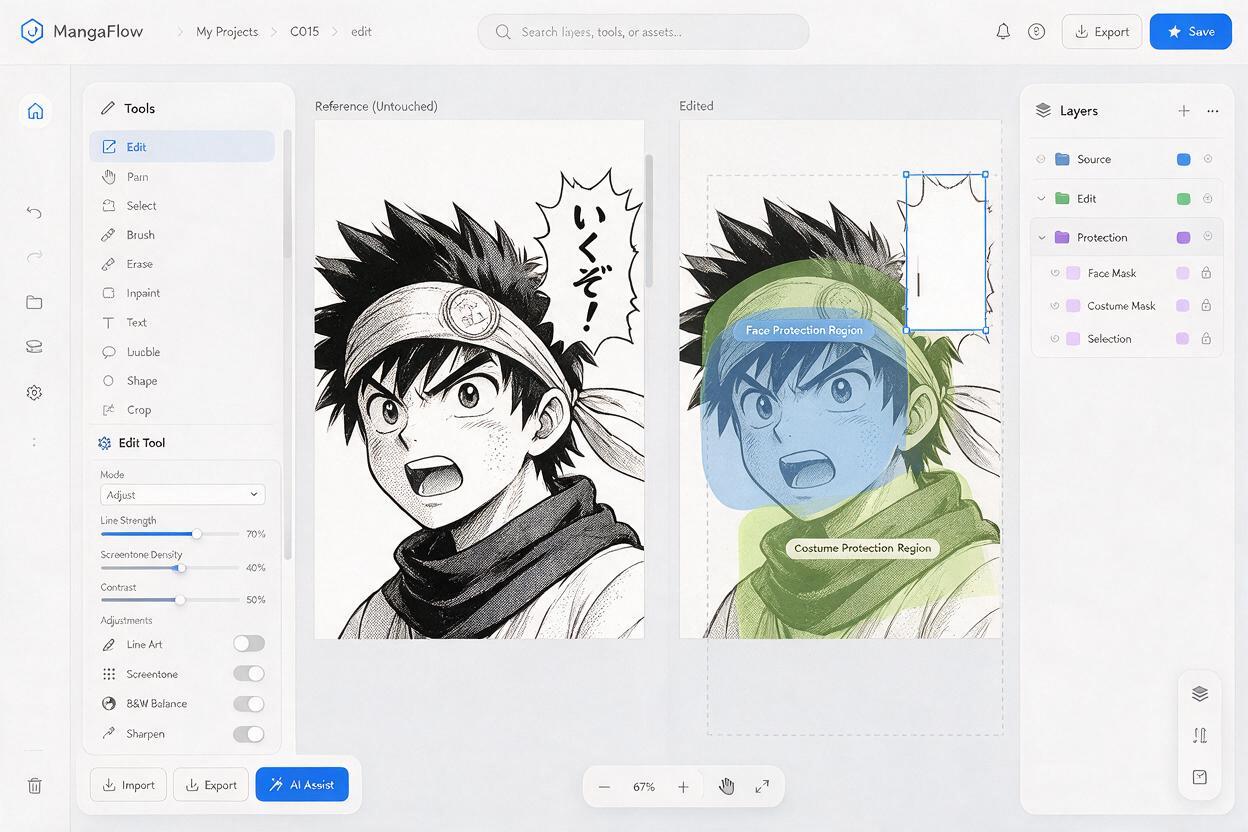
- Protection reference: a marked copy identifying faces, hands, costume details and important props that must not change.
Add extra canvas beyond the intended animation crop when possible. This overscan gives later pans, zooms and parallax moves room to operate without exposing an unfinished border.
Before sending the image to the model, make a tight selection around one obstruction. Include a narrow ring of surrounding artwork so the reconstruction can match nearby lines and tones, but avoid selecting an entire face or body merely because a bubble touches one edge.
Describe the hidden artwork, not the deletion
A deletion-only instruction explains what should disappear but not what should replace it. Instead, describe the continuation that the image needs. Mention the visible evidence around the selected area: contour direction, material, perspective, screentone density and line weight.
Use a compact prompt such as:
Edit only the selected speech-bubble region.
Reconstruct the artwork hidden behind it by continuing the visible background and line art.
Match the surrounding black-and-white manga ink style, line weight, screentone density and perspective.
Preserve the character's face, hair silhouette, costume, pose and panel composition exactly.
Do not add text, symbols, new objects, extra limbs or decorative details.
Leave all unselected areas unchanged.
Replace “background and line art” with the actual missing content whenever it can be inferred. For example:
Continue the character's jacket shoulder seam beneath the removed caption.
Complete the fabric fold using the visible contour on both sides.
Restore the wall screentone behind the shoulder with the same dot scale and density.
Do not redesign the jacket, alter the neck or change the hairstyle.
Specific continuation instructions reduce the temptation to invent an elaborate object inside a visually simple gap. If the hidden content cannot be inferred, prefer a neutral continuation of the nearest surface instead of introducing story information that was never present.
Repair one obstruction at a time
Editing all bubbles in one pass creates too many uncertain regions. The model may change unrelated faces, simplify backgrounds or produce different screentone patterns across the panel. Isolate one bubble, inspect the result and only then continue to the next area.
Use the following edit order inside the panel:
- Start with bubbles covering simple backgrounds to establish the panel’s tone and line treatment.
- Continue with captions crossing clothing, hair or props.
- Handle faces, hands and dense action artwork last, using the smallest practical selection.
- Remove large sound effects in several overlapping local edits rather than one broad replacement.
Generate several candidates for difficult regions. Judge them by continuity rather than by standalone beauty. A modest reconstruction that connects existing lines is usually safer than a detailed result that introduces a new design.
Restore manga tones without visible patches
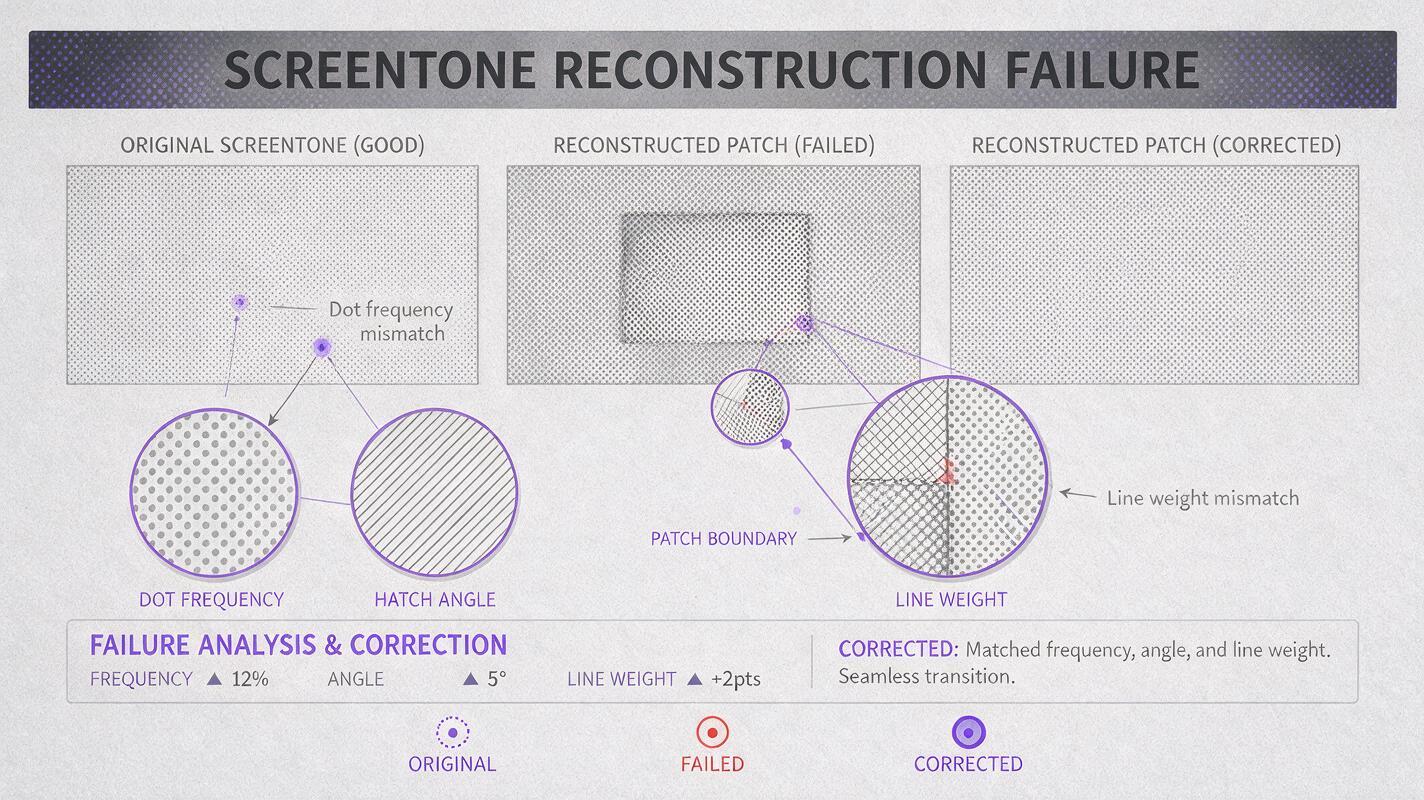
Screentones are especially unforgiving. A reconstructed patch may have the correct gray value but the wrong dot frequency, angle or texture. It can look acceptable at normal size yet flicker after a camera move or video compression.
Inspect the result at both 100 percent and the intended delivery size. Look for:
- Dots that become larger or softer inside the edited region.
- A rectangular tonal boundary around the former bubble.
- Gradients that reverse direction unexpectedly.
- Hatching that changes angle or spacing.
- Artificially smooth gray areas beside printed textures.
If the tone does not match, ask for the underlying line art first and replace the screentone separately in an image editor. Uniform tones are often more reliable when sampled from an unaffected part of the original panel rather than regenerated repeatedly.
Reconstruct sound effects as action artwork
Large manga sound effects are not ordinary text overlays. They can function as part of the composition, covering speed lines, impact bursts, smoke or shattered debris. Removing them without rebuilding the action structure can make the panel feel empty or physically confusing.
Identify the visual force behind the lettering before editing. Determine whether lines radiate from an impact point, follow a sword arc, trail a moving character or converge toward a vanishing point. The prompt should preserve that direction:
Replace only the selected sound-effect lettering with the action artwork behind it.
Continue the radial impact lines from the visible center near the character's fist.
Maintain the existing line density, direction and hand-inked variation.
Preserve both characters, their silhouettes and the contact point exactly.
Do not add a new explosion, weapon, text or anatomy.
When the sound effect is compositionally important, consider keeping a separate typography layer for the final animation. You can restore the artwork underneath, then animate the original lettering with scale, shake or directional blur during editing.
Diagnose weak reconstructions before animation
| Failure | Likely cause | Better correction |
|---|---|---|
| Character design changes near the bubble | The edit mask includes too much anatomy | Shrink the selection and explicitly protect identity, costume and silhouette |
| Lines stop inside the repaired area | The prompt requests removal without structural continuation | Name the contours that must connect across the gap |
| Background perspective bends | The missing surface was described too generally | Identify visible parallel lines, edges and vanishing direction |
| Screentone forms a visible patch | Generated texture differs from the source scan | Restore line art first, then sample or rebuild the tone separately |
| New props appear behind the text | The model fills uncertainty with decorative detail | Request the simplest plausible continuation and forbid new objects |
| Impact art loses energy | A sound effect was treated as isolated typography | Reconstruct the directional speed lines and force pattern underneath |
Flip rapidly between the original panel and clean plate. The only intentional difference should be the restored area. If eyes, mouth shapes, costume seams or panel framing jump during the comparison, reject the edit even when the filled region looks convincing.
Prepare the clean plate for animation
Once the artwork is restored, separate elements according to the intended shot. A simple push-in may require only the clean plate, but parallax movement benefits from distinct foreground, character and background layers.
For a typical dialogue panel, prepare:
- A complete background plate with the character removed or carefully covered.
- The character on a transparent layer with repaired edges where bubbles previously overlapped.
- Optional hair, clothing or environmental elements that need independent motion.
- Original bubbles and sound effects on separate layers if they will reappear as animated graphics.
Extend hidden edges slightly beyond each cutout. Even subtle motion can reveal transparent seams around shoulders, hair or props. When the layered artwork is ready, a restrained reference image to video pass can add breathing, cloth movement or a controlled camera drift without asking the video model to solve missing artwork at the same time.
Keep reconstruction and animation as separate decisions. The clean plate establishes what exists in the shot; the animation prompt establishes what moves.
Final checklist
- The highest-resolution source panel was preserved as an untouched reference.
- Only bubbles, captions and sound effects that interfere with the shot were removed.
- Each obstruction was reconstructed with a tight local selection.
- Prompts described hidden contours, surfaces and perspective rather than deletion alone.
- Faces, hands, costumes and important props match the original panel.
- Line weight, hatching and screentone remain consistent across repaired regions.
- Large sound effects were rebuilt according to the direction of the underlying action.
- The clean plate includes enough overscan and hidden-edge extension for camera movement.
- Typography is retained separately when it will return as an animated layer.
If you have a panel with a bubble crossing important artwork, test this prompt yourself on one small region before reconstructing the entire page.
Keywords
remove manga speech bubbles, manga clean plate, Nano Banana Pro, manga background reconstruction, comic panel editing, manga to anime, illustration to animation