Script to Video AI: Turn a Flashback Script Into a Clear Film
Learn how to convert a flashback-heavy script into an AI video without confusing the audience. This workflow separates chronology from screen order, assigns each time period a visual grammar, and designs transitions before generating full clips.
Table of contents
Turn Time Jumps Into Visual Rules
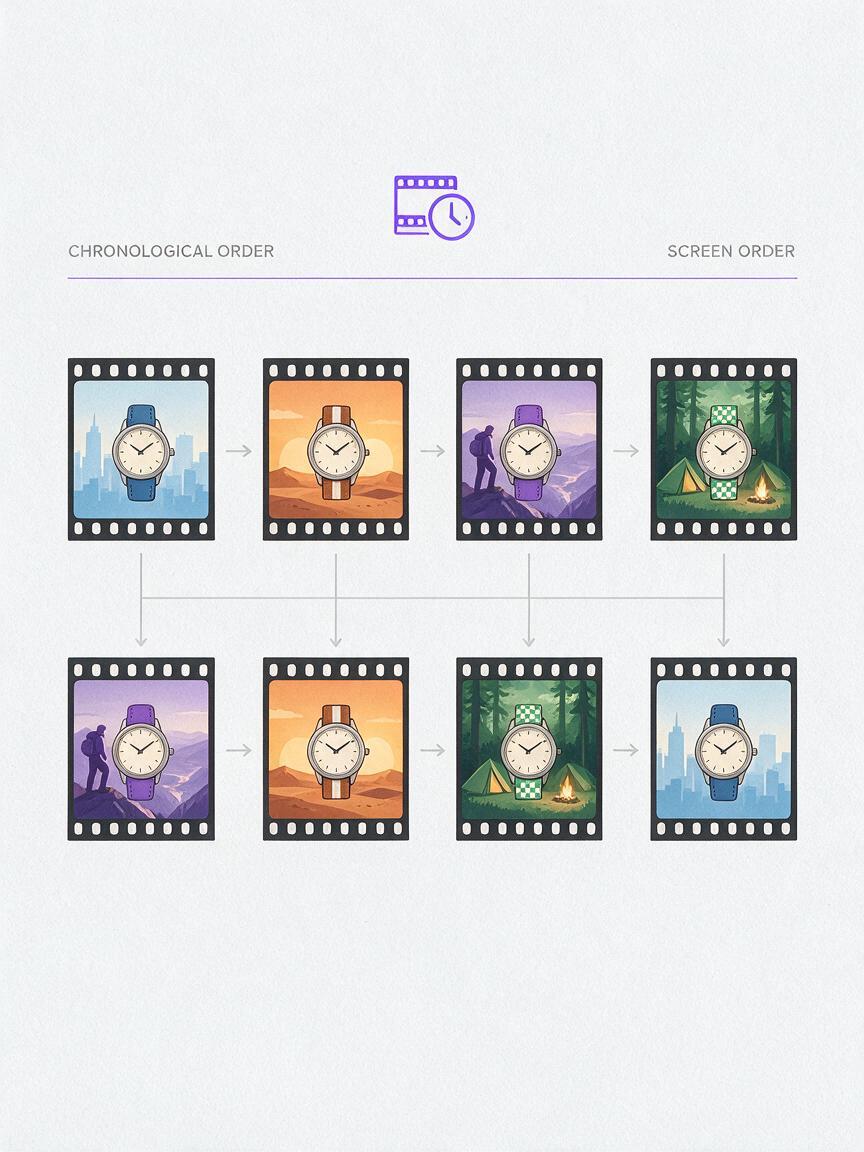
The safest way to convert a flashback script with script to video AI is to map two timelines before generating anything: the order in which events happened and the order in which viewers will see them.
A nonlinear script may be clear on the page because headings, dialogue, and context identify every transition. In a generated video, that structure must become visible. Changes in color, lighting, wardrobe, props, camera behavior, sound, and transition design should tell viewers when they have entered a different period.
The central rule: never ask a video generator to solve chronology, production design, performance, and camera movement in one undivided prompt. Define the periods first, storyboard the transitions, and generate each shot as a controlled unit.
Step 1 — Separate Story Time From Screen Time
Begin by making two scene lists. Story time is the chronological order of events inside the fictional world. Screen time is the order presented to the audience.
Suppose a short film opens with Mara finding a broken watch, moves to the day her brother gave it to her, returns to the present, and then reveals an earlier argument. The two lists would look like this:
| Chronological order | Screen order | Period |
|---|---|---|
| The watch is given as a gift | Mara finds the broken watch | Present |
| The siblings argue | The watch is given as a gift | Early memory |
| The watch is damaged | Mara examines the watch | Present |
| Mara finds the watch | The siblings argue | Late memory |
Give every period a short production code such as PRESENT, MEMORY-A, or MEMORY-B. Put that code at the beginning of every storyboard and clip prompt. This reduces the chance that visual details from one period will drift into another.
SCENE MAP
PRESENT: Mara finds the damaged watch in an empty kitchen.
MEMORY-A: Her brother gives her the new watch in a sunlit garden.
PRESENT: Mara turns the watch over and notices an engraving.
MEMORY-B: The siblings argue beside a parked car during a storm.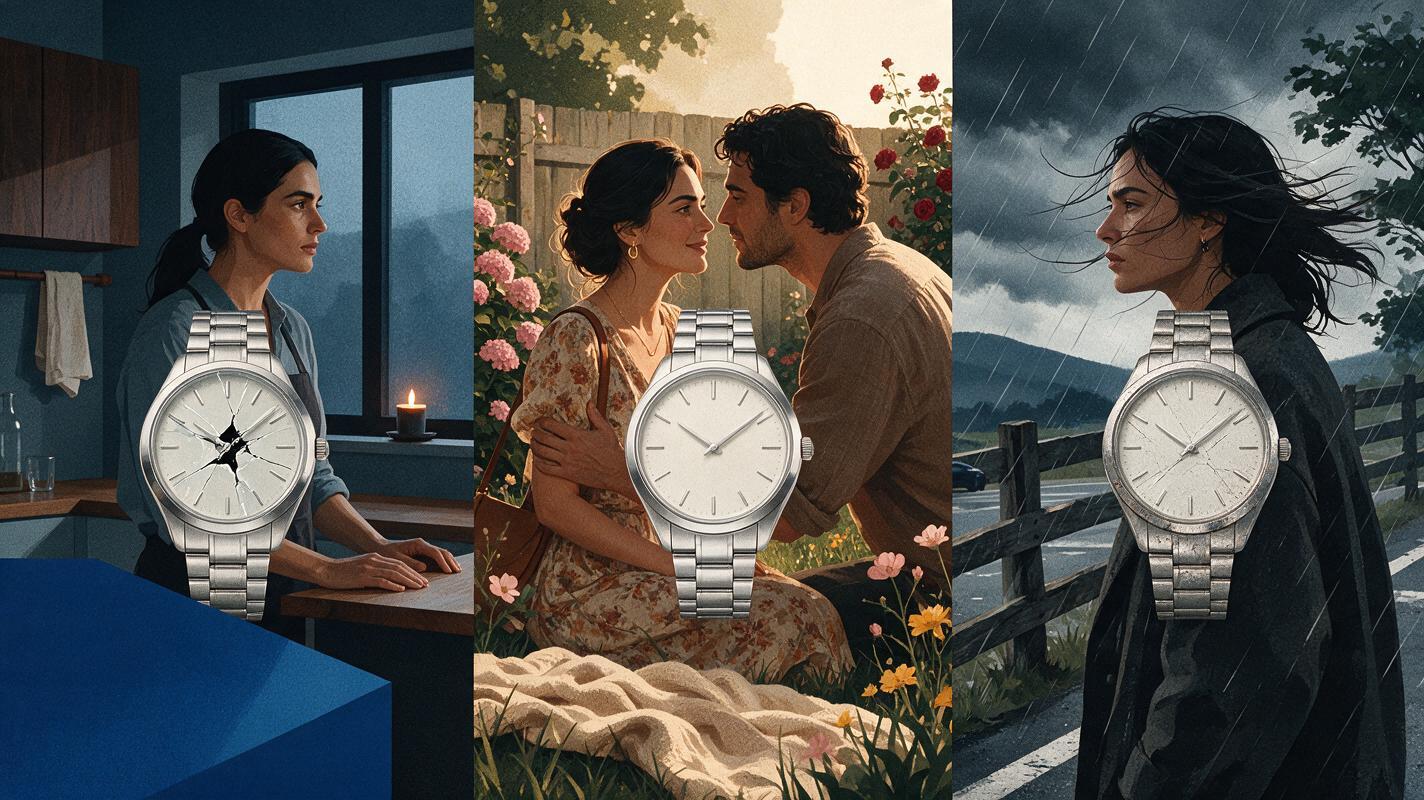
Step 2 — Identify the Trigger for Every Flashback
A flashback should not appear merely because the screenplay says “FLASHBACK.” Give each time jump an observable trigger that can be photographed and heard.
- Object trigger: a watch, photograph, key, letter, or stain.
- Sound trigger: a train horn, repeated phrase, melody, or door slam.
- Gesture trigger: a hand movement repeated in two periods.
- Location trigger: the same doorway or street shown years apart.
- Emotional trigger: a present reaction that motivates the remembered event.
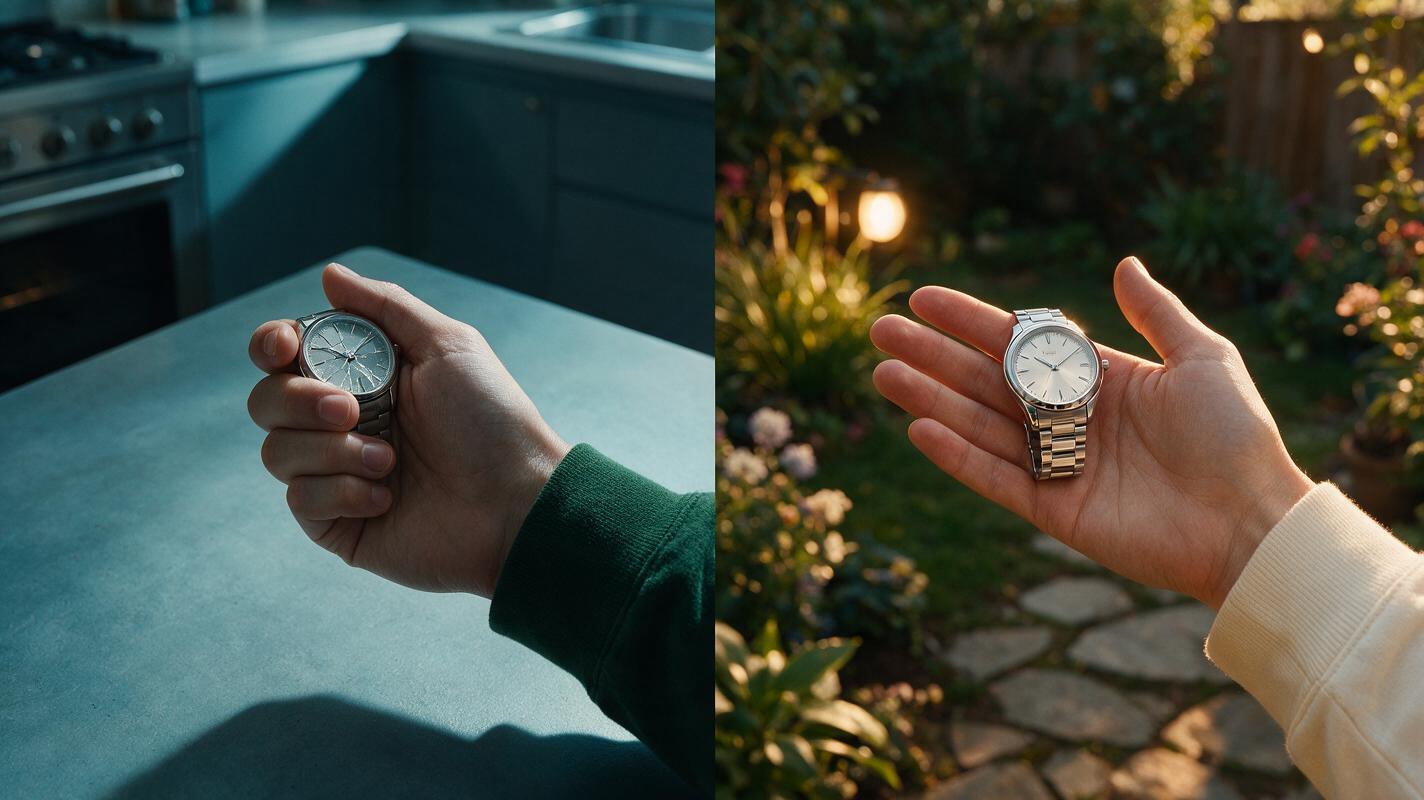
Write the transition as a pair of shots rather than an abstract editing instruction. For example, replace “Mara remembers the gift” with “Present-day Mara closes her fingers around the broken watch; cut to her younger hand opening around the undamaged watch.”
This matched action gives an AI storyboard generator two concrete compositions. It also creates compatible endpoints for the eventual clips.
Step 3 — Assign a Visual Grammar to Each Time Period
Choose a small set of visual rules for every period. The rules must be distinct enough to communicate time, but simple enough to repeat across many shots.
| Control | Present | Early memory | Late memory |
|---|---|---|---|
| Lighting | Cool window light | Warm afternoon sun | Hard storm light |
| Camera | Locked, restrained frames | Gentle lateral movement | Close handheld framing |
| Wardrobe cue | Dark green coat | Cream linen shirt | Blue rain jacket |
| Watch condition | Cracked face | Clean and polished | Scratched but intact |
| Environment | Quiet kitchen | Flowering garden | Wet roadside |
Avoid depending entirely on sepia, monochrome, blur, or heavy film damage. Those effects can overpower faces and make every memory feel interchangeable. Production details such as weather, costume, object condition, and camera distance usually provide clearer narrative evidence.
Use the following prompt to develop period-specific design rules:
You are preparing a visual plan for a nonlinear short film.

Create a distinct visual grammar for each time period below.
For each period, define lighting, color relationships, camera behavior,
wardrobe cues, location condition, and the state of the recurring prop.
Keep the same characters recognizable across all periods.
Do not use text labels, dreamlike distortion, or sepia as the primary cue.

Periods:
[PASTE PERIOD SUMMARIES]
Recurring prop:
[DESCRIBE PROP]
Emotional progression:
[DESCRIBE CHANGE]
Step 4 — Turn Each Time Jump Into an AI Storyboard Pair
When you turn a script into an AI storyboard, treat every temporal transition as a two-frame unit: the final image of the departing period and the first image of the arriving period.
The frames should share one strong visual relationship. That relationship might be matching composition, continuous movement, a repeated shape, contrasting weather, or the same prop in a different condition.
Create two cinematic storyboard frames for a time transition.

Frame A — PRESENT:
Medium close-up of Mara's hand holding a cracked silver watch above
an unlit kitchen table, cool dawn light, dark green sleeve, still camera.

Frame B — MEMORY-A:
Matching medium close-up from the same angle; a younger Mara opens her
hand to reveal the same watch new and polished, warm garden light,
cream sleeve, soft foliage behind her.

Continuity requirements:
Keep hand position, watch shape, lens perspective, and screen direction aligned.
Change only age cues, wardrobe, prop condition, lighting, and environment.
No captions, lettering, split screen, interface elements, or logos.
Review the pair at thumbnail size. If the time change remains understandable without dialogue, the visual distinction is working. If not, strengthen one physical cue instead of adding several decorative effects.
Once the timeline map and transition pairs are ready, you can create the storyboard frames and motion clips in one workflow rather than rebuilding the structure during editing.
Step 5 — Generate Transition Pairs Before Full Clips
Do not render the entire sequence immediately. Generate the outgoing and incoming clips for each flashback first. These shots determine whether the nonlinear structure will read clearly.
Define a precise endpoint for the first clip and a compatible starting point for the second:
OUTGOING CLIP — PRESENT
Mara slowly closes her fingers around the cracked watch.
The camera remains still. Her hand finishes centered in frame.
No lighting change, no camera rotation, no added objects.
End with her fist motionless for a brief beat.

INCOMING CLIP — MEMORY-A
Begin on the same centered closed fist and matching camera angle.
A younger Mara opens her hand, revealing the polished watch.
Warm garden light and a cream sleeve establish the earlier period.
Use gentle natural hand movement; keep the watch shape consistent.
Test a direct cut before adding dissolves, flashes, or elaborate transitions. A clean match cut often communicates the relationship more effectively because the repeated object or gesture carries the meaning.
If you use an AI clip maker, keep each motion prompt focused on one action. Extra actions can change hand position, prop orientation, framing, or character appearance at the exact point where two clips need to connect.
Step 6 — Rebuild Context With Sound and Return Shots
Sound can prepare viewers for a jump before the image changes. Let a sound from the incoming period begin over the outgoing shot: garden laughter under the present-day close-up, for example, or rain arriving before the roadside memory appears.
The return to the present deserves equal attention. Reuse the present-day composition, but show a meaningful change. Mara might now grip the watch more tightly, sit in a different posture, or notice a detail she overlooked before. This proves that the memory affected the current moment.
- Place timeline markers for each period in the editing sequence.
- Keep dialogue intelligible across sound bridges.
- Check whether each return shot advances the present-day story.
- Remove any flashback that only repeats information viewers already understand.
- Watch once without sound to test visual clarity, then listen without looking to test audio continuity.
This is where you begin to direct an AI short film rather than merely assemble generated clips. The edit should reveal information in deliberate stages, with every return to the present changing the audience’s interpretation.
FAQ
How many visual cues should distinguish a flashback?
Start with two or three dependable cues, such as wardrobe, lighting, and prop condition. Too many simultaneous effects can distract from the story and make generated shots harder to match.
Should every flashback use the same transition?
No. Use transitions that reflect the trigger. An object may support a match cut, a voice may support a sound bridge, and a repeated location may support a composition match. Consistency should come from the period’s visual grammar, not from repeating one effect.
Can I create AI video from script scenes that contain several time jumps?
Yes, but divide the scene into separate present and memory units before generation. Build each transition pair independently, confirm that its visual relationship works, and only then generate the surrounding coverage.
What if the same actor appears at different ages?
Preserve stable identity anchors such as facial structure, hair color, and distinctive features while changing only age-appropriate details. Keep a separate reference description for each age and attach the correct period code to every prompt.
Do flashbacks always need a different color palette?
No. Time can be communicated through location condition, wardrobe, weather, lens distance, prop state, or camera behavior. Color is one option, not a requirement.
Sources
- BBC Writers — Script Library
- StudioBinder — Nonlinear Narrative Explained
- Adobe Premiere Pro — Working With Markers
Final Checklist
- Write separate chronological and screen-order scene lists.
- Assign a production code to every time period.
- Give each flashback a visible or audible trigger.
- Define repeatable lighting, wardrobe, prop, and camera rules.
- Storyboard both sides of every temporal transition.
- Generate transition clips before surrounding coverage.
- Use sound bridges only when they improve orientation.
- Return to a changed present-day image after each memory.
Keywords
script to video AI, AI storyboard generator, create AI video from script, turn a script into an AI storyboard, direct an AI short film, AI clip maker