How to Turn a Storyboard Into a Cinematic Image-to-Video Sequence
Build a coherent AI video by designing a six-shot storyboard, generating one continuity-controlled keyframe per shot, and animating those frames individually. This hybrid workflow gives you more control over composition, geography, and recurring objects than generating an entire sequence from one text prompt.
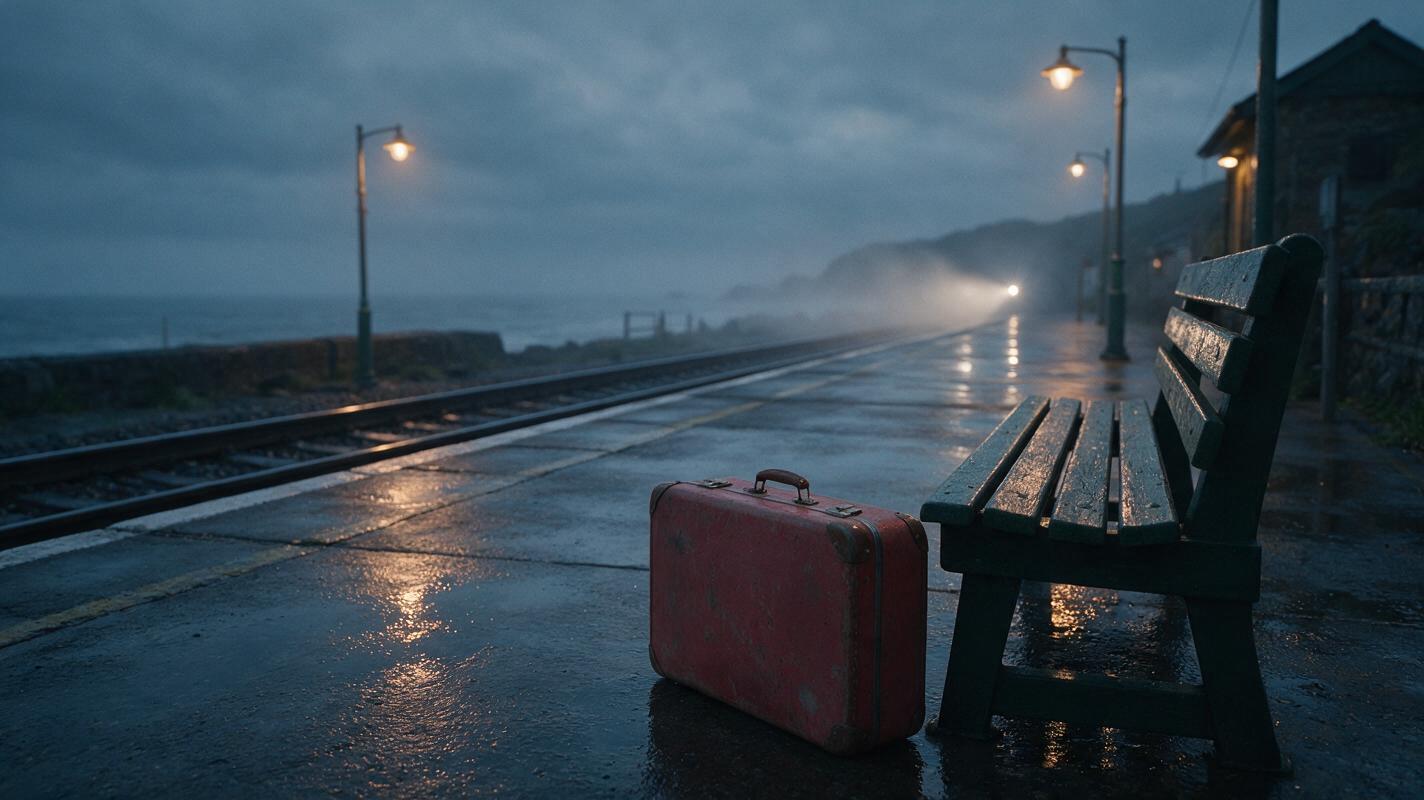
Table of contents
The fastest storyboard-to-video workflow
TL;DR: Convert your story into six simple shot descriptions, create a consistent still keyframe for each shot, and animate the frames one at a time. Use text to video only for exploratory drafts; for the final sequence, image-guided generation is the more controllable route.
This tutorial builds a short cinematic scene around a weathered red suitcase left on a coastal railway platform. The suitcase acts as a visual anchor, letting us concentrate on shot continuity without introducing face, wardrobe, or lip-sync problems.
The key principle is simple: decide what every shot looks like before asking a video model to decide how it moves.
Why one long prompt usually produces an inconsistent sequence
A text prompt can describe an entire scene, but it does not function like a locked production design document. When a model creates multiple clips independently, small ambiguities become visible continuity errors.
- The red suitcase becomes burgundy, glossy, oversized, or newly manufactured.
- The bench moves from the platform wall to the track edge.
- The railway tracks reverse direction between shots.
- Rain changes into fog or bright afternoon sunlight.
- A wide shot shows two platform lamps, while the close-up invents five.
- The camera appears to cross the scene's axis, making the train arrive from opposite directions.
Motion can also become overloaded. A prompt asking for rain, a moving train, a rotating camera, blowing paper, flashing lights, and a sliding suitcase gives the model too many competing tasks. The result may contain warped rails, duplicated luggage, unstable architecture, or movement that starts strongly and collapses near the end.
A storyboard-first workflow separates three decisions: what exists, where the camera is, and what moves. That separation makes failures easier to identify and repair.
Three ways to turn a storyboard into AI video
| Approach | Best use | Main trade-off |
|---|---|---|
| Text-only generation | Fast visual exploration and alternate ideas | Weakest control over recurring objects and geography |
| Storyboard plus image-guided animation | Narrative sequences with planned framing | Requires still-image preparation |
| Storyboard plus motion reference | Shots requiring a specific human gesture or camera rhythm | The source motion must match the target composition |
The second approach is the main workflow in this guide. It gives every video clip a visual starting point while leaving the selected video model room to generate rain, steam, train movement, and subtle camera motion.
How MagicBoat handles a storyboard-based AI video workflow
MagicBoat lets you test image and video models from one account instead of rebuilding the project across unrelated services. Models such as Seedream, Flux, and GPT Image can be used to explore storyboard frames, while options such as Seedance, Kling, and Veo can be compared for animation when they are available in the platform.
The practical mapping is:
- Still-image models: create the contact sheet, location plate, and shot-specific keyframes.
- image to video models: animate each approved keyframe with a short motion prompt.
- Text-led video models: create rough alternatives when you want to discover an unexpected camera idea.
- Motion transfer or face swap: repair or extend a sequence when a later version introduces a performer.
Model behavior differs, so treat the storyboard and continuity notes as portable production assets. If one model changes the suitcase or bends the platform, test the same keyframe and restrained motion prompt with another model rather than redesigning the whole scene.
Step 1 — Reduce the story to six visible beats
Write one sentence for each shot. Each sentence should describe something the viewer can actually see, not an emotion the model has to interpret.
| Shot | Framing | Visible event |
|---|---|---|
| 1 | Wide establishing shot | An empty coastal platform sits under steady rain. |
| 2 | Medium three-quarter shot | A weathered red suitcase rests beside a green bench. |
| 3 | Low close-up | Rainwater runs past the suitcase wheels. |
| 4 | Long view down the tracks | A train headlight appears through sea mist. |
| 5 | Platform-level medium shot | The train arrives and sends mist across the suitcase. |
| 6 | Static closing shot | An open carriage door faces the untouched suitcase. |
Keep each shot centered on one change. Shot 4 introduces the train; Shot 5 handles its arrival. Combining both actions in one clip makes timing and geometry harder to control.
Expected result: a sequence that can be understood even as six silent still images.
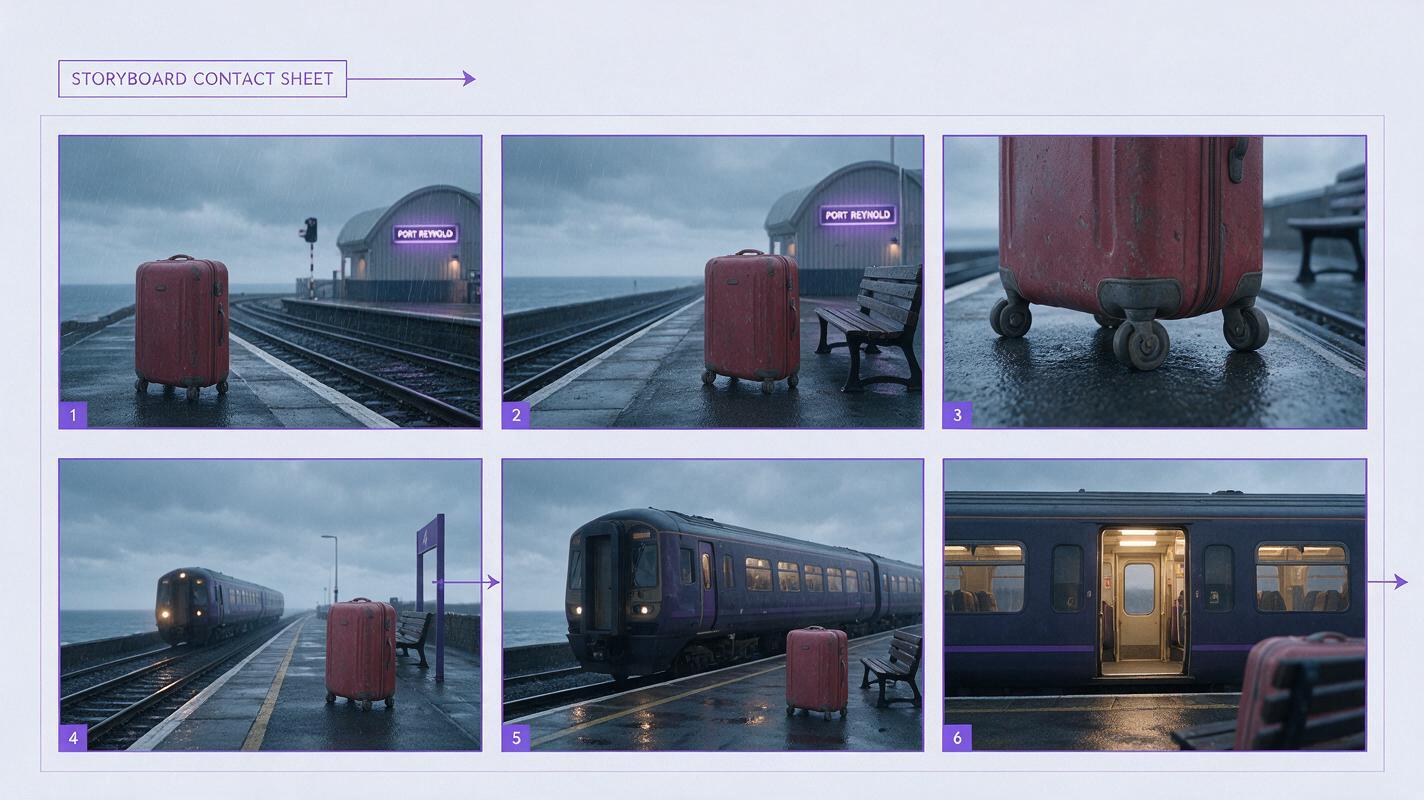
Step 2 — Generate a storyboard contact sheet
Create a single contact sheet to test visual rhythm before investing in polished keyframes. At this stage, composition matters more than tiny material details.
Create a cinematic six-panel storyboard contact sheet for a short film set at a small coastal railway platform after dusk. The recurring visual anchor is one weathered hard-shell suitcase in muted railway red, with rounded corners, two black wheels, a short black handle, and several subtle travel scratches. Panel 1: wide establishing view of the empty rain-soaked platform. Panel 2: medium three-quarter view of the suitcase beside a dark green wooden bench. Panel 3: low close-up of rainwater flowing around the suitcase wheels. Panel 4: long compressed view down wet tracks with one distant train headlight in sea mist. Panel 5: platform-level view as a silver regional train arrives behind the suitcase. Panel 6: static closing composition with an open carriage door opposite the untouched suitcase. MANDATORY LAYOUT: landscape 16:9 canvas divided into six equal clean panels in two rows of three, consistent platform geography and object design in every panel. MANDATORY CAMERA: preserve the track direction from left background to right foreground; do not reverse screen direction. Cinematic editorial realism, natural rain, practical station lighting, subdued blue-gray palette with the red suitcase as the only strong color, no people, no captions, no logos, no futuristic architecture.Inspect the sheet at thumbnail size. The sequence should alternate wide, medium, and close framing. If every panel has the suitcase centered at the same scale, the finished edit will feel static even if each clip contains motion.
Expected result: six compositions that feel like connected coverage of one location rather than six unrelated illustrations.
Step 3 — Build one continuity-controlled hero frame
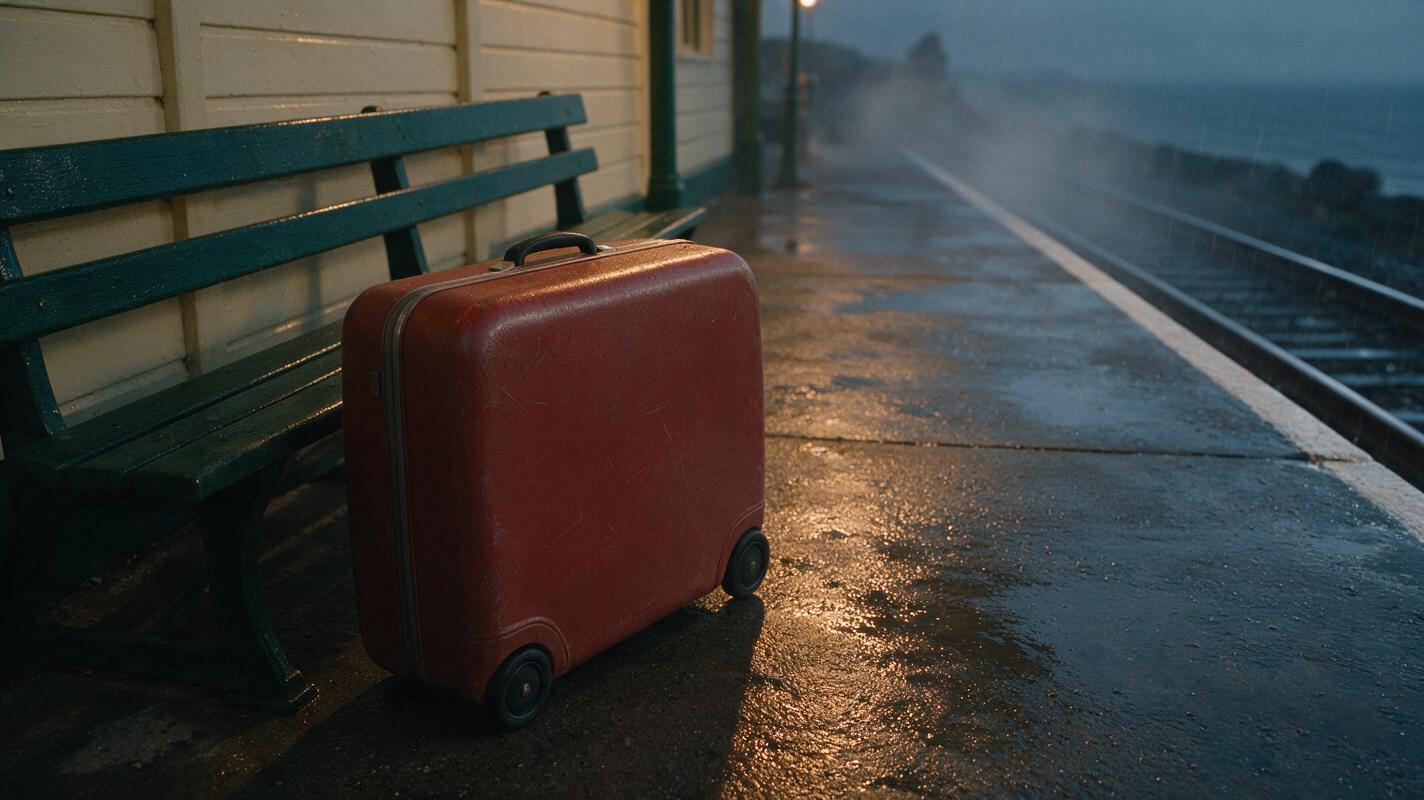
Choose the medium suitcase shot as the hero frame because it contains the subject, bench, platform edge, tracks, and lighting. This image becomes the visual reference for the other keyframes.
Photorealistic cinematic editorial still of one weathered hard-shell suitcase in muted railway red resting beside a dark green wooden bench on a small coastal railway platform after dusk, rounded suitcase corners, two black wheels, short black handle, restrained travel scratches, wet concrete reflecting warm practical station lamps, silver rails running from left background toward right foreground, old cream-painted station wall, faint sea mist beyond the tracks, steady realistic rain, no people. MANDATORY CAMERA: true three-quarter view from camera near the front-right corner of the suitcase, camera height 75 centimeters, 50mm lens look, suitcase in the lower-left third, bench extending behind it, platform edge visible on the right. MANDATORY FORMAT: landscape 16:9, cinematic editorial realism, natural materials, subdued blue-gray color grade, physically plausible reflections, sharp suitcase silhouette, no text, no logo, no extra luggage, no train.Do not use vague modifiers such as “epic,” “dreamlike,” or “surreal.” They can override the grounded visual rules. Describe lens position, object placement, weather, and material condition instead.
Expected result: one definitive frame that establishes the suitcase design and the station's spatial layout.
Step 4 — Create a compact continuity bible
Extract only the details that must survive every shot. A long prose description is harder to reuse and more likely to introduce contradictions.
SUBJECT LOCK
One muted railway-red hard-shell suitcase
Rounded corners, two black wheels, short black handle
Light scratches; never glossy, new, open, duplicated, or oversized

LOCATION LOCK
Small old coastal station
Cream wall, dark green bench, wet concrete platform
Tracks run from left background to right foreground

LIGHT LOCK
After dusk, steady rain, blue-gray ambient light
Warm practical lamps, realistic wet reflections

STYLE LOCK
Photorealistic cinematic editorial realism
Natural materials, restrained contrast, 16:9
No people, text, logos, fantasy elements, or extra luggage
Paste the relevant locks into every still-image prompt, but change the camera paragraph for each shot. This protects production design without forcing every frame into the same composition.
For the track close-up, preserve the suitcase wheels and red shell while omitting the bench if it would not naturally fit. Continuity means preserving what should be visible, not cramming every known object into every frame.
Expected result: a reusable specification short enough to carry across models and future revisions.
Step 5 — Generate each shot as a separate keyframe
Create the remaining five frames individually, using the hero frame and continuity bible as references where supported. Keep the same aspect ratio and screen direction.
For example, transform the hero description into the train-arrival frame without redesigning the location:
Use the established coastal station, bench, platform, lighting, track direction, and identical muted railway-red suitcase. A silver regional train has just entered the platform behind the suitcase, with soft headlight glow diffused through rain and sea mist. The suitcase remains stationary and unobstructed. MANDATORY CAMERA: platform-level medium shot, camera 1 meter high and several meters farther left than the hero frame, 65mm lens look, suitcase sharp in the lower-left foreground, train moving from left background toward right foreground, no axis reversal. Landscape 16:9, photorealistic cinematic editorial realism, physically plausible rain and reflections, no passengers, no duplicated train, no text, no logo.Check every frame for four items before animation:
- Silhouette: the suitcase shape and handle remain recognizable.
- Geography: tracks, platform edge, wall, and bench maintain their relationship.
- Direction: the train always approaches along the same screen vector.
- Light: dusk and station lamps do not jump to daylight or neon lighting.
Expected result: six clean keyframes that already cut together as a rough animatic.
Step 6 — Animate one primary motion per shot
Animate each keyframe separately. If duration and aspect-ratio controls are available for the selected model, begin with short 16:9 clips. Short clips usually make it easier to identify the exact frame where geometry starts drifting.
Write motion prompts as instructions for change, not as a second description of the still image.
Shot 1 motion: slow controlled dolly forward; steady fine rain; faint mist moving laterally beyond the tracks; architecture remains rigid.

Shot 2 motion: nearly locked camera with a subtle five-percent push-in; rain strikes the platform; one small luggage tag moves gently; suitcase remains fixed.

Shot 3 motion: locked low camera; shallow stream of rainwater flows past both wheels; no movement or deformation of the suitcase.

Shot 4 motion: locked telephoto camera; distant headlight grows gradually brighter through mist; train remains distant until the final moment.

Shot 5 motion: silver train enters smoothly from left background toward right foreground; restrained mist displacement; camera and suitcase remain fixed; preserve straight rails and carriage geometry.

Shot 6 motion: locked closing shot; carriage door remains open; warm interior light flickers subtly on wet concrete; suitcase does not move.
Seedance prompts and Kling prompts often benefit from this kind of explicit hierarchy: name the primary movement first, then environmental motion, then protected elements. Avoid requesting a dolly, pan, rack focus, fast train, splashing water, and moving suitcase in the same clip.
Expected result: controlled motion that adds atmosphere without rebuilding the approved frame.
Step 7 — Diagnose failures before regenerating
Classify each bad result by layer. This prevents unnecessary full-sequence regeneration.
| Failure | Likely cause | Best correction |
|---|---|---|
| Suitcase duplicates | Ambiguous subject count or excessive motion | Add “one suitcase only” and lock the camera |
| Rails bend | Camera motion conflicts with train movement | Remove camera movement and simplify the arrival |
| Color shifts | Object description is too general | Repeat “muted railway red” and reuse the keyframe |
| Train reverses direction | Missing screen-direction instruction | State left-background to right-foreground motion |
| Final frames melt | Clip asks for more action than it can sustain | Use the stable earlier segment or generate a shorter action |
Compare multiple model outputs using the same frame and motion prompt. Select for structural stability first. A dramatic clip is not useful if the rails warp or the suitcase changes halfway through.
Assemble the selected clips in timeline order, then trim entrances and exits around stable frames. Ambient station sound, rain, and a distant train can create continuity even when the clips were generated independently.
Expected result: a concise sequence with consistent geography, object design, and motion direction.
Keep the same location across future projects
Archive the hero frame, continuity bible, final keyframes, and successful motion prompts together. If you return to the station later, begin with those assets rather than asking a model to reconstruct the location from memory.
You can also make a dedicated location plate: a wide empty view with no suitcase or train. Use it to design new angles while preserving the wall color, bench style, platform width, track direction, weather, and practical lighting.
Alternative: start with text-led video for camera discovery
If you do not know whether the train arrival should be wide, low, or compressed with a long lens, generate rough text-led variations first. Treat them as moving sketches. Capture the strongest composition as inspiration, rebuild it as a clean still, and then run the controlled image-guided workflow.
Alternative: use motion transfer for a human insert
A later cut could show a station worker stepping into frame and lifting the suitcase. Record or choose a motion reference with the same body orientation, camera height, and visibility of the hands. Generate the performer separately, transfer the motion, and composite or cut to that shot rather than asking the environmental clip to invent a complex pickup action.
Alternative: replace an unstable face with face swap
If a close-up performer is added and the body motion works but the identity drifts, preserve the good clip and repair the face instead of regenerating the train, platform, rain, and performance together. Face replacement works best when head angle, lighting direction, and expression already resemble the intended reference.
Where this workflow falls short
- Fine continuity is not guaranteed. Scratches, wheel spacing, lamp counts, and carriage details can still change between frames.
- Image-guided video may resist large camera moves. Strong orbiting or crane motion asks the model to invent unseen geometry.
- Rain complicates structure. Reflections and mist improve atmosphere but can hide object edges or encourage visual smearing.
- Long actions remain difficult. A complete train arrival followed by a door opening is safer as two shots than one extended generation.
- Sound needs separate planning. Visual continuity does not automatically create synchronized ambience, dialogue, or effects.
The workflow is strongest when each clip performs one readable action and cuts before visual stability declines.
FAQ
Should I generate the storyboard as one image or six separate images?
Start with one contact sheet to judge pacing and composition. Once the sequence works, generate separate full-resolution keyframes so each shot can receive precise camera and continuity instructions.
Can I animate the entire contact sheet directly?
No. A contact sheet is a planning asset containing multiple viewpoints. Animate each extracted or regenerated shot separately so the model receives one unambiguous camera setup.
How long should each generated shot be?
Use only the duration needed for one visual beat. A locked atmospheric shot can hold longer than a complex train-arrival shot, but stable short clips are generally easier to edit than overloaded long generations.
Do I need the same AI model for every shot?
No. You can compare models by shot. However, preserve the same keyframes, continuity bible, aspect ratio, color direction, and motion vocabulary so model changes do not become visible style changes.
Why does my keyframe look consistent but the animated object changes?
The motion prompt may be asking the model to reinterpret the subject. Reduce camera movement, explicitly protect the object's shape and position, and remove unnecessary actions. If the clip still drifts, test the same input with another model.
Can this workflow be used for characters?
Yes, but create a dedicated front, side, and back character reference sheet first. Lock facial structure, hair, wardrobe, age, and body proportions, then use the same storyboard process with one approved character keyframe per shot.
Final checklist
- Reduce the narrative to one visible event per shot.
- Test shot rhythm with a six-panel contact sheet.
- Create a hero frame that defines the location and recurring subject.
- Write compact locks for subject, location, light, and style.
- Preserve track direction and camera axis across every frame.
- Animate one primary motion per clip.
- Protect static architecture and recurring object geometry.
- Repair only the failed layer instead of rebuilding the sequence.
- Archive approved frames and prompts for future scenes.
Keywords
image to video, AI video workflow, storyboard to video, prompt engineering, Seedance prompts, Kling prompts, shot consistency
Ready to build the sequence? Create your first ai video free and test the storyboard prompts now.